.svg@webp)
Common Photogrammetry Problem – the Bowl Effect
 Lukas
Zmejevskis
Lukas
Zmejevskis
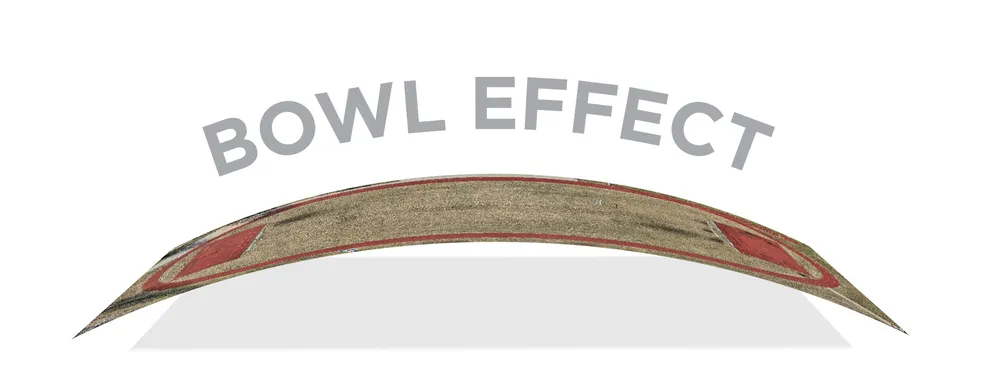
A bowl or bowing effect is common photogrammetry problem that usually occurs in an aerial photogrammetry scan when the entire reconstruction bows upwards or downwards. It eliminates any possibility of having accurate measurements and makes the 3D scene unrepresentative of the real world. Most people consider such projects unusable. In this article, we aim to understand why the bowing happens and how to effectively prevent it from happening or even fix it in post-processing.
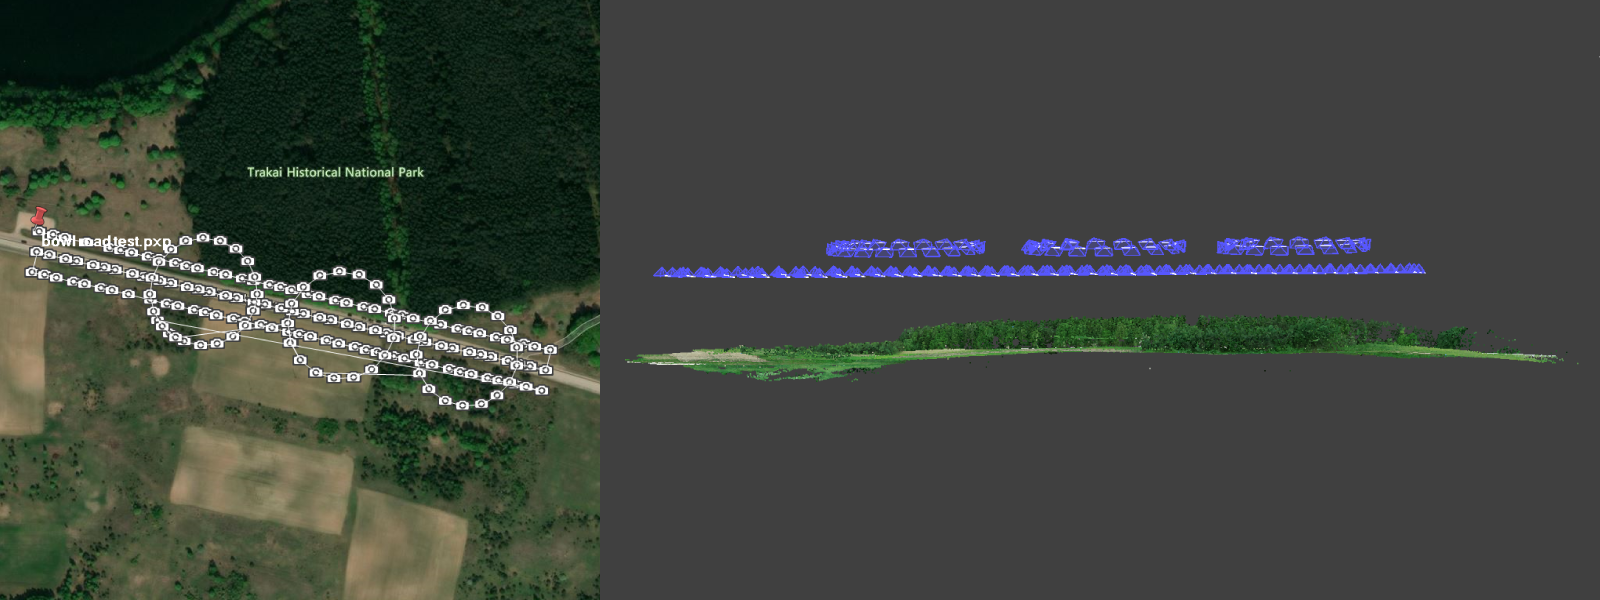
Bowing effect present in a 3D reconstruction
What Causes the Bowl Effect
Both input data and photogrammetric processing can cause the bowl effect. In our experience, these are the factors regarding the input data that may result in a bowed reconstruction:
- Photos for the scan are made in a straight and elongated shape, for example, when scanning a road.
- Input photos are at the same flight altitude.
- Input photos are in the same orientation – usually, nadir only image sets produce the bowl effect.
- The camera lens used for the scan contains complex and heavy distortion patterns.
- No GPS data is present in the photo metadata, or the data is corrupt.
- A very flat and featureless subject.
A combination of two or more of these factors can throw off the processing algorithm in such a way that the software will produce a 3D reconstruction with the bowl effect present. During our experience of processing various image sets, we encountered quite a few bowed reconstructions and eventually found a few solutions.
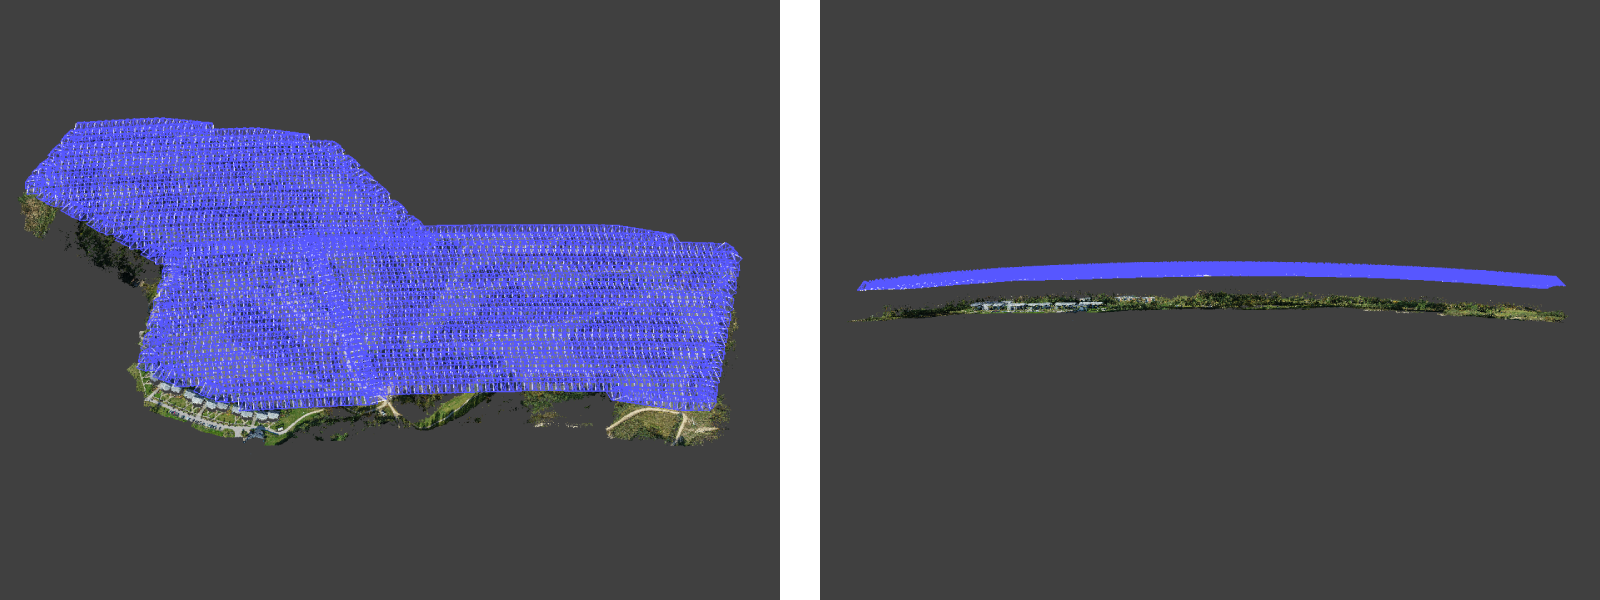
Another example of bowing effect in photogrammetry project
Bowl Effect Prevention
We can prevent the bowl effect from happening with some good practices in the field. If you feel like any of the factors mentioned above are occurring during your scan, or you have to redo the flight due to the effect, there are steps you can take.
Adding Ground Control Points
The best but not the easiest way to eliminate the bowl effect is to add ground control points to your project. It will require getting back in the field and possibly redoing the flight, but this is a surefire way to eliminate the effect and improve the reconstruction overall. For extreme cases, the GCPs can be the only viable solution.

Bowing effect on the left and the correction achieved by adding GCPs on the right
Using RTK and PPK Capable Drones
If you have access to an RTK drone – you can use that to eliminate the bowl effect. RTK can be the solution in most medium to small scans. Larger scans may require adding GCPs, but with RTK data in the images, fewer GCPs are enough to eliminate the bowl effect and improve the scan overall.
PPK is a superior version of RTK, requiring an additional post-processing step and more know-how. But PPK level data can fix even larger photo sets and more extreme cases. Even fewer GCPs will suffice in large 3D scans containing thousands of images with PPK-level data.
Additional Flights Without Professional Equipment
Solutions mentioned above involve professional equipment and work. Using consumer-level equipment, you can still improve your 3D scan and reduce or eliminate the bowl effect by taking more photos. The key is to eliminate the first three causes mentioned earlier:
- Even if your subject is long and thin, scan a larger area than necessary, and add much more buffer zone than you would normally.
- Add a second flight over the same subject at a different altitude.
- Change the camera orientation during the additional flights. Adding oblique flight to initial nadir photo sets dramatically improves the results.
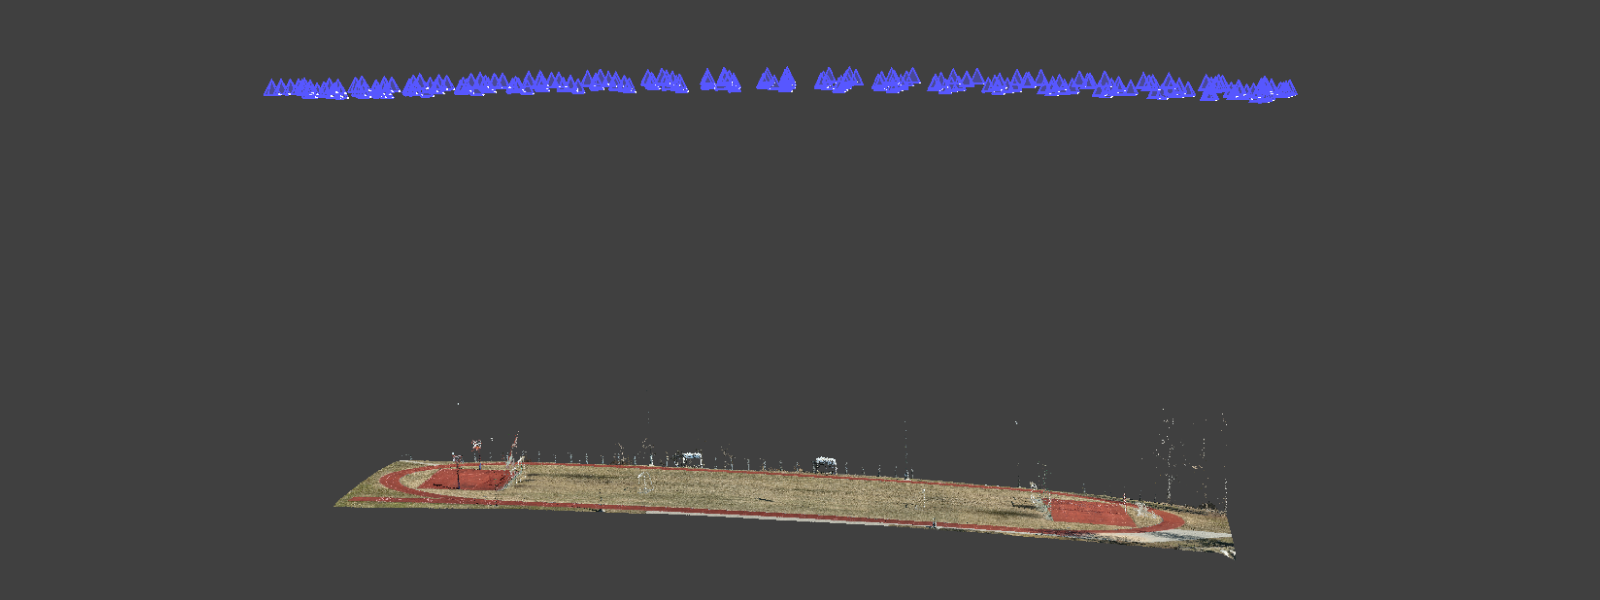
Bowing road reconstruction with single grid 3 row nadir scan
These methods help in the case of scanning featureless and flat subjects as well. We have found the most efficient way is to add orbital or perimeter scans to any scan that results in a bowed reconstruction. Especially thin and long scans may require multiple orbits along with the scanned subject or a perimeter type scan around the entire area. When making these additional scans, ensure the camera faces the subject area at 45 or 60 degrees and choose a different altitude than your main flight. Choose a slightly higher flight altitude than your main scan to reduce the number of additionally required photos.
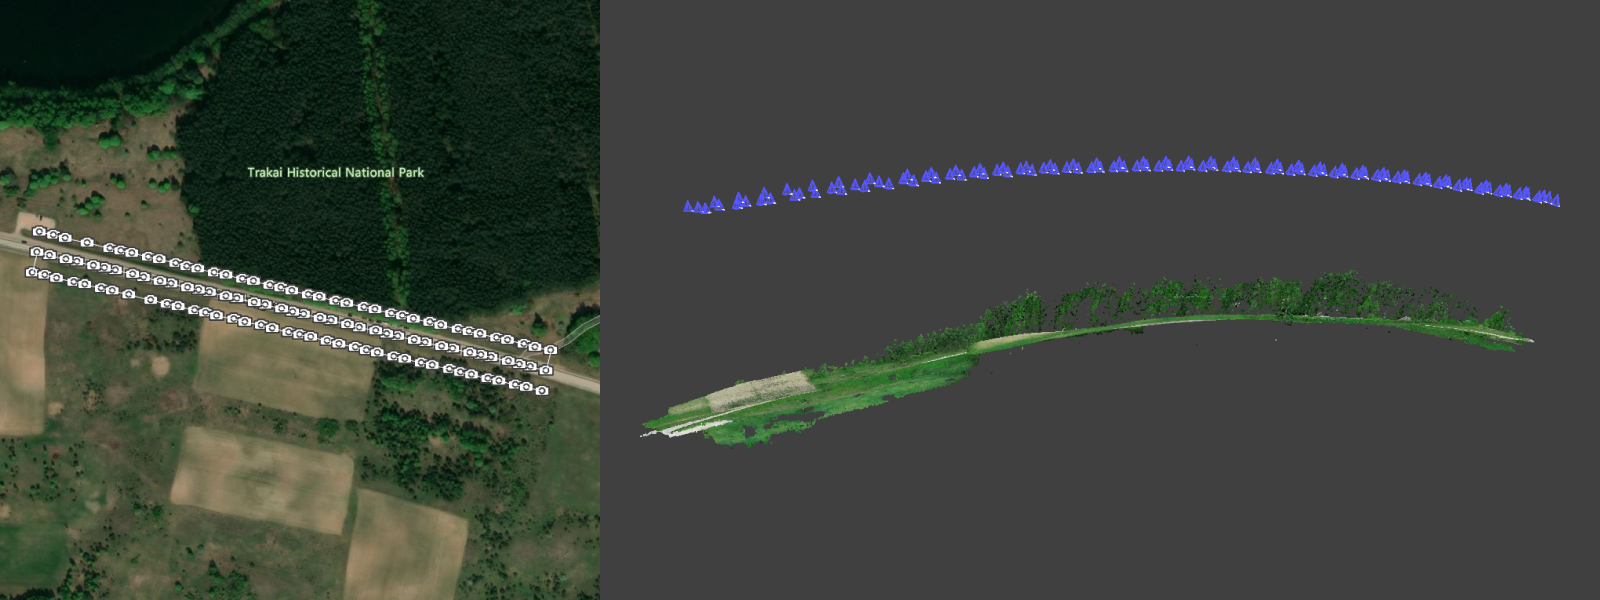
Road reconstruction with single grid 3 row nadir scan, bowing effect eliminated by adding few orbits
In the example above, three orbital scans were added to a long, thin single grid scan. Orbits were added roughly in the middle part of the scan, 15 meters higher than the initial flight. Orbital scan images were made at a approximately 45-degree angle to the ground and combined to cover the entire scanned road. Orbital flights added 63 additional photos to 114 existing ones and increased the processing time by about 30 percent. As a result, we get close to a perfect 3D reconstruction of the scene, and the bowl effect is eliminated. Scans were made with the consumer-grade DJI Phantom 4 Pro drone, Drone Duty, and DJI GO 4 applications.
Solutions In the Processing Stage
Sometimes you can find solutions to reduce or eliminate the bowl effect in the photogrammetric processing stage. In Pixpro, we have enabled a few types of reconstruction algorithms. We often suggest changing those settings and retrying the 3D reconstruction process if you encounter the bowl effect. Usually, these settings help reduce the bowing enough to get measurements within a few centimeter accuracies, and the aesthetic appearance of the scene becomes indistinguishable from reality. Watch a video below on how to change these settings in Pixpro.
Photogrammetry with the Mavic 3 – No Flight Planner Required Part 1
Conclusion
Most common photogrammetry problems arise from a lack of knowledge or experience. Elongated aerial photogrammetry scans introduce the bowl effect for those who have not taken preventative actions because they were not expecting it. After reading this article, it should be easier to identify cases where this effect might present itself and apply available prevention methods. In the future, we will dive deeper into the methodology mentioned in this article and share any new ways of improving your aerial photogrammetry scan that we discover.
Read more:
Photogrammetry
Fails and Issues Part 1
Photogrammetry Fails and Issues Part 2
Photographer - Drone Pilot - Photogrammetrist. Years of experience in gathering data for photogrammetry projects, client support and consultations, software testing, and working with development and marketing teams. Feel free to contact me via Pixpro Discord or email (l.zmejevskis@pix-pro.com) if you have any questions about our blog.
Related Blog Posts
Our Related Posts
All of our tools and technologies are designed, modified and updated keeping your needs in mind

Accuracy of Your Photogrammetry Project
Accuracy in photogrammetry is a multifaceted point of discussion. We can talk about absolute, relative, or even geometric accuracy, to name a few. No tool or technique can really prove anything beyond reproach.
Buying a Used Drone - Mavic 2 Pro in 2024
Buying used gear is an excellent way to save money and obtain something that may not be on sale anymore. With drones reaching the 4th or 5th technological generation, the used drone market is becoming more extensive.

Photogrammetry Processing - Common Hardware and Software Issues
Photogrammetry requires complex processing and data crunching to turn photos into 3D models. We need a powerful machine to run the software and all its processes. Not only that, but the software within our machine may impact the performance of photogrammetry software in various ways.
Ready to get started with your project?
You can choose from our three different plans or ask for a custom solution where you can process as many photos as you can!
Free 14-day trial. Cancel any time.