.svg@webp)
GCP Workflow in Pixpro
 Lukas
Zmejevskis
Lukas
Zmejevskis
Ground control points – are an essential part of photogrammetry. They provide the best possible absolute accuracy compared to the real world. Because ground control points are part of the scene itself – they are superior to any photo metadata information. In this article, we will focus on the different workflows of preparing and adding ground control points to your Pixpro project.
GCP Distribution
Before we begin post-processing, we must touch on ground control point collection and distribution. Besides the technical aspect, which is different depending on your equipment, there are a few best practices when collecting the GCPs:
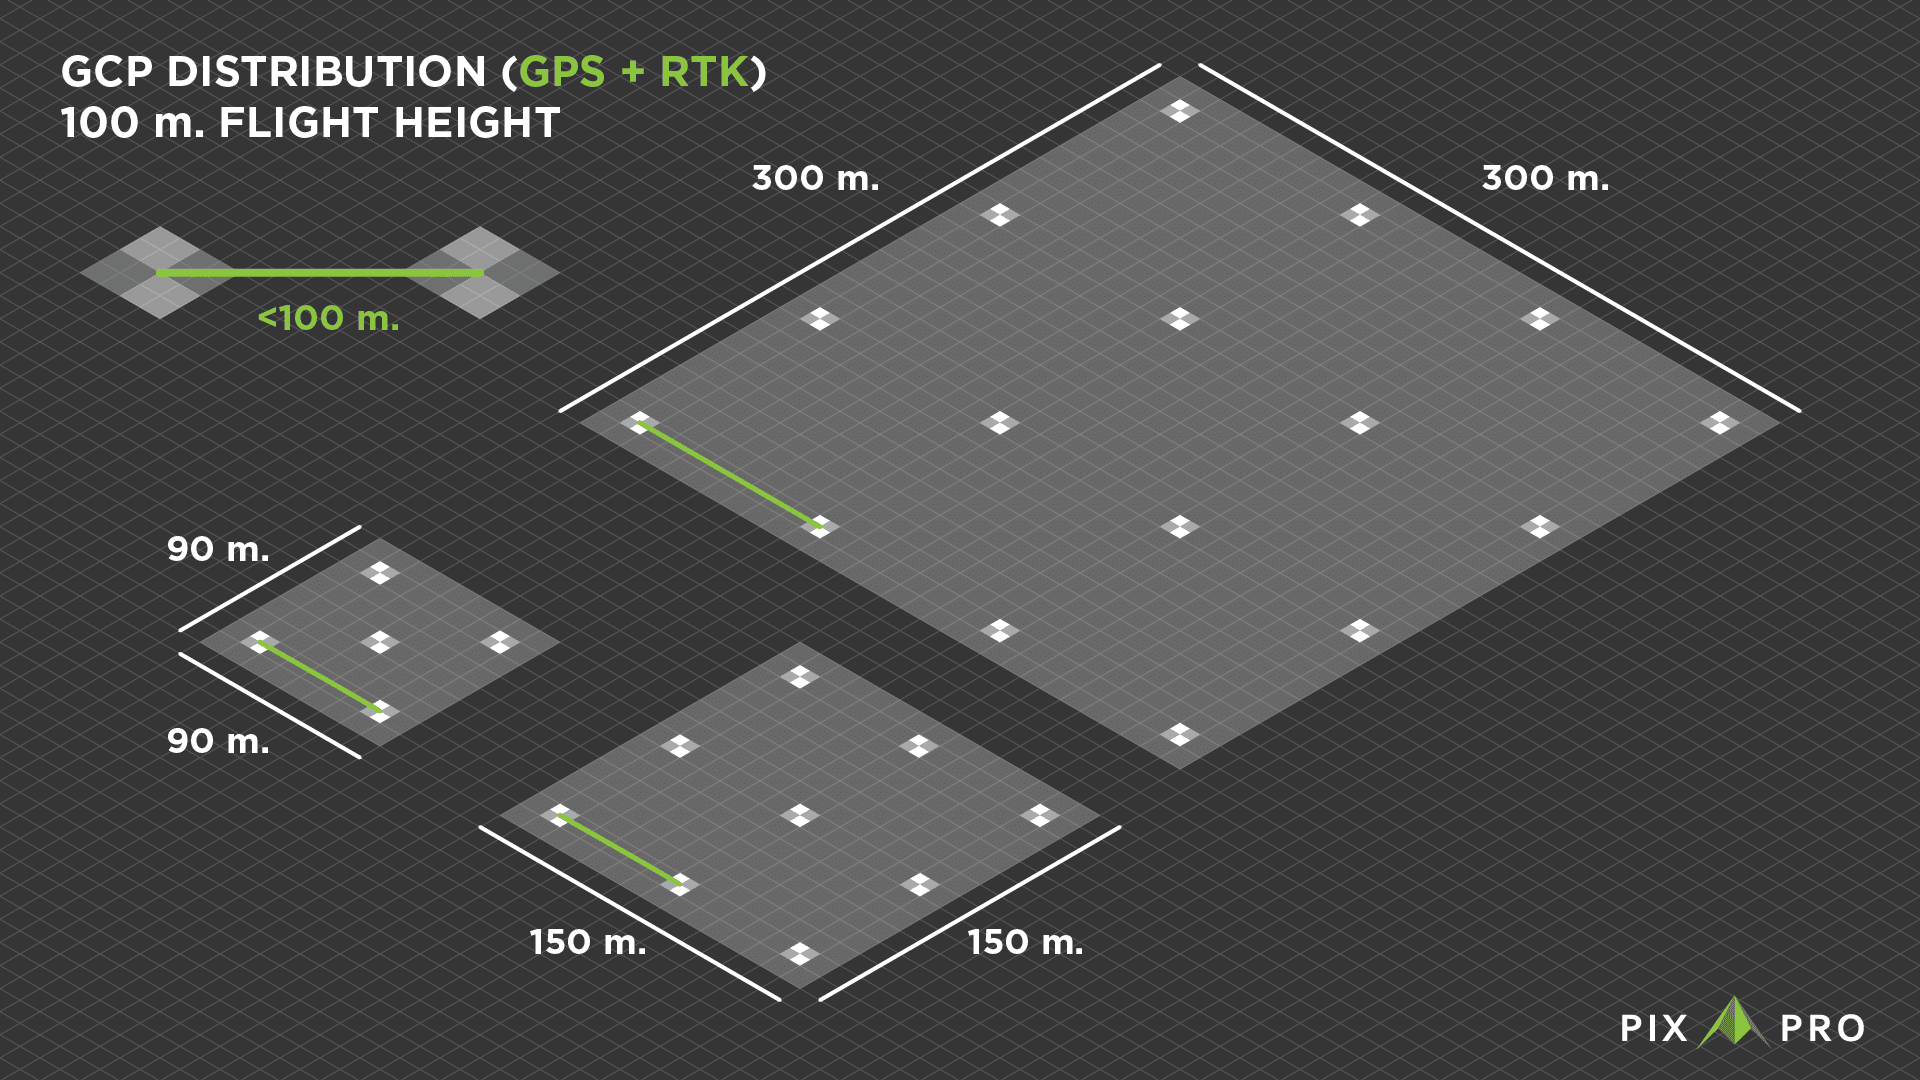
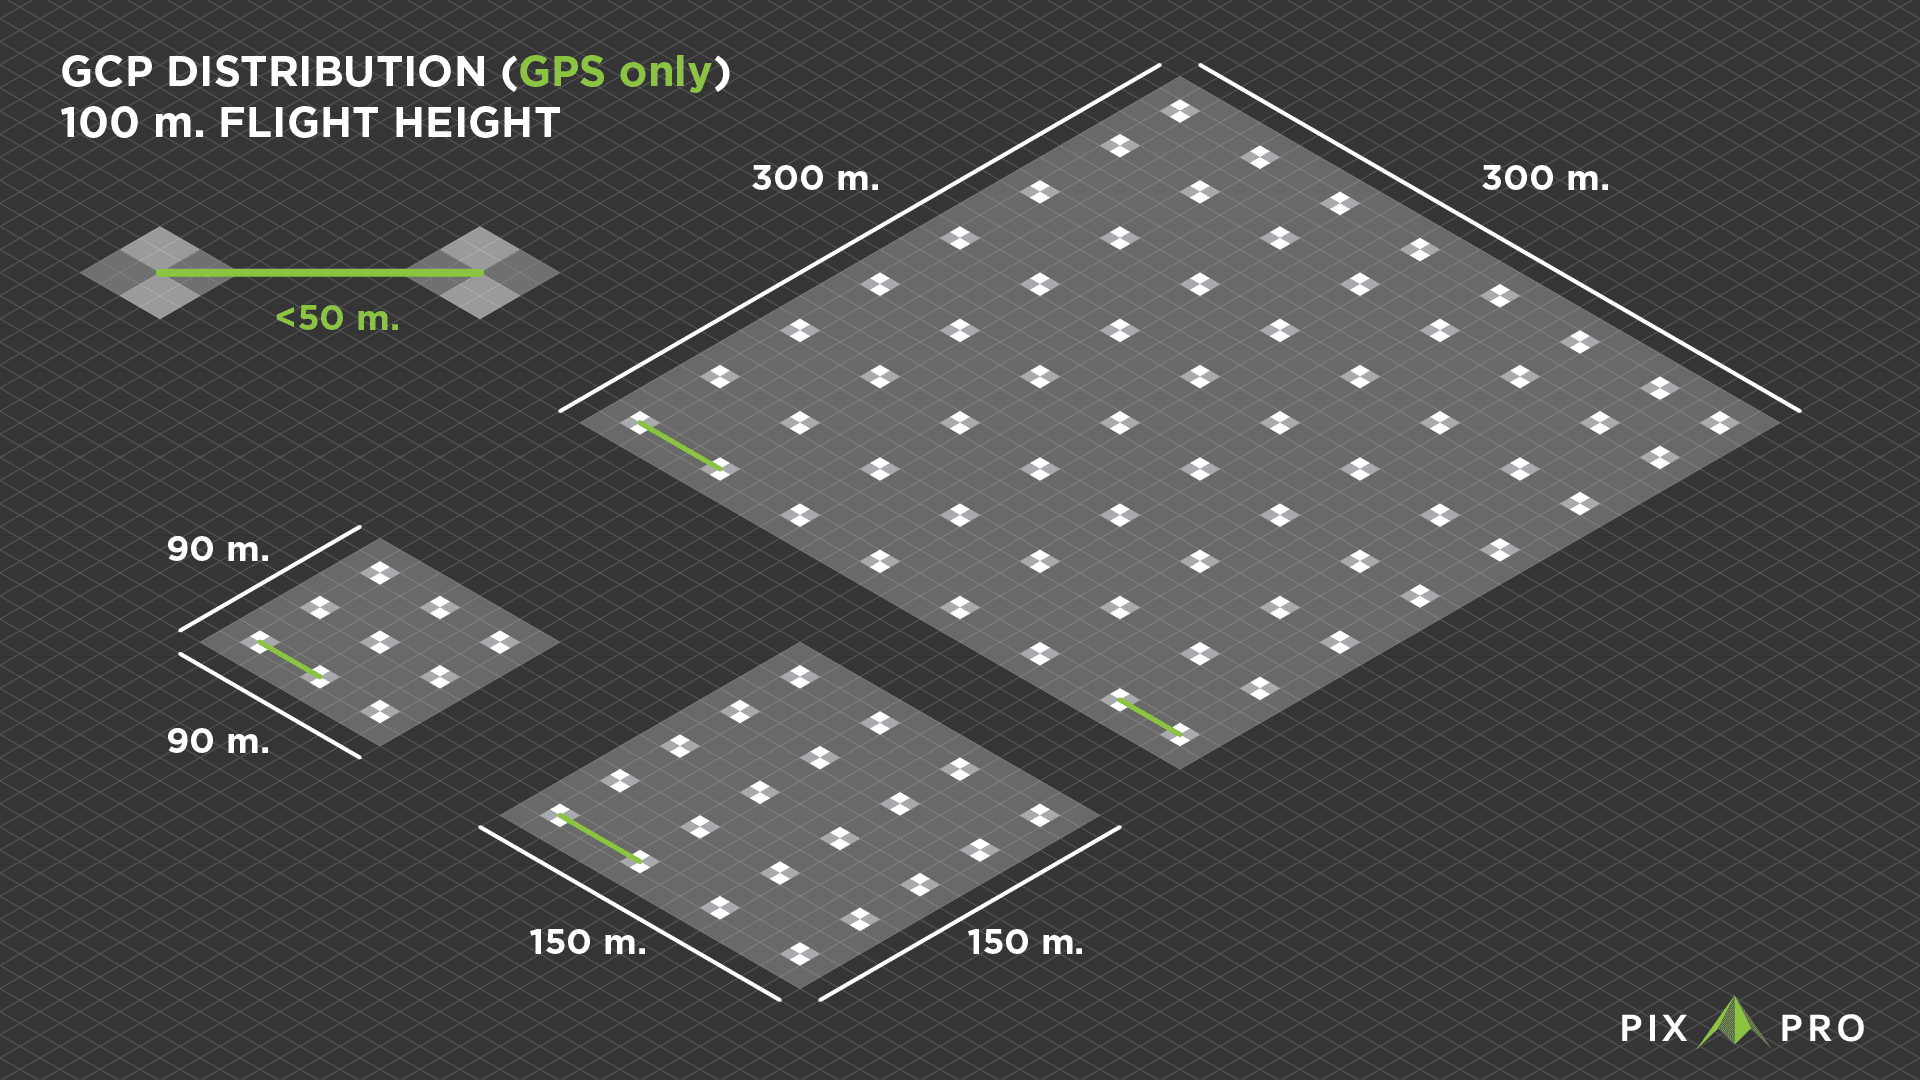
- We need at least 5 GCPs per project, even for most minute objects.
- Distribution of GCPs should be as equal as possible in the area of interest.
- If the project contains significant elevation changes, we need GCPs in the lowest and highest parts of the scanned area.
- If the gaps between GPCs become more than 50 meters – add more.
- If the photos contain high-accuracy PPK or RTK metadata, we can reduce the amount of GCPs in a project. All gaps between the points should be less than 100 meters for best results.
GCP Files
Once the collection is complete, we must go through the files provided by the rover as GCP data. Usually, these files are simple text files with rows representing each GCP and columns representing different data types. If the columns do not have headers, we must figure out what each column means.
We aim to tidy up the files so that the photogrammetry software has no problem reading the file. To view and edit these files, use an excel type calculator or Notepad++. Notepad ++ is a free but powerful text editor. At the same time, a cell-based calculator can help to keep all the data in the proper places.
The essential part of GCP data files to keep track of is separators. These symbols separate values in rows and let us use the data correctly. Pixpro supports four separators: spaces, tabs, commas, and semicolons. These symbols should only act as separators. If a separator symbol appears in an incorrect place – it throws off the data columns. We can delete some columns altogether to make the file more readable. Below is an example of a messy and corrected file open in the notepad.

Good vs Bad GCP .csv files
Coordinate Systems
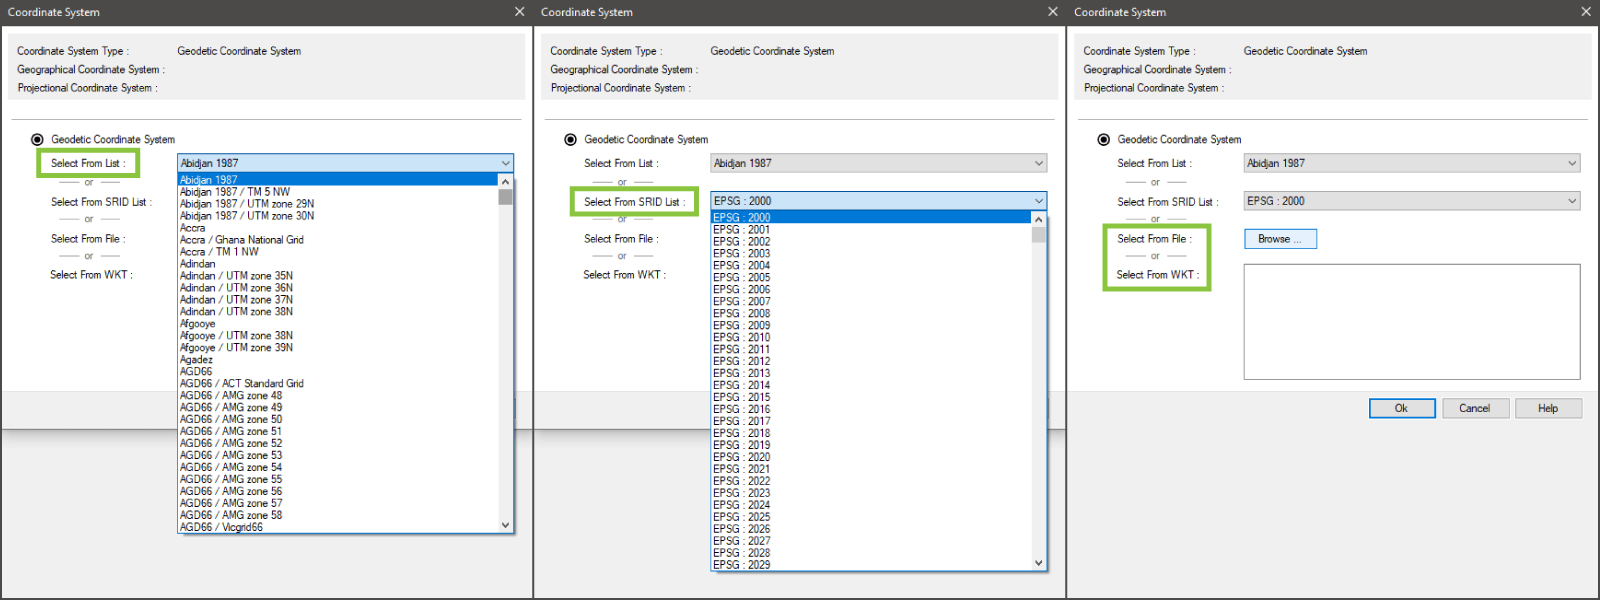
The most important specification of any GCP data set is the coordinate system. Knowing the exact coordinate system of the GCPs is imperative. Pixpro contains all widely used coordinate systems and their conversion parameters. You only need to manually convert the values of your GCPs if you want to.
The best way to identify a coordinate system is to know the EPSG code. If these codes match – you can be sure that you have selected the correct coordinate system. In most cases, you will want your project to be in the same coordinate system as GCPs you plan to use. So select the correct coordinate system when creating the project. But matching coordinate systems are not a must, the conversion is automatic, and you can choose the coordinate system after completing the project.
Local Pixpro Workflow
Now that we have the precursor knowledge let us look at the exact workflow on how to import, project, and then use the GCPs for referencing in Pixpro. Below is a video demonstrating the local processing project workflow.
Cloud Pixpro Workflow
If you prefer using cloud computing services, you can still use GCPs. But the workflow will be more extended because, without the 3D reconstruction, we do not have estimated projections to help speed up the workflow.
GCP Export
Suppose you use the same photos to create a similar project with different settings or on another machine. In that case, Pixpro can export ground control points with their projections. It means that all that projecting work will not have to repeat as long as the photos used for reconstruction are identical.
This feature can also be used as a workaround to speed up the cloud workflow. You can run a fast 3D reconstruction on your machine, then project the GCPs and export the file with projections. We can use this file when uploading the same photos to the cloud, bypassing the slower standard cloud workflow. The only downside is you have to run the 3D reconstruction locally or wait twice for cloud processing to finish.
To get a GCP file with projections, you need to export the ground control points after the projecting work is done and select the native Pixpro .pxg format. When we import the native file, everything is detected automatically in Pixpro.
Evaluating Accuracy
After the reoptimization step is complete, you can inspect the errors to determine the relative accuracy of the 3D reconstruction. Open GCP manager and look at the projection error column. These values should be less than 10 centimeters if everything went according to the plan. If the errors are more significant, you can run the reoptimization step several times. If the errors are abnormally high, look for any mistakes made during the workflow. Common mistakes are accidentally swapping easting, and northing values, wrong Z-axis units, and incorrectly identified GCP numbers. But these errors are rare due to the linear nature of Pixpro workflows.

Conclusion
Whether you are an existing Pixpro user or just evaluating the software, you can see how simple it is to use the ground control point in our program. Ground control functionality applies to cloud processing, too, and does not cost any extra. With GCPs, you can get photogrammetry projects to be as accurate as they come with minimal post-processing time in Pixpro. Try our free software now and download Sample 1 data set, which includes ground control points.
Photographer - Drone Pilot - Photogrammetrist. Years of experience in gathering data for photogrammetry projects, client support and consultations, software testing, and working with development and marketing teams. Feel free to contact me via Pixpro Discord or email (l.zmejevskis@pix-pro.com) if you have any questions about our blog.
Related Blog Posts
Our Related Posts
All of our tools and technologies are designed, modified and updated keeping your needs in mind

Accuracy of Your Photogrammetry Project
Accuracy in photogrammetry is a multifaceted point of discussion. We can talk about absolute, relative, or even geometric accuracy, to name a few. No tool or technique can really prove anything beyond reproach.
Buying a Used Drone - Mavic 2 Pro in 2024
Buying used gear is an excellent way to save money and obtain something that may not be on sale anymore. With drones reaching the 4th or 5th technological generation, the used drone market is becoming more extensive.

Photogrammetry Processing - Common Hardware and Software Issues
Photogrammetry requires complex processing and data crunching to turn photos into 3D models. We need a powerful machine to run the software and all its processes. Not only that, but the software within our machine may impact the performance of photogrammetry software in various ways.
Ready to get started with your project?
You can choose from our three different plans or ask for a custom solution where you can process as many photos as you can!
Free 14-day trial. Cancel any time.