.svg@webp)
Photogrammetry With DJI Mavic 3 - Waypoints
 Lukas Zmejevskis
We got access to waypoints with the most recent software update to the DJI Mavic 3. Waypoints are an automated and repeatable flight type that uses predefined points on the map. The drone can fly between the designated spots while filming or taking photos. We can see the similarities between waypoints and automated grid flights in enterprise drones. With a different approach and some calculations, we can use waypoints to simulate grid flying and get photogrammetric photo sets.
Path Curving
Before we get into the “how to,” we need to address a single factor right away, the waypoint flight path is automatically curved between the designated spots to make it smooth. This feature may be desirable for smooth hyperlapse or video shooting, but in photogrammetric 3D scanning, we prefer right angles. To understand this, you must try drawing waypoints to know how it works and get used to it.
Two Different Methods
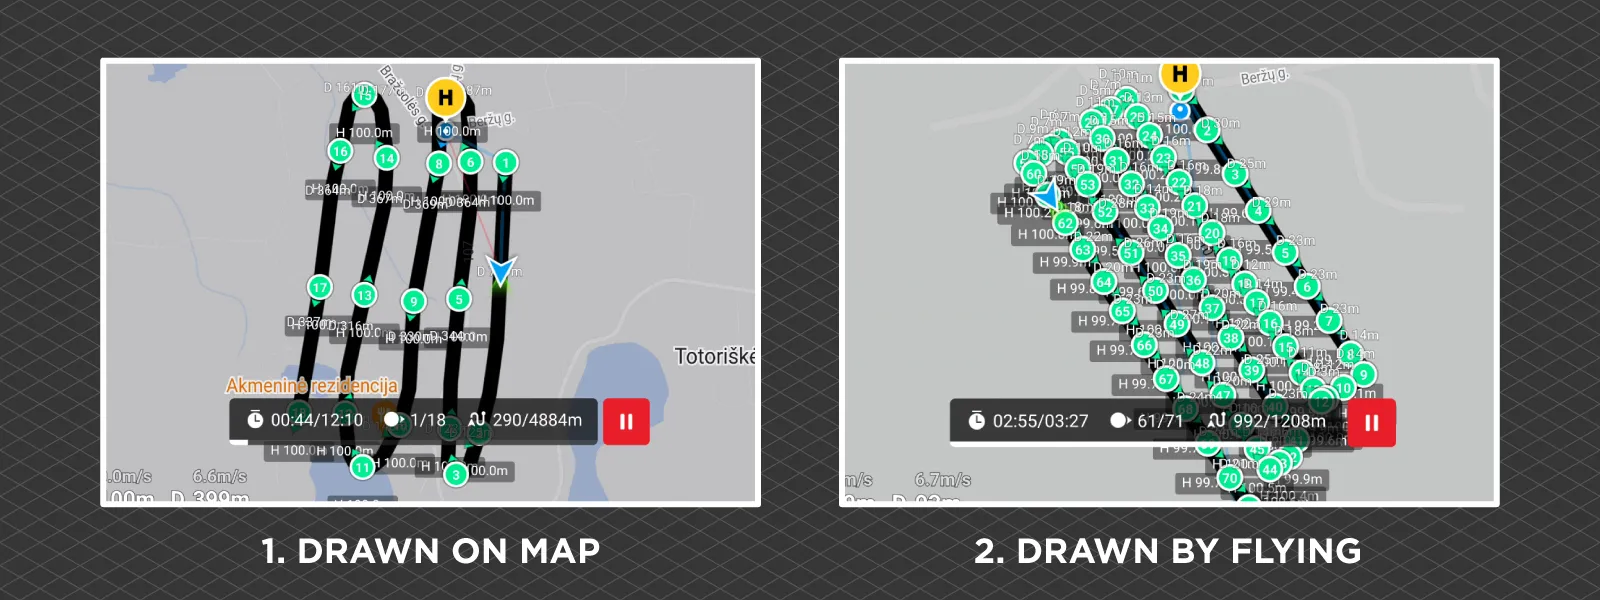
To start using waypoints, turn on your drone and the DJI fly app on your control device. To engage waypoint functionality, tap the button on the left side of the app. Now you have two ways of adding waypoints to your mission. The first method is to bring up the map and tap a location to add a waypoint.
The second method is to fly the drone to the spot where you want to add a waypoint and press a button. This approach is comparatively inefficient because you must waste battery flying to draw the waypoints. But it is more effective because it is easier to control the sider overlap and the curvature of the path.
Before getting into the next section, we recommend just going out and practicing adding waypoints with both methods and familiarizing ourselves with the waypoint user experience. The process might be a little tedious and not entirely optimized yet.
Waypoints For Photogrammetry
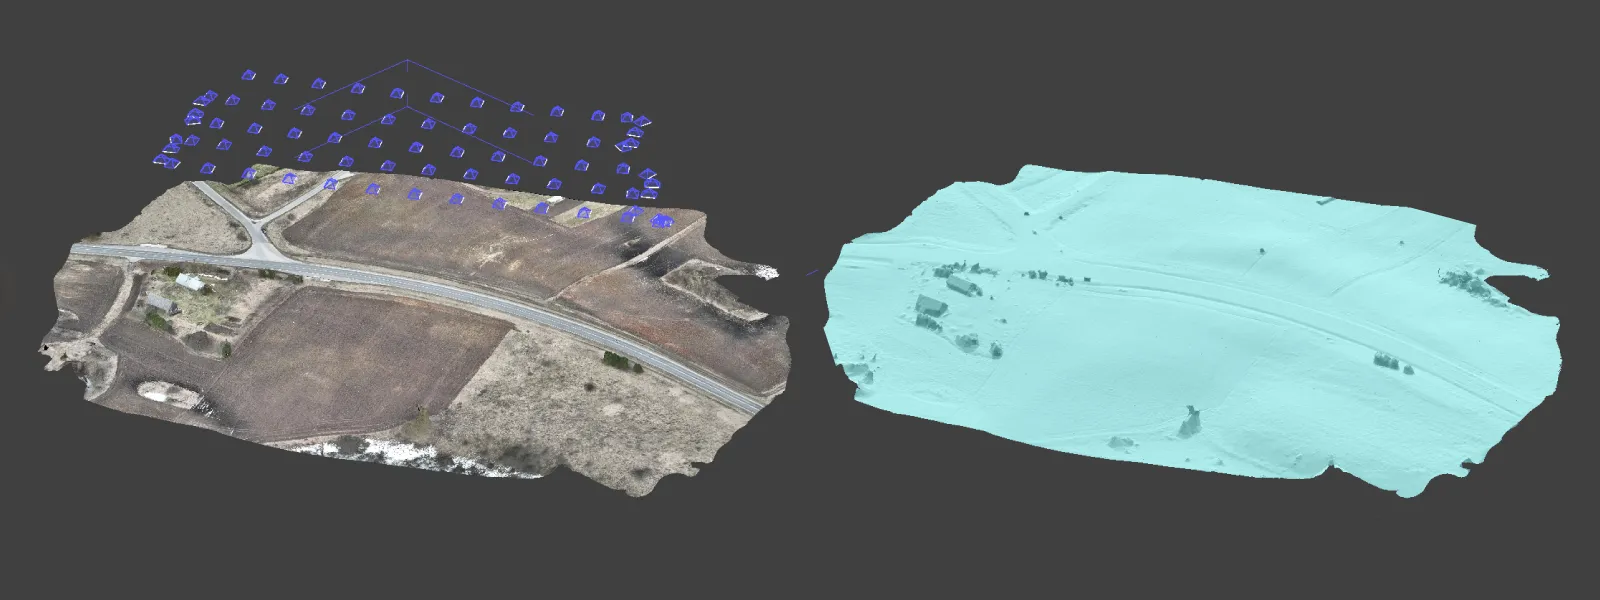
If you have done photogrammetric scans before, you may immediately recognize the potential of waypoints. In this article, we will focus on making a successful nadir scan which is the bread and butter when making orthophoto imagery. To achieve that, we face three main challenges using this waypoint implementation:
Waypoint path drawing: proper waypoint drawing will require care and practice. To combat the curving issue described earlier, you must add many more waypoints that may seem necessary. The more waypoints you add, the less automatic curving occurs. Try practicing adding a lot of points to get an idea of how the app reacts.
Front overlap control: we control vertical overlap with speed and photo interval. Fortunately, you can use our photogrammetry calculator to get the correct values. Enter the photo interval and the flight height you want to use for the mission, and you will get the flight speed needed to achieve 80 percent overlap. In our case, a flight 100 meters above ground requires 6.7 meters per second speed to achieve proper overlap when taking photos every 3 seconds.
Side overlap control: horizontal overlap becomes much more difficult to control. Suppose you are drawing your waypoints on the map. In that case, you need to measure how much distance between the rows there should be to get approximately 80 percent overlap. The best way of doing that is by ascending to the height you plan to do your flight at and moving the drone sideways by 1/6th of the camera view. It will give you an idea of how much distance between rows should be. At first, it may sound unclear, but the principle is the same as fully manual grid flying, which you can learn from our original article.
Photogrammetry with the Mavic 3 - No flight planner required part 1 (Nadir)
Photogrammetry with the Mavic 3 - Orbital scanning
After ascending and moving the drone by 1/6th of the field of view in the camera, you can see the flight paths drawn on the map. Use those flight paths to get an approximate idea of how you should space your grid lines. Below a short video of doing just that.
If you are adding waypoints by flying the drone, you need to do the same, but add waypoints while creating your entire flight path while adhering to the same rule of 1/6th of the view. Move the drone sideways between rows, and you will get the correct amount of overlap.
Starting the Flight
Before executing the flight path, you must set specific parameters for each waypoint. These are camera action, altitude, speed, follow course, gimbal tilt, and zoom. Tap on your last waypoint, and you will see a few options:
- Camera action is set to none, as we can engage in timed shooting when the drone is in flight and keep it going.
- Altitude is your chosen flight height.
- Speed should remain as Global speed.
- Follow course option is set to Heading.
- The Gimbal tilt and Zoom need to be manual.
After choosing the settings for one waypoint, tap Apply to all. Applying the same settings to all waypoints is essential in our case. The manual settings mean that we will enable the Timed shooting ourselves and manually angle the gimbal down for nadir shooting. All camera settings for photos and operation apply as you have them set in the app.
After everything is in order, we can tap Next, choose our speed, and tap Go. The drone will begin flying, and all that is left to do is engage the Timed shooting mode and angle the gimbal down manually. We can stop the timed shooting when the drone completes the waypoint path and head back home.
If you plan to do multiple identical scans of the same area, you will save a lot of time by not needing to redraw the mission again. Repeatability is one of the reasons why waypoint flights can make a lot of sense for 3D scanning. Remember to tap save when exiting the waypoints UI to save your mission.
Conclusion
Nadir scanning is the most accessible flight type to execute, but the potential of waypoints is much broader. The user experience may be a little janky, but the functionality remains. We can orient that camera using preset values or programmed POI spots. That alone can enable us to do more advanced flights suitable for photogrammetry. We will continue to test waypoints for photogrammetric scans and will share our findings in the future.
Photographer - Drone Pilot - Photogrammetrist. Years of experience in gathering data for photogrammetry projects, client support and consultations, software testing, and working with development and marketing teams. Feel free to contact me via Pixpro Discord or email (l.zmejevskis@pix-pro.com) if you have any questions about our blog.
Related Blog Posts
Our Related Posts
All of our tools and technologies are designed, modified and updated keeping your needs in mind
Vertical Photogrammetry Part 1 - Outdoor Walls
Walls, facades, and geological outcrops are examples where the scanned subject is entirely vertical. For some - it may be the focus of their work and the most common use case. This article begins a series on vertical scanning techniques for different subjects and situations.

Handheld Photogrammetry with a Drone
Drones are cameras with wings and propellers. The aerial perspective often makes a drone their first dedicated imaging device for many people. Most drones can be used as good terrestrial cameras as well.
Relative vs. Absolute Accuracy in Photogrammetry
Photogrammetry can be as accurate as anything, but it is only as good as your input data. Input data also determines the absolute and relative accuracy of your project.
Ready to get started with your project?
You can choose from our three different plans or ask for a custom solution where you can process as many photos as you can!
Free 14-day trial. Cancel any time.
Welcome to Pixpro
Sign in
And access your account.