.svg@webp)
Thermal Photogrammetry Basics
 Lukas
Zmejevskis
Lukas
Zmejevskis
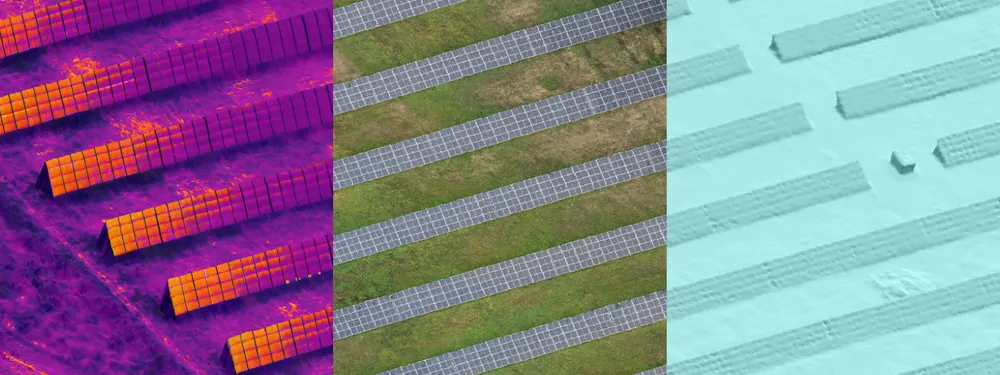
Thermal images reveal what the human eye cannot see. The camera sees in the infrared part of the electromagnetic spectrum, clearly allowing it to visualize heat emanating from any object or surface. Infrared heat signature transforms into visible light in a raster image, and we get a new perspective of the subject. In recent years, it has been essential in inspection, health and safety, search and rescue, and other applications. Now thermal imagery is coming to photogrammetry as well.
Familiar Fundamentals
Technically, we can use any raster images for photogrammetry as long as 3D scanning fundamentals are there. Overlap, image quality, subject coverage, and consistency rules also apply when taking thermal photos. But due to the nature of thermal camera hardware and limitations, infrared photogrammetry requires a more careful approach.
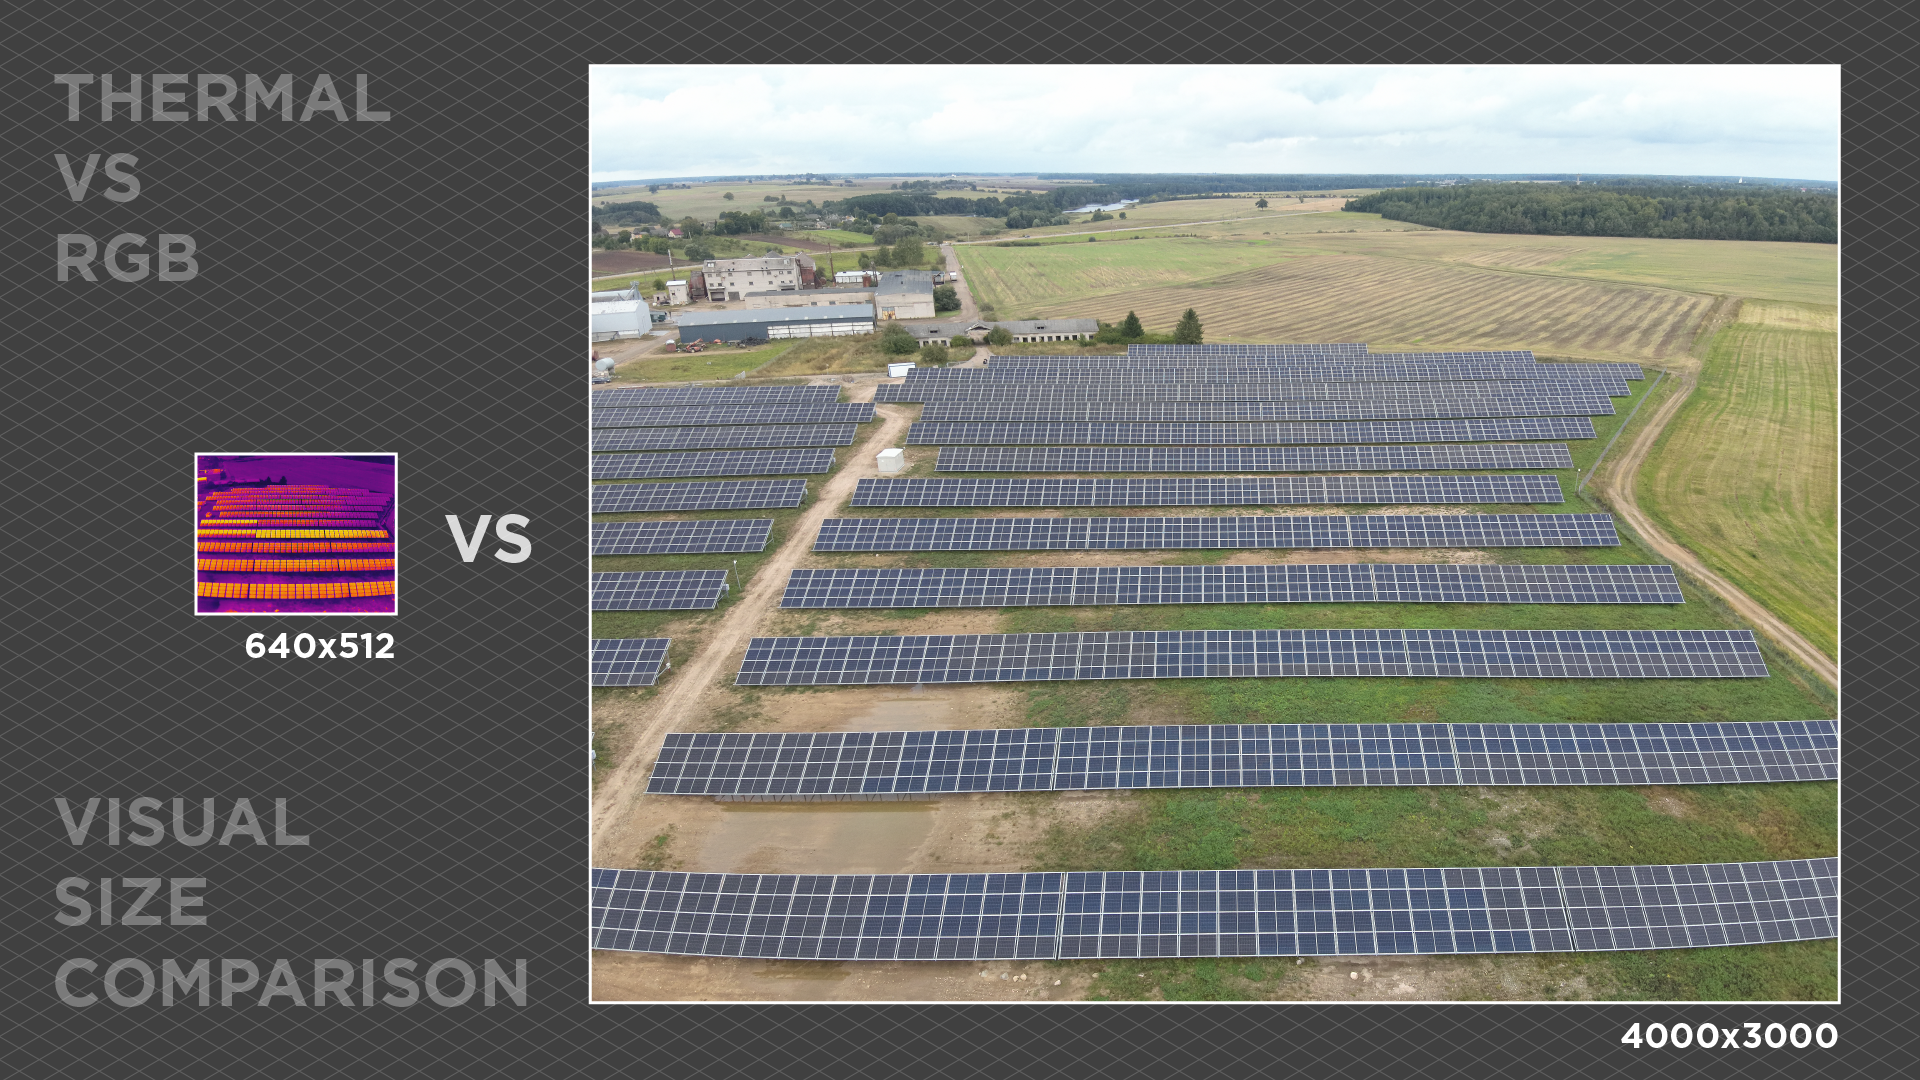
Currently, available technology limits the quality of thermal photos we can get. It is especially true regarding widely available products such as thermal drones. With current mainstream tech, we get images that are only 640 by 512 pixels and with a noticeable loss of detail further from the center. The low resolution and sharpness of thermal images mean that using them for photogrammetry is more challenging than regular, well-made RGB photos.
Another important aspect – GPS metadata info – should stay and be used the same as in normal photos. In addition, expensive enterprise drones with thermal payloads usually have RTK functionality which helps with GPS accuracy and 3D reconstruction. If possible – always have the RTK functions enabled when taking thermal photos.
Thermal Photogrammetry Data Collection
Thermal image capture is essentially the same as regular. Still, you must be extremely careful and leave more margin for errors. Besides keeping to traditional photogrammetry rules, there are a few things to keep in mind:
1. Exposure is only auto. It means that you cannot control the shutter speed or sensitivity of the camera. It is all done automatically. When taking thermal pictures, you must be very careful about the drone’s speed. A blurry thermal or RGB image is useless. The best way to avoid this is to test your setup every time you go out to scan. Take a few test shots and see if the photos you are getting are sharp. In many cases, you may even need to stop when taking thermal images. There is no way around this, so take your time and do not rush.

2. The lens is different. Most drones come with regular cameras besides the thermal imager. But the field of view of both cameras is different. The most likely chance is that the thermal camera lens is more zoomed-in and has a narrower field of view. Lens FOV influences the overlap calculations, so if you set 80 percent overlap in a planning app, make sure that the thermal photo overlap is the basis for calculations. We need at least 80 percent overlap for thermal photos to produce a 3D reconstruction.

3. Mind the infrared-specific settings. There are a few settings to keep track of that does not apply to regular cameras. The color palette of all images must be the same, as well as the temperature range. We can address some of these issues in post-production, but that will depend on your specific setup. The ultimate goal is that every picture must represent the exact temperature using the same color. If it is not the case – you may get inconsistent results.
Data Processing
With the data collection stage over, let us divide the processing part into three different substages:
- Photo inspection – we must inspect all photos before any further processing. Discard failed blurry pictures. If too many images are blurry – we must redo the flights accordingly. Discarding a large percentage of images will reduce overlap and make it impossible to reconstruct the scene.
- Thermal imagery-specific post-production – in this stage, we may adjust various properties of the thermal images. The tool for the job is usually the software provided by the manufacturer with the thermal camera (drone). During this stage, you may find means that help to equalize and convert the thermal color palettes. All photos have to calibrate to the same values. Whether this is possible depends on your specific platform and its supported file formats.
- 3D reconstruction – starting the photogrammetry part. The exact process depends on the software of your choice. Given the lesser quality of thermal imagers, it is usually best to choose settings appropriate for lower-resolution images and try to extract as much quality as possible.
Thermal Photogrammetry Data Analysis
Once the photogrammetric processing is complete, you should get a 3D model with colors representing temperatures. Having your entire scene in 3D will present many advantages instead of just inspecting thermal images alone. Every spot will have its location and surrounding context easily visible and measurable in 3D space. It is like having the whole scene in the palm of your hand and a different electromagnetic spectrum.
We created our examples with DJI M30T and Mavic 3T drones – the latest thermal drones on the market. Of course, we can take regular photos simultaneously with infrared, which enables you to create two projects and toggle between the two types of imagery. This way, we can connect what we can and cannot see with the naked eye.

Conclusion
Whether thermal imagery helps detect anomalies or defects, photogrammetry is the most effective way. Photogrammetry projects provide a reliable 3D framework with coordinates and the opportunity to save your progress. Any additional software functions, such as measurements and simulation, are also at your disposal. If you follow our advice, you should be able to get thermal 3D reconstruction alongside RGB. Still, we will look at more specific thermal use cases and workflows in the future.
Photographer - Drone Pilot - Photogrammetrist. Years of experience in gathering data for photogrammetry projects, client support and consultations, software testing, and working with development and marketing teams. Feel free to contact me via Pixpro Discord or email (l.zmejevskis@pix-pro.com) if you have any questions about our blog.
Related Blog Posts
Our Related Posts
All of our tools and technologies are designed, modified and updated keeping your needs in mind

Accuracy of Your Photogrammetry Project
Accuracy in photogrammetry is a multifaceted point of discussion. We can talk about absolute, relative, or even geometric accuracy, to name a few. No tool or technique can really prove anything beyond reproach.
Buying a Used Drone - Mavic 2 Pro in 2024
Buying used gear is an excellent way to save money and obtain something that may not be on sale anymore. With drones reaching the 4th or 5th technological generation, the used drone market is becoming more extensive.

Photogrammetry Processing - Common Hardware and Software Issues
Photogrammetry requires complex processing and data crunching to turn photos into 3D models. We need a powerful machine to run the software and all its processes. Not only that, but the software within our machine may impact the performance of photogrammetry software in various ways.
Ready to get started with your project?
You can choose from our three different plans or ask for a custom solution where you can process as many photos as you can!
Free 14-day trial. Cancel any time.