.svg@webp)
The Cake is 3D – Food Photogrammetry Guide
 Lukas
Zmejevskis
Lukas
Zmejevskis
Scanning foodstuffs can be fun and sometimes even useful. 3D asset creation for VFX, VR, and gaming industries is the most obvious use case, while showing off your homemade cake to your friends and family in 3D is more of a niche proposal. Either way, if you have a camera and some interest, all you need is a bit of guidance, which I will be offering here. I will do a couple of basic food-related scans using orbital patterns (going around in a circle and taking photos) and tell you everything I did step by step.
Different Photogrammetry Techniques
First, I need to choose the technique for orbital scanning. The first is always the classic approach of going around the item. The camera is moving in an orbital pattern, and we are taking pictures every few degrees, maintaining high photo overlap as required by photogrammetry standards - one of the most common 3D scanning patterns in both aerial and terrestrial scanning.
Second is the turntable technique, where the camera remains stationary, but the scanned object is rotated on a turntable. This one is harder to pull off because it requires a more elaborate lighting and background setup. Why so? Because we cannot afford stationery details. If something remains static in all photos and produces features for photo alignment, it can throw off the entire process of 3D reconstruction, which requires scene features to be captured from different perspectives.
Finally, there is the cross-polarisation photogrammetry route, where we use polarising filters to block out reflections which can appear as static features during turntable (or orbital) scans. This is a bulletproof method in many cases, but it requires even more additional equipment. And it is only required if the scan subject is reflective.
Equipment for Turntable 3D Scanning
In this case, I will choose the turntable scan route. I think I can pull it off with the equipment I have. For the turntable, I have an electric turntable that came with a 3D scanner I had previously purchased. A camera, lens, tripod, and a few video lights for lighting. Additionally, I ended up using an external intervalometer for convenience (a wired remote controller with an interval function to trigger the camera every 2 seconds).
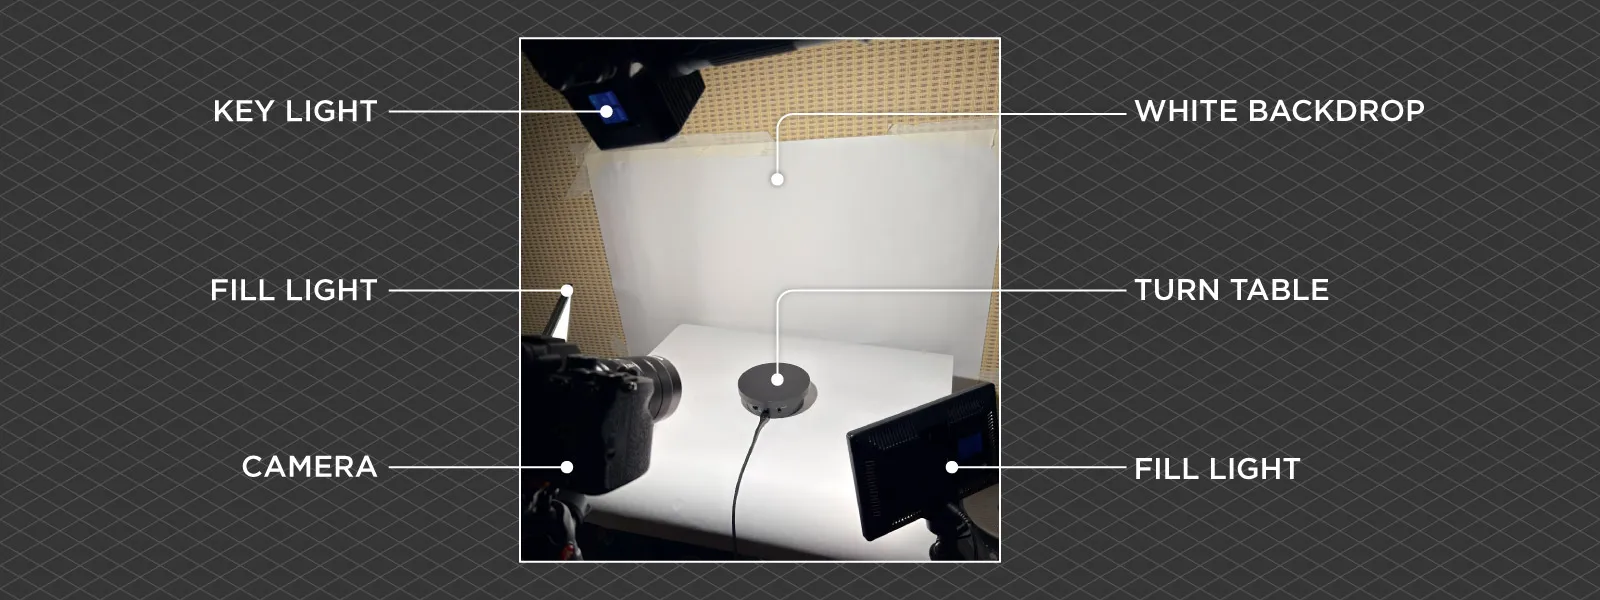 Finally, a few pieces of white paper. If you check other articles on turntable scanning, you will often see people going the “void” route, which means blacking out the background and the base of the turntable if possible. I prefer going the white-out route because a white base provides a good amount of reflected light for my subject. This results in softer shadows and a bit less contrast.
Starting Healthy – Broccoli 3D Scan
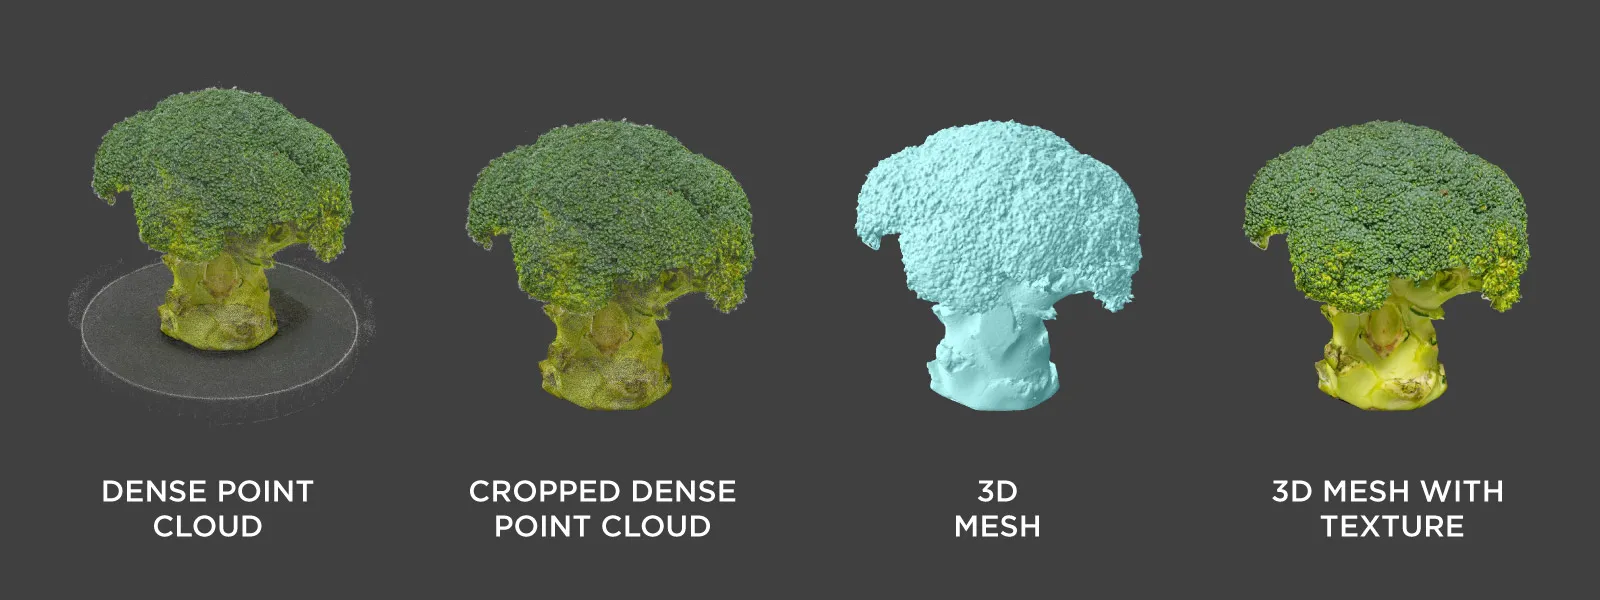
They say you should start with the veggies before getting dessert. Broccoli is an A-tier vegetable for eating and scanning. It is not reflective like a waxy watermelon and has tons of details. Because the cake is somewhat time-sensitive to work with, I will test my setup with a head of broccoli first.
My final lighting setup ended up being a strong overhead light, a couple of barely noticeable fill lights on the sides above the white papers, and the electric turntable spinner. I used my soon-to-be-replaced Sony A7 IV with a couple of “standard” prime lenses on a tripod, paired with the external intervalometer remote for triggering photos. As a side note, the Sony camera does not allow the use of its built-in intervalometer function with the mechanical shutter. Good for preserving the mechanical parts; bad, because the electronic shutter on this camera sucks.
 The turntable I have is very basic, so it can only adjust the turning direction and speed. No fancy features like stopping and triggering camera capture a set number of times. So we need to figure out two things:
-
How fast can we spin the object without introducing motion blur for the given lighting in the photos?
-
How many photos will result at what capture interval?
Take test shots of the spinning subject at various speeds using the exposure you intend to use. Ensure the focus is correct and check for any blurring due to motion. If there is some, reduce the spin speed until the subject is definitely sharp. For sharpness reference, you can take a stationary photo.
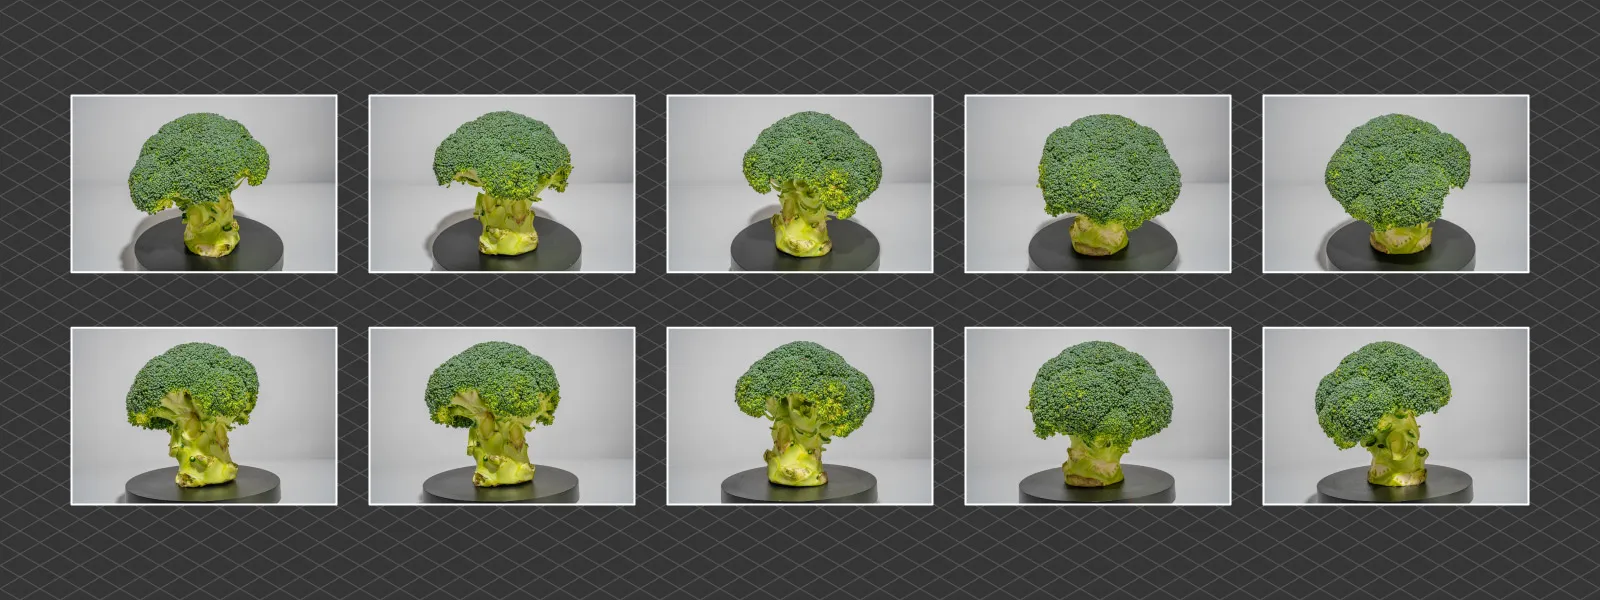
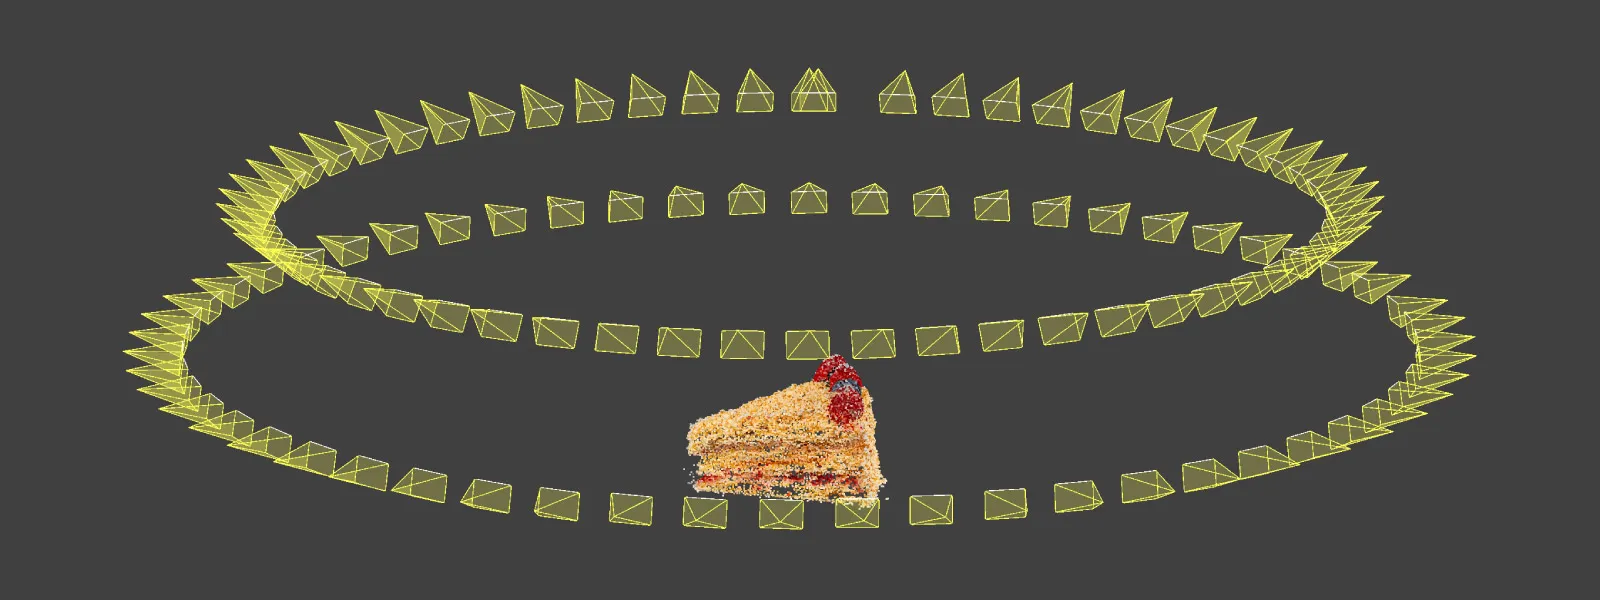
 Once you know the turntable speed, see how long it takes to make a complete circle and divide that by the number of photos you desire to get. I was aiming for 56 photos per orbit, which is slightly more than necessary, and got a 2-second interval. My camera settings for proper exposure of the broccoli were a shutter speed of 1/80th, an aperture of f/22, and an ISO of 1600.
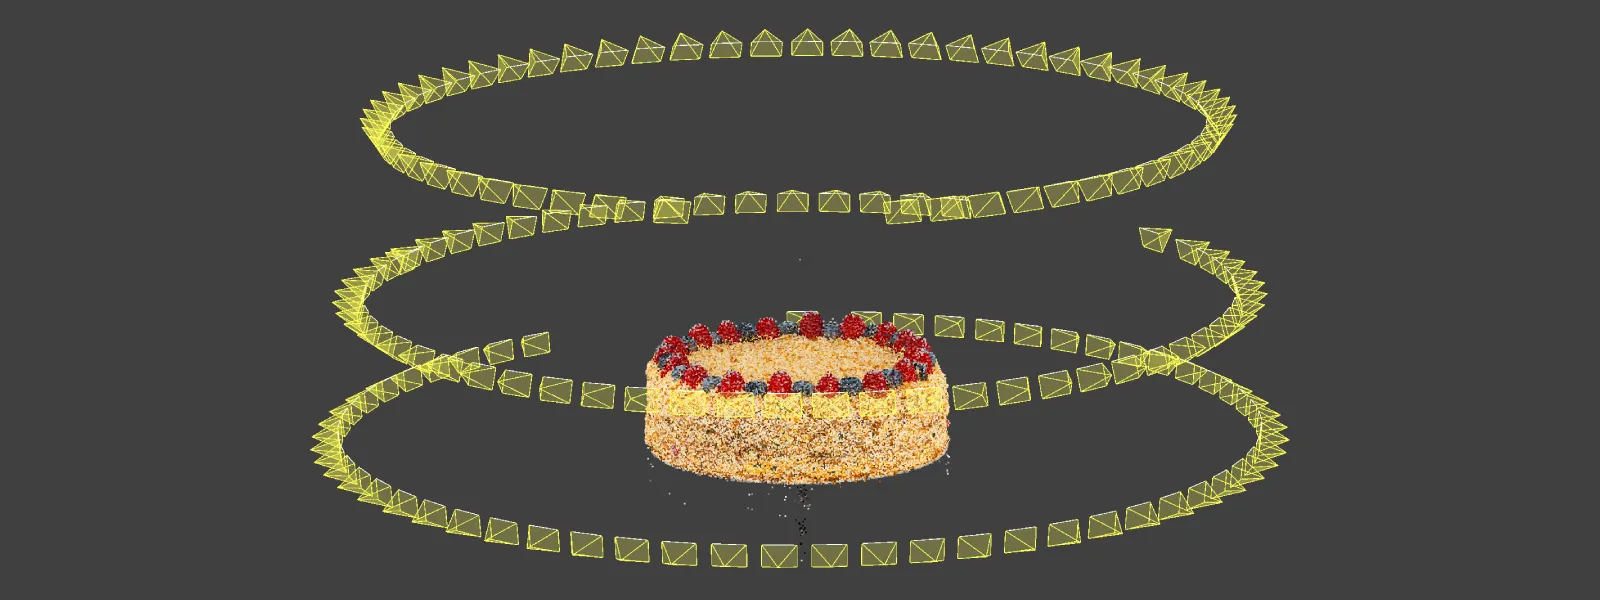
 Intervalometers of all kinds allow selecting the final amount of photos, so I ran 56 photos with 2-second intervals, knowing that would give me a full orbit on the turntable. Once we establish this rule, we no longer need to track anything - we simply shoot at multiple heights.
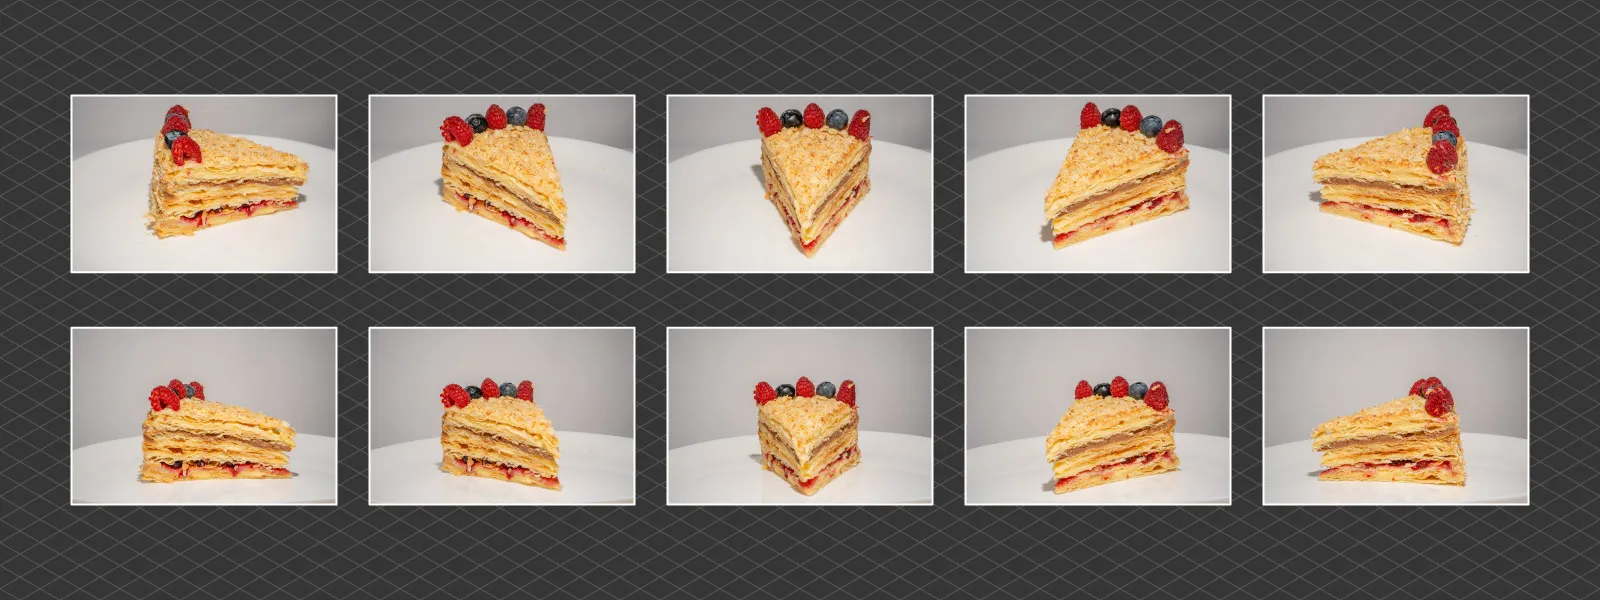
For Dessert – 3D Scanning a Homemade Cake
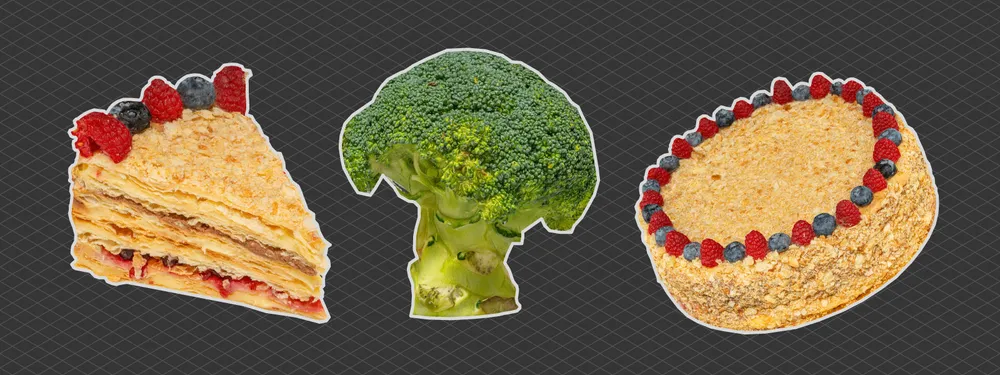
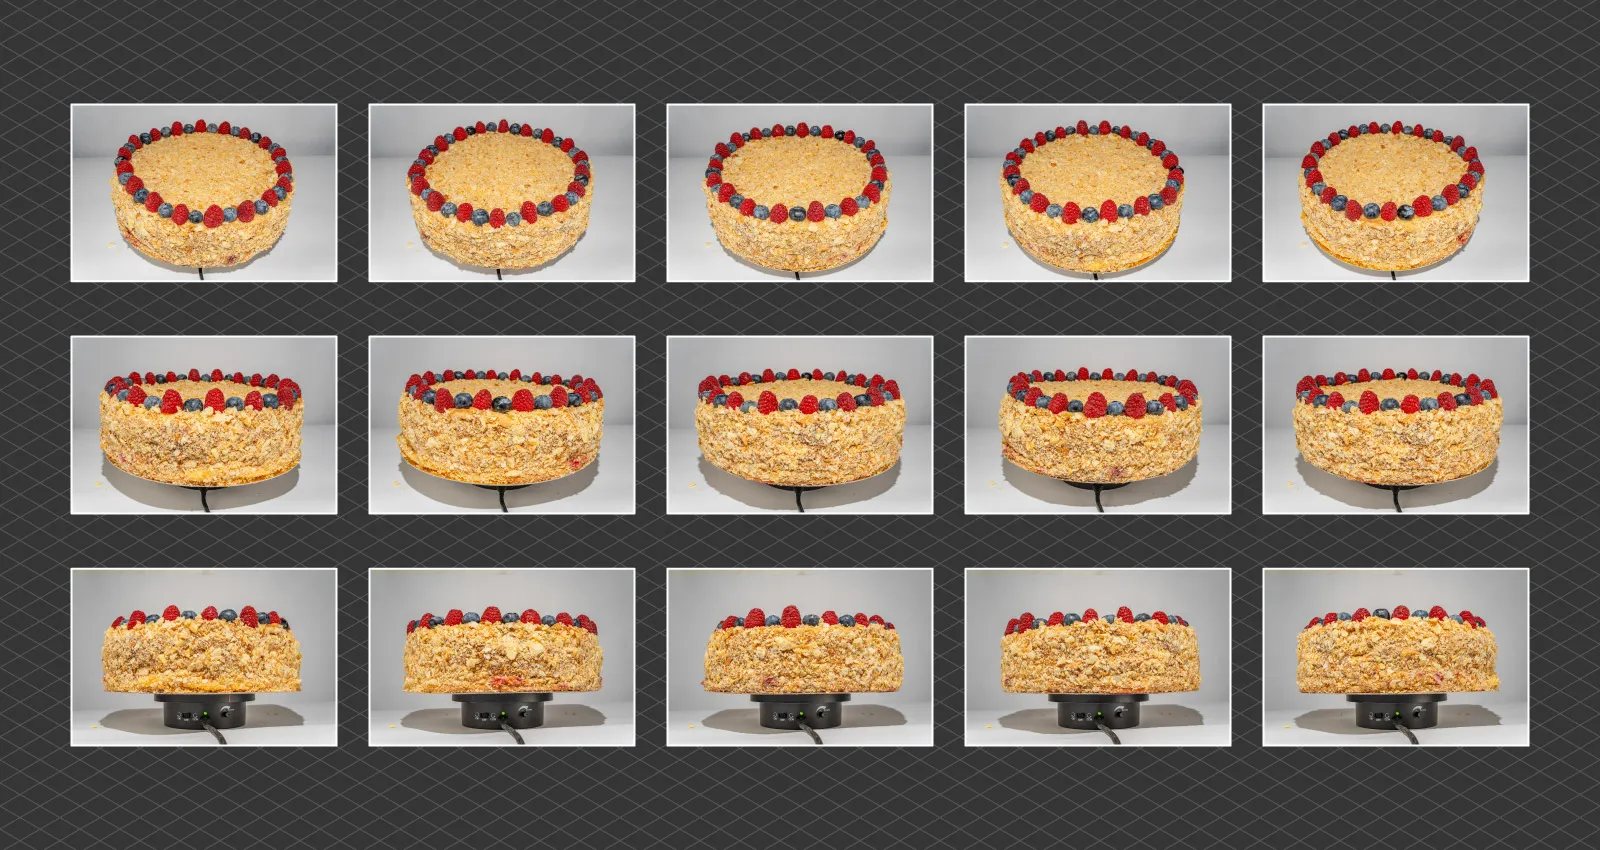 Cake time. I will use the exact same principles as I did with the broccoli test. The cake is not reflective, so it does not require cross-polarisation or any lighting setup changes. It is a homemade Napoleon cake, which is both S-tier for scanning and eating. It may not look fancy, but it has plenty of texture in all possible senses.
 When compared to the broccoli scan, I had to adjust the exposure and framing (by changing the lens to a wider one) so that the cake fits properly in the frame. I left the same turntable speed, but because the cake is larger, it produces more angular speed at the perimeter. This means I had to check for motion blur again and increase my shutter speed to 1/125th of a second. I used an f/16 aperture for maximum depth of field and ISO 400.
 Data Processing in Pixpro Photogrammetry Software
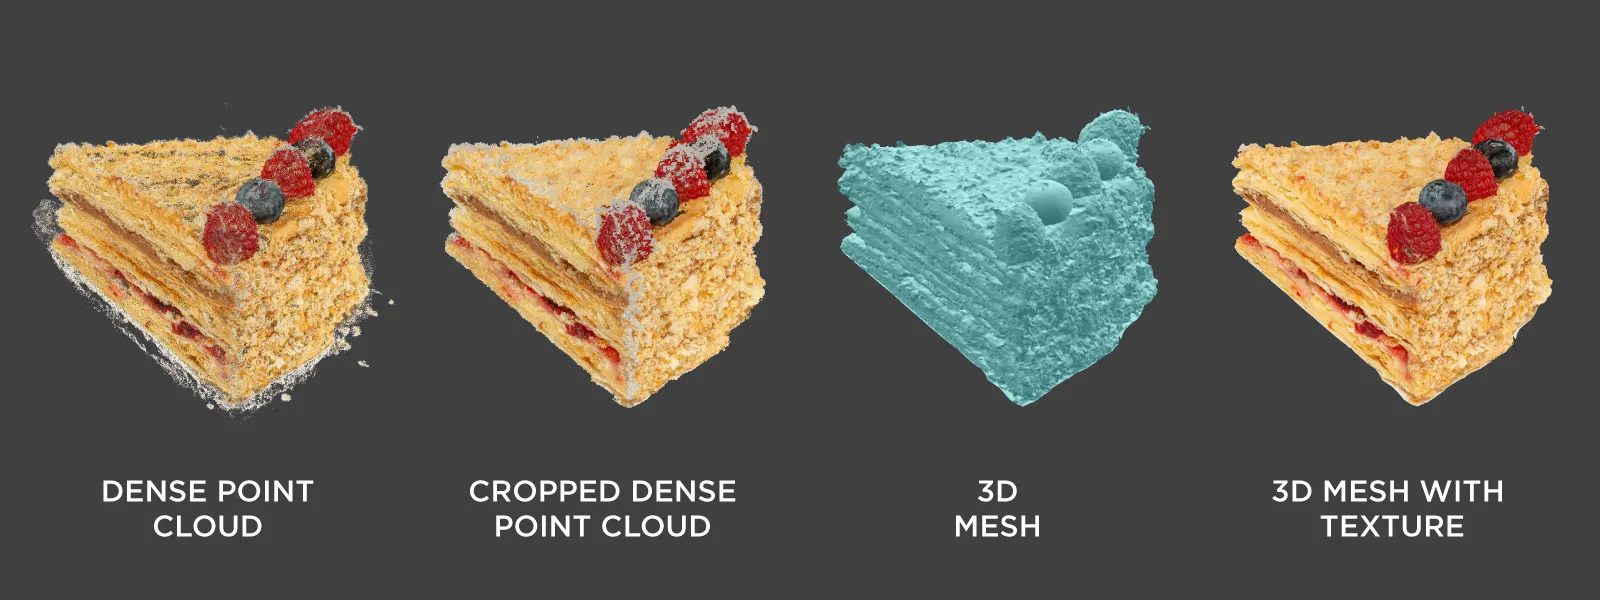
 Pixpro photogrammetry software workflow is pretty straightforward. However, I will describe the more advanced version, where we do not simply click “Full Workflow” and obtain the results after a set amount of time.
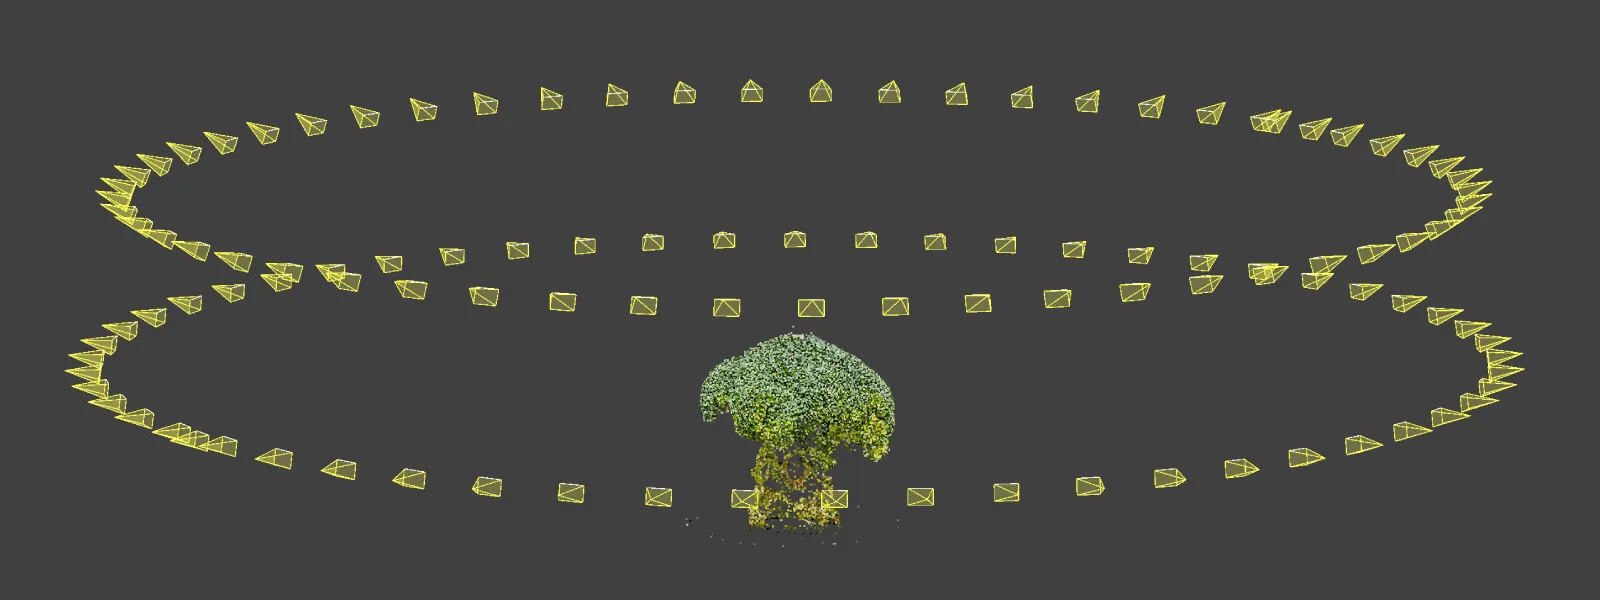
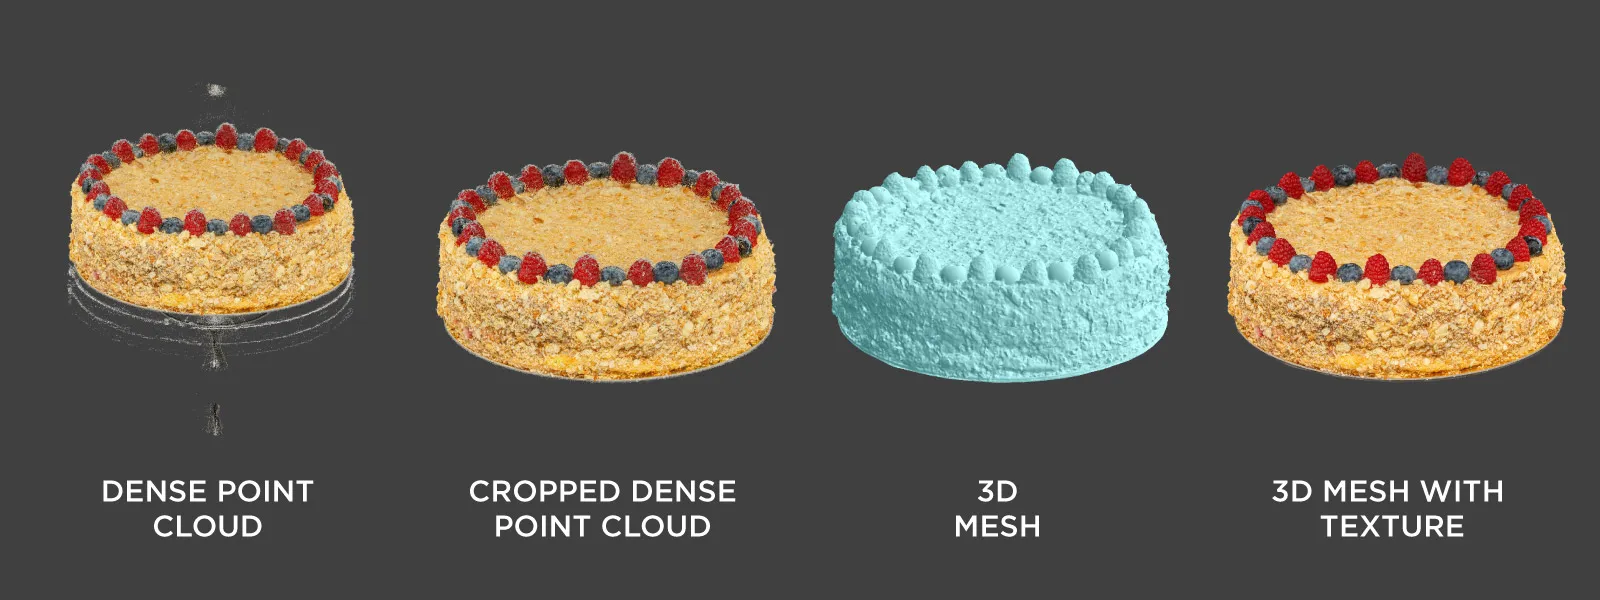
 I recommend processing layers one at a time. So, we run 3D Reconstruction first to see if the camera positions look okay. Then, we create the Dense Point Cloud, which we crop using the Clipping Box or delete points using Pixpro’s point cloud editing feature. And finally, we create a 3D Mesh with Texture using the cleaned-up point cloud. These steps are illustrated throughout this article.
 3D Model Sharing – Sketchfab
Sketchfab is one of the best-established 3D model hosting and sharing platforms on the internet; we use it here all the time. And the free tier offers a reasonable limitation of 100 megabytes per upload. Upload - not model size - because we are uploading an archive every time, which must contain all 3D model files.
A .zip file also means compression, which reduces the size of the model file you initially see after export from photogrammetry software. For this reason, some trial and error might be involved if you want to maximise quality within the 100-megabyte limit.
Your results may vary, but based on my experience, an .obj file can compress down to 4–5 times its original size in megabytes. I mean the mesh only, just using normal compression when creating a .zip archive. This means a 2-million-triangle .obj, originally 240 megabytes, can be reduced to approximately 60 megabytes.
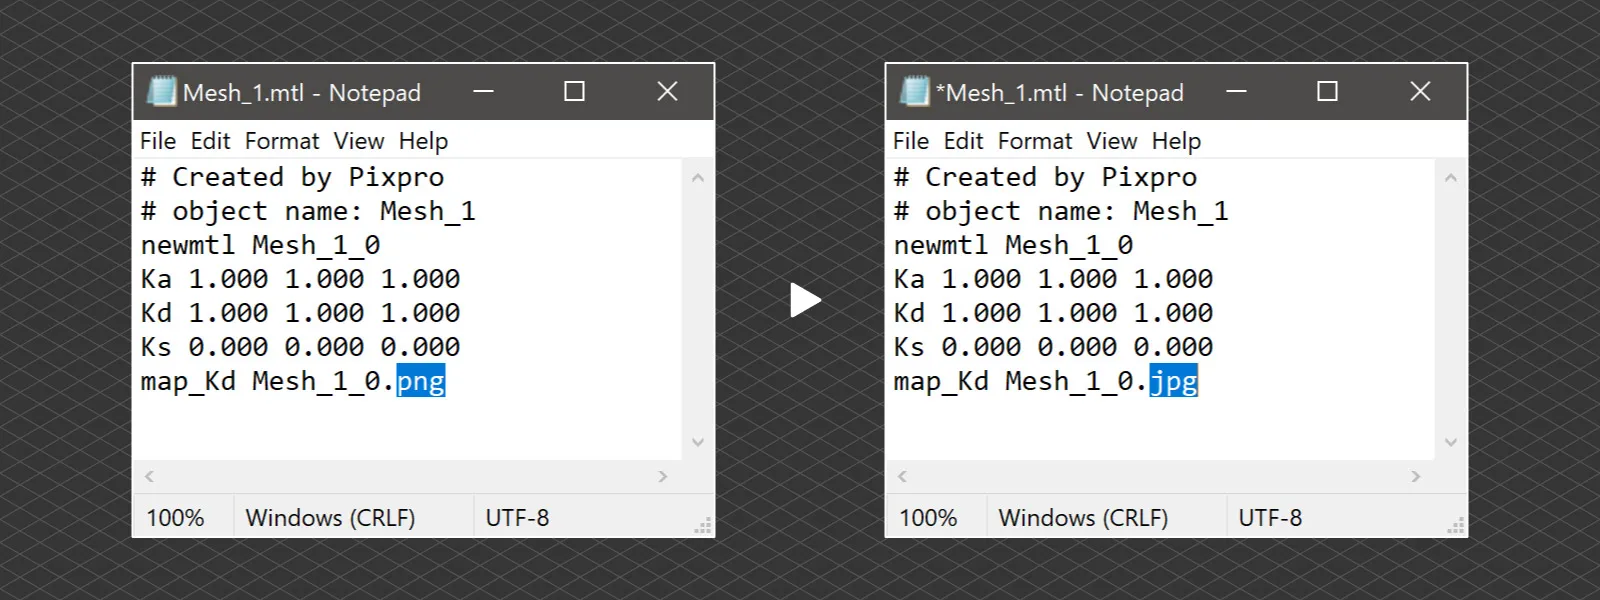
The texture .png file will not compress at all using the same algorithm. That is why I often resort to a hack by converting the .png file to a simple JPEG. You can achieve this with almost any image editor, and it reduces the texture file size by approximately 6–7 times. The impact on the texture quality is hardly noticeable. For this to work, we need to change the file extension in the .mtl file, which comes with the .obj mesh. Replace the .png file extension with a .jpg file using Notepad and compress all files into a single archive before uploading them to Sketchfab.
 Conclusion
3D scanning food is less fun than I thought, not because it is a challenging photogrammetric process, but because I cannot eat it right away. Never do it when hungry, because that spinning, aromatic cake distracts from the work we need to do. And if you are on a diet - well, that is playing in hard mode. However, the 3D models we create will remain forever, reminding us of what we had in three dimensions. Until capturing and reproducing smells becomes a thing, at least.
Photographer - Drone Pilot - Photogrammetrist. Years of experience in gathering data for photogrammetry projects, client support and consultations, software testing, and working with development and marketing teams. Feel free to contact me via Pixpro Discord or email (l.zmejevskis@pix-pro.com) if you have any questions about our blog.
Related Blog Posts
Our Related Posts
All of our tools and technologies are designed, modified and updated keeping your needs in mind

Mid-Range Smartphone Photogrammetry: Poco X8 Pro Max vs iPhone 16 Pro Max
During my Sony A7 V review I argued that professional cameras are "solved" now. There is little left to revolutionize, and not much that still gets in the way of a competent shooter. I think we have reached the same point with mid-range smartphones.

Travel Photogrammetry - More Fun than 2D Photos
Sometimes a 2D photo does not do justice to a moment or a place, and you wish you had something more… dimensional. Something that captures shape, texture, and the little details that flat images tend to flatten even more.
How Many Photos Are Enough for Photogrammetry?
The photo amount is an essential metric in photogrammetry. Pixpro Photogrammetry Software, for example, bases its subscription tiers mainly on this metric. More data to crunch means more resource consumption and generally more demanding projects.
Ready to get started with your project?
You can choose from our three different plans or ask for a custom solution where you can process as many photos as you like!
Free 14-day trial. Cancel any time.