.svg@webp)
Camera Calibration With Pixpro - Your Unique Values
 Lukas Zmejevskis
Camera calibration in photogrammetry is an essential part of the 3D reconstruction of a scene. Every camera sensor and lens combination can have a set of unique parameters that describe the camera system - these are intrinsic values, often referred to as camera intrinsics. These parameters are always obtained automatically for each project you make. But even an automatic calibration process requires some initial parameters to begin with. This blog post will describe how you can get the best initial intrinsic parameters for your camera.
Benefits of Calibrated Initial Intrisics
Providing good initial values has two significant benefits for long-term work: speed and consistency. If you use a particular drone or fixed camera for most projects - you may speed up every future project by creating good initial intrinsic values for your camera. Thus, the automatic calibration process for each reconstruction will do less work. Also - all of the future results of this automatic calibration will be more consistent with proper initial values. Consistency means a more accurate 3D reconstruction and, therefore, more precise measurements and geometric representation of the scene. These improvements will be incremental if you are already doing great 3D scans. Still, the benefits are clear and valuable for everyone.
A Perfect Scan
With the latest Pixpro photogrammetry software version, we added the ability to save a set of intrinsic values for any camera. The saving process itself is as easy as pressing a single button. But to obtain these values, you need an excellent image set made for 3D scanning purposes.
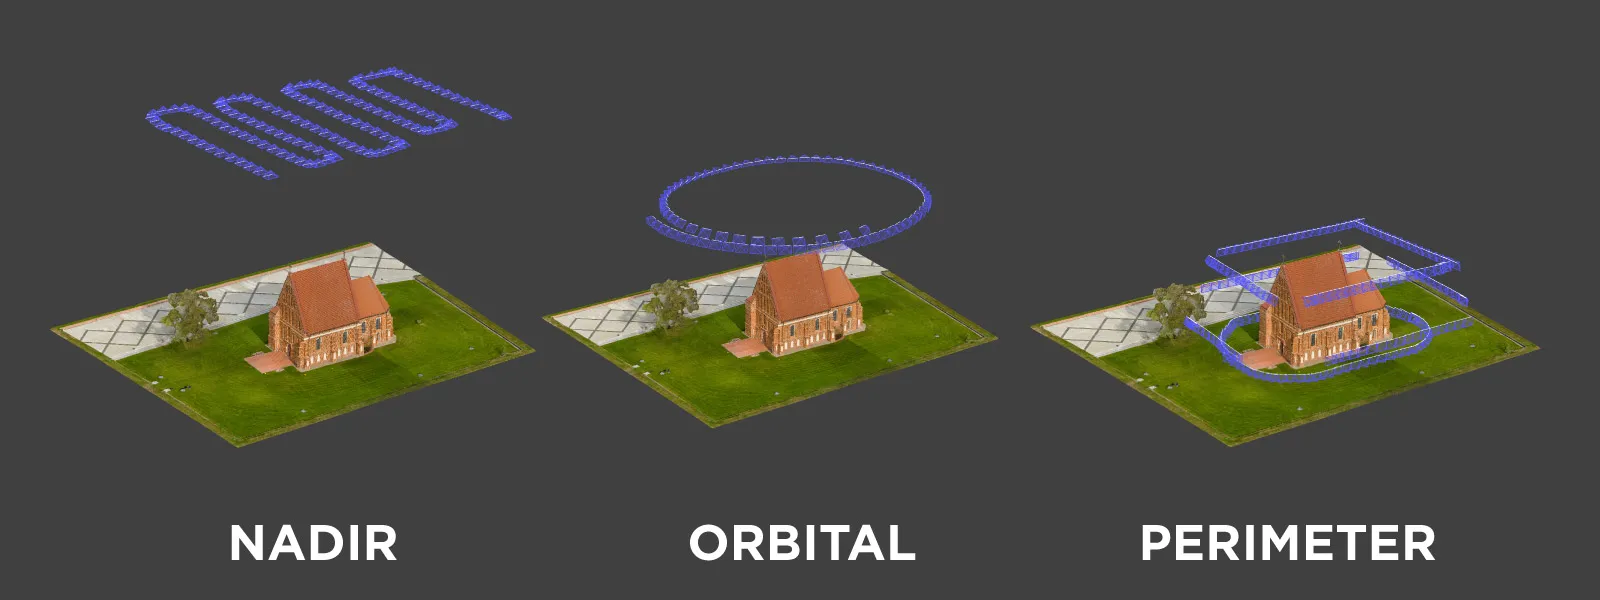
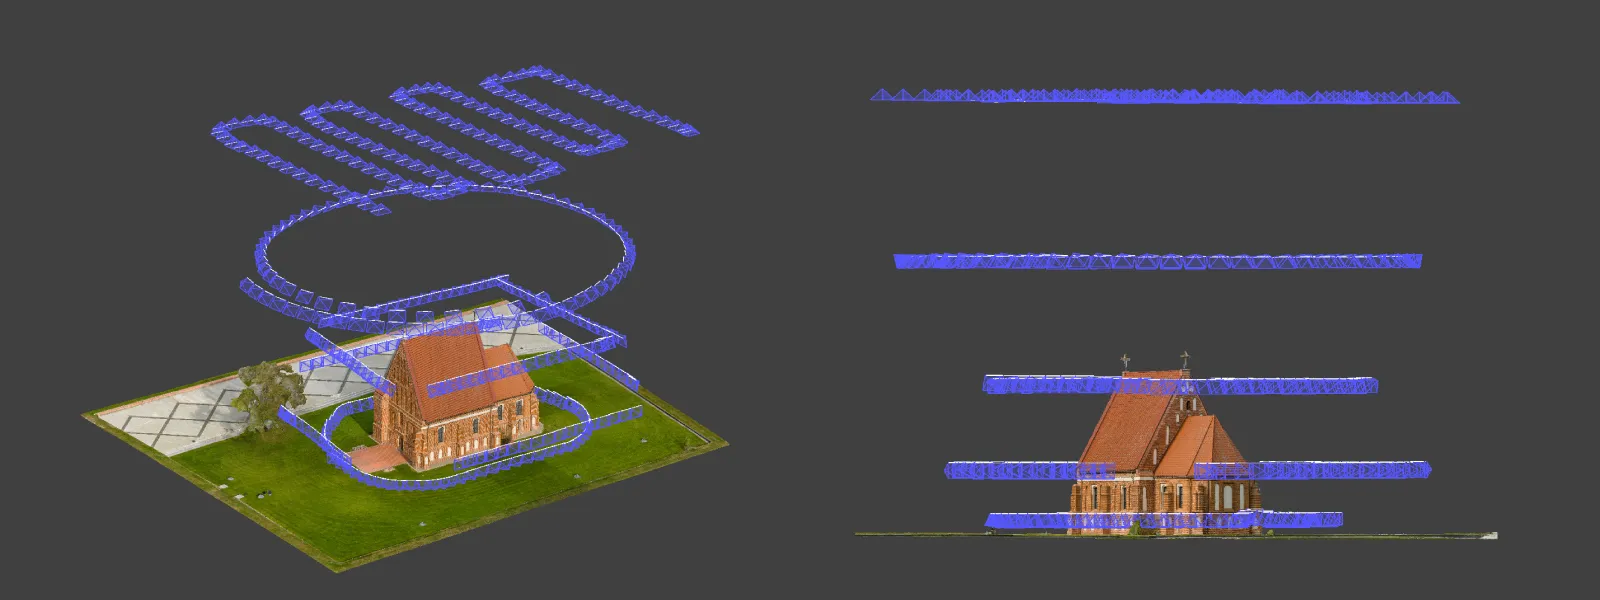
It seems straightforward - and it is, but it is easier said than done. You need a perfect subject and excellent technique for an ideal photo set. Let us lay down some rules for a perfect subject:
- Something large that you can freely photograph for as long as you need without any accessibility issues.
- It has to be well-lit and easily scannable - so no reflective or transparent surfaces, immaculate surfaces, significant obstructions, or flight limitations if you calibrate a drone.
- The subject must be rock solid and cannot physically move between photos.
- If doing a drone calibration, the subject should be in a place with no GPS, magnetic interference, or other anomalies.
- Ideally - the subject should not be too simple, like a cube or a large round rock. It should have at least some geometrical features.
As for the technique:
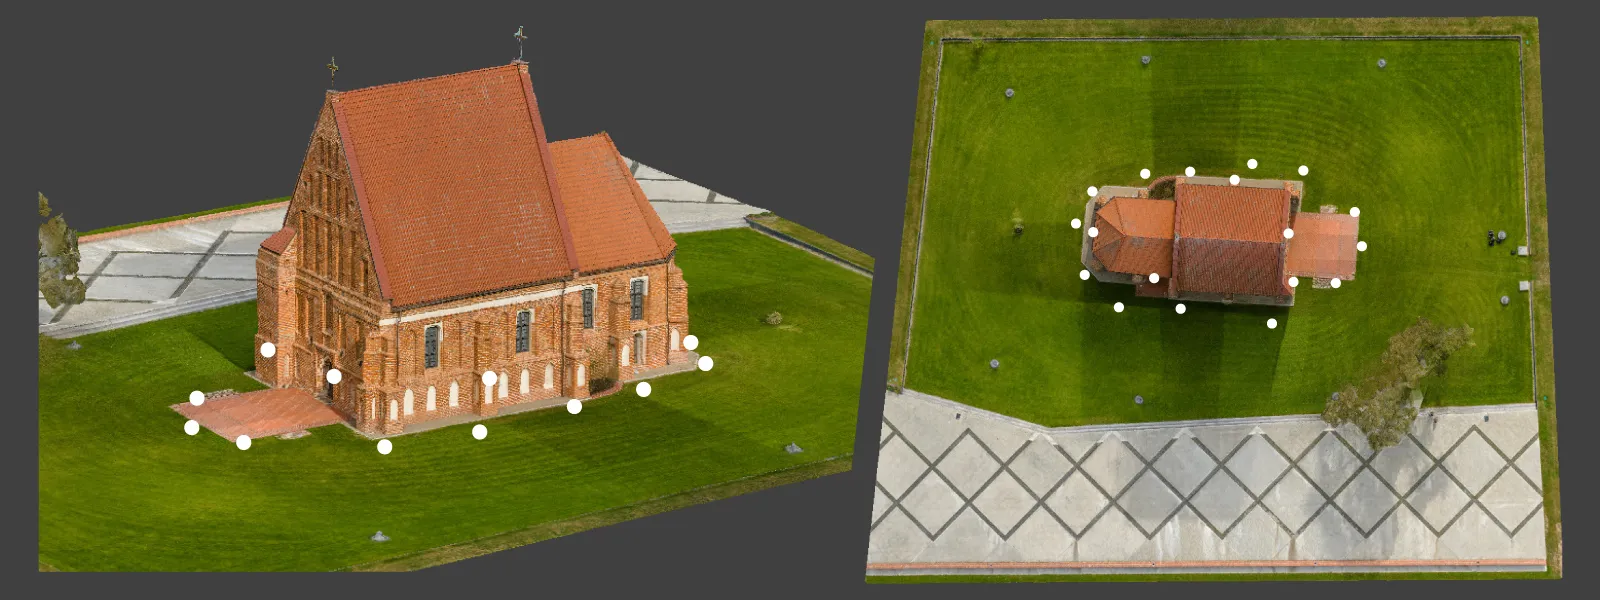
- High overlap between all images - 80 percent optimally.
- All photos must be taken from all angles relative to the subject and the ground.
- No failed images should be in the set - especially blurry or out-of-focus shots.
- Strictly no irrelevant photos in the set. All images should come from the single camera and lens combination.
- Ideally - you should make all photos in similar conditions and without significant time breaks between shoots.
- You cannot have two or more photos taken in the same spot without movement.
These would be the fundamental requirements for a successful scan, which later could provide great initial intrinsic values, but there is one more thing.
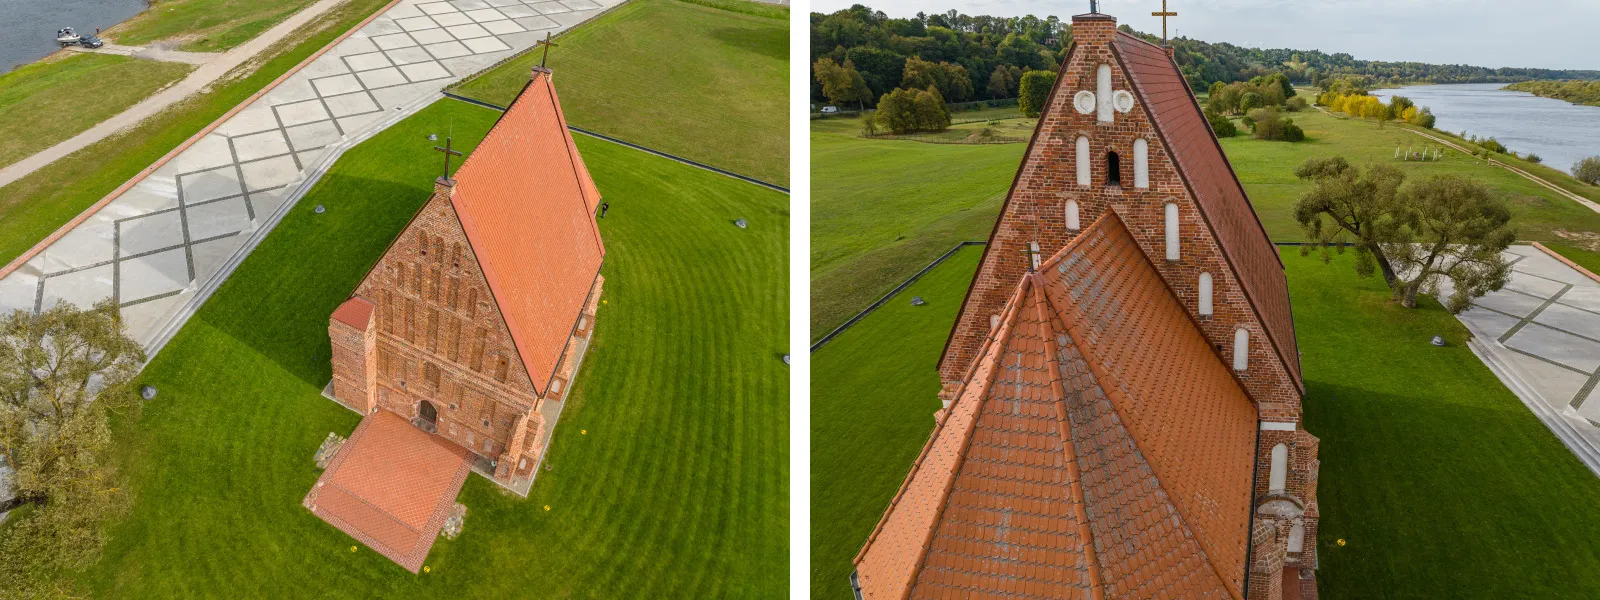
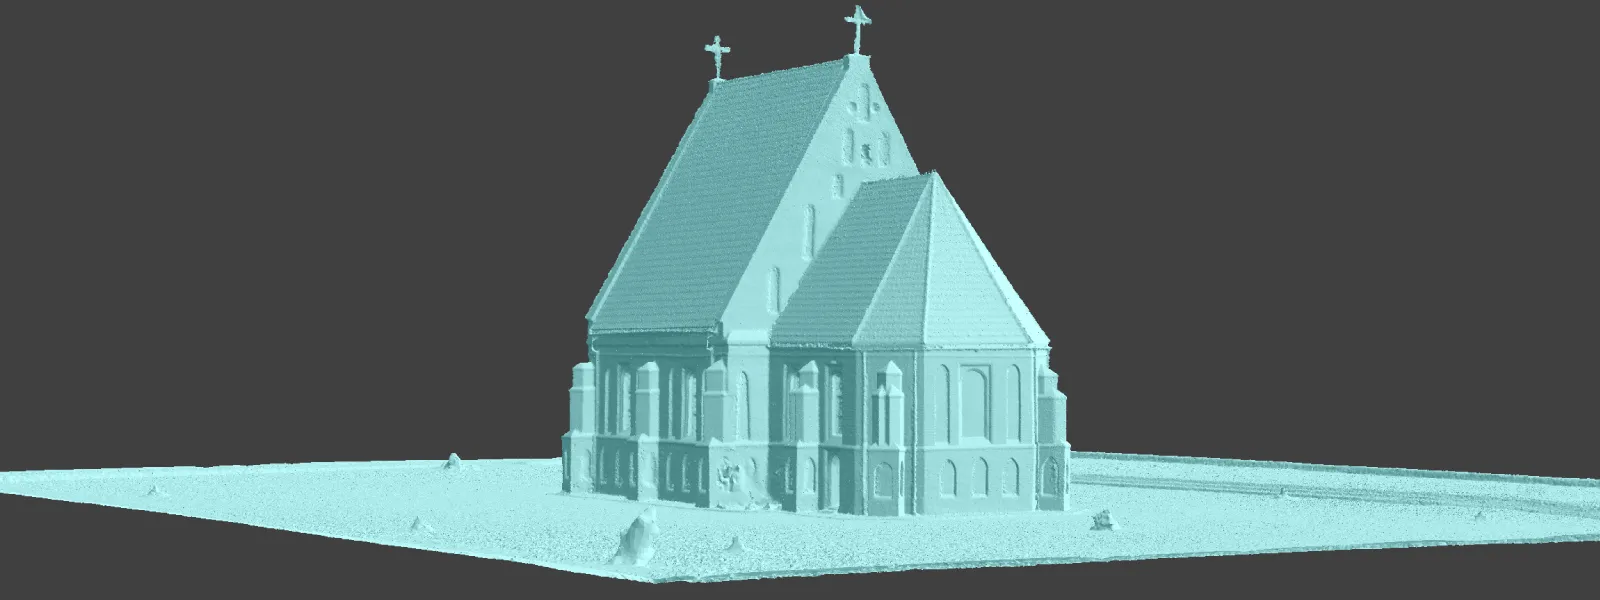
As our example, we chose a small, gothic, red brick church without large windows in a peaceful and unobstructed environment except for a single tree. None of the surfaces on the building are reflective or even shiny. And it is as solid as it gets - a perfect subject overall.

Ground Control Points
If you want to achieve the best possible results and do this by the book - you need some control points. Professional GCPs can provide precise “ground truth,” anchoring the 3D reconstruction to the real world on an accurate scale. Suppose you can access such a rover or other surveying equipment and work professionally. In that case, you need to use GCPs for this process. Even if you use GCPs for all your photogrammetry projects - getting the initial intrinsic values for your specific camera will yield even more incremental speed and consistency improvements. And you can not be too precise in this line of work. Here are a few fundamental pieces of advice when using GCPs for this process:
- Place a few more GCPs than you would usually do.
- Spread them around your subject, and place some on it if possible.
- Place GCPs in different altitudes if possible.
- Ensure excellent GPS connection for all GCPs collection. Data interpolation is unacceptable.
 If you cannot make GCPs, a great photo set will still work to get you the values. But to push that bit further to perfection - you will need survey-grade GCPs.
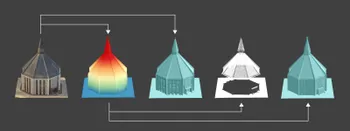
Process in Pixpro
To get the values, you need to run a regular 3D reconstruction. After the reconstruction is complete, you get two divergent workflows:
If you did not use GCPs - run the 3D reconstruction and save the values in the camera manager. For that, you only need to go to the camera manager, the optimized tab, and click “Add Optimized Camera Intrinsics To Calibration DB.” These values will now remain in the database. Whenever you start a new project made with this exact camera - they will appear as initial values, giving all the benefits we discussed above.

If you do use GCPs, the process becomes a little longer. Upload photos, run the reconstruction, add the GCPs, reference by GCPs, and reoptimize. Reoptimization will alter the reconstruction according to the precise control points. Reconstruction becomes even more accurate, so the optimized intrinsic values adjust slightly. Press the long “Add Optimized Camera Intrinsics To Calibration DB” button - and the process is complete.
Below, you will find a short video for both of the workflows. For a more detailed explanation of how to add GCPs in Pixpro, read our previous article:
Conclusion
If you followed the instructions of this blog post - you have taken your photogrammetry to the next level. 3D reconstruction consistency and quality is the difference between what you may do for fun versus professional work. We hope our new camera manager made it as painless as possible from the software side, and this article will serve as a guide for everyone willing to improve.
Photographer - Drone Pilot - Photogrammetrist. Years of experience in gathering data for photogrammetry projects, client support and consultations, software testing, and working with development and marketing teams. Feel free to contact me via Pixpro Discord or email (l.zmejevskis@pix-pro.com) if you have any questions about our blog.
Related Blog Posts
Our Related Posts
All of our tools and technologies are designed, modified and updated keeping your needs in mind

Why Choose Pixpro Photogrammetry Software? Practical Comparison
There is no shortage of photogrammetry software today. From well established industry tools to newer cloud based solutions, the choice is not exactly obvious, especially for someone just getting started. Most options promise high accuracy, automation, and ease of use, and to some extent they all del
3D Point Clouds in Pixpro: How to Convert and Export Spatial Data
Photogrammetry software produces several types of spatial outputs, but the dense 3D point cloud is the foundation of them all. In Pixpro, the dense point cloud acts as the base dataset from which every other derivative is generated.

How to Create and Import a KML File in Pixpro Waypoints
We are continuing our improvements to the Pixpro Waypoints service and bringing a few small updates. Pixpro Waypoints is a service that allows automatic photogrammetry flights with consumer grade DJI drones using a bit of workaround magic.
Ready to get started with your project?
You can choose from our three different plans or ask for a custom solution where you can process as many photos as you like!
Free 14-day trial. Cancel any time.
Welcome to Pixpro
Sign in
And access your account.