.svg@webp)
Speed Limit Settings for Photogrammetry
 Lukas Zmejevskis
Speed settings are essential for consistent flights and overlap control in photogrammetry. When we make our 3D scanning examples, we always use various speed limit settings with the consumer DJI drones. We also mention in our reviews that cruise control and speed limits are great features, and DJI was wise to implement them on all recent drones. This blog post will go more in-depth about how we use various speed settings and how they can help you achieve consistent overlap.
Backstory
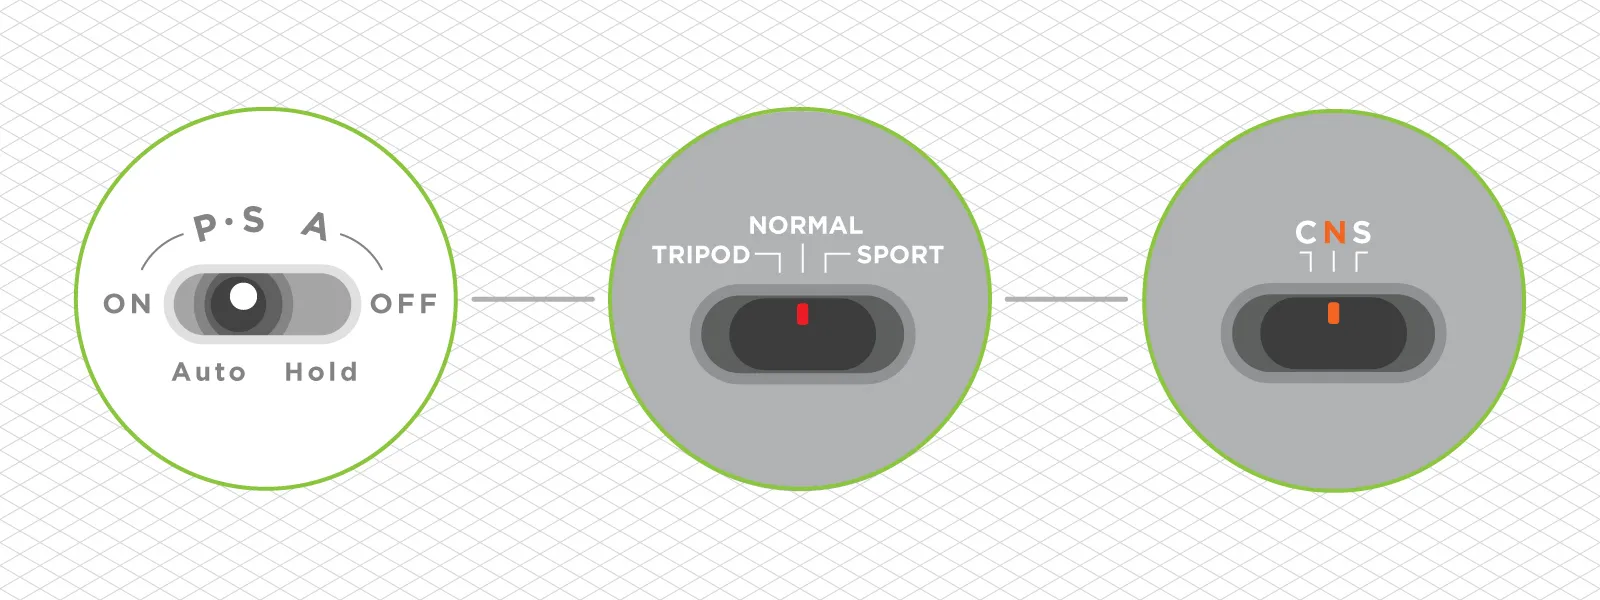
DJI drones had different flight modes from the very beginning. At first, we had A P and S modes, which stood for ATTI (altitude), positioning (GPS), and Sport. When the Mavic 2 drones came out, DJI replaced altitude mode with Tripod mode, making the drone fly slowly and smoothly, ideal for more peculiar situations like indoor flying. Later, the Tripod mode became cine, but the speed of the new cine mode increased dramatically. In reaction to this, filmmaker Philip Bloom created a petition, which was highly successful. Then DJI made the last change and added custom speed settings for all modes. Now, the Cine mode can have any maximum speed we desire.
Slow Speed
Slowing down your drone makes it easier to control, reducing the chance of hitting something. It is essential in situations where spaces are tight and there are a lot of obstacles. Examples are indoor flights, flying in the woods, under bridges, close to the ground, and many others. For us photogrammetry enthusiasts - precise speed control with numbers means we can achieve proper overlap between consecutive photos, which is one of the fundamental requirements for successful 3D scans.
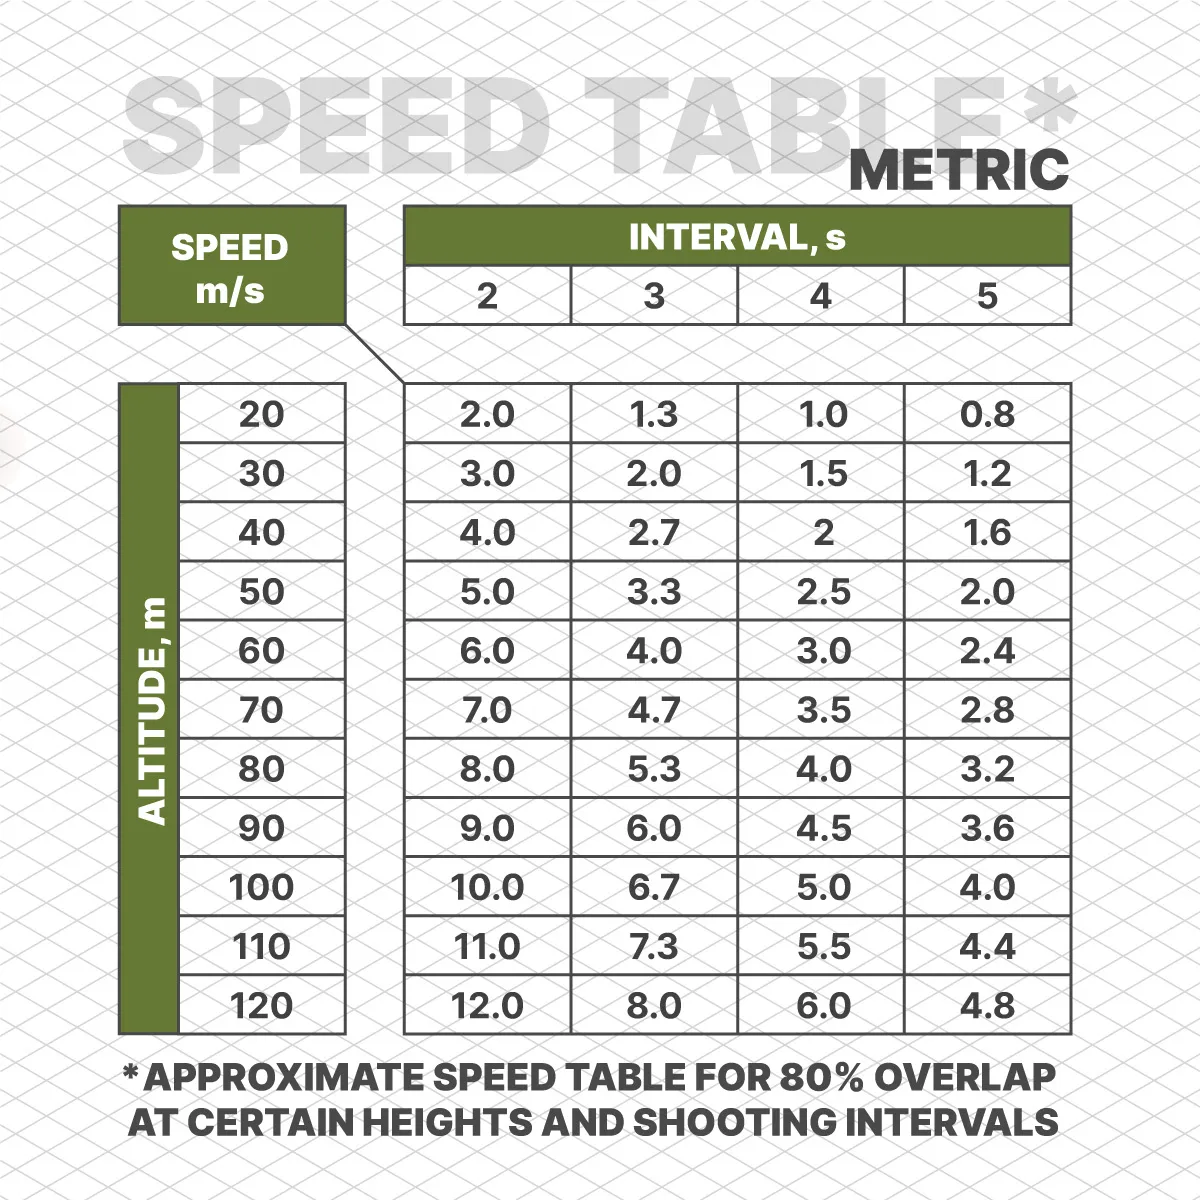
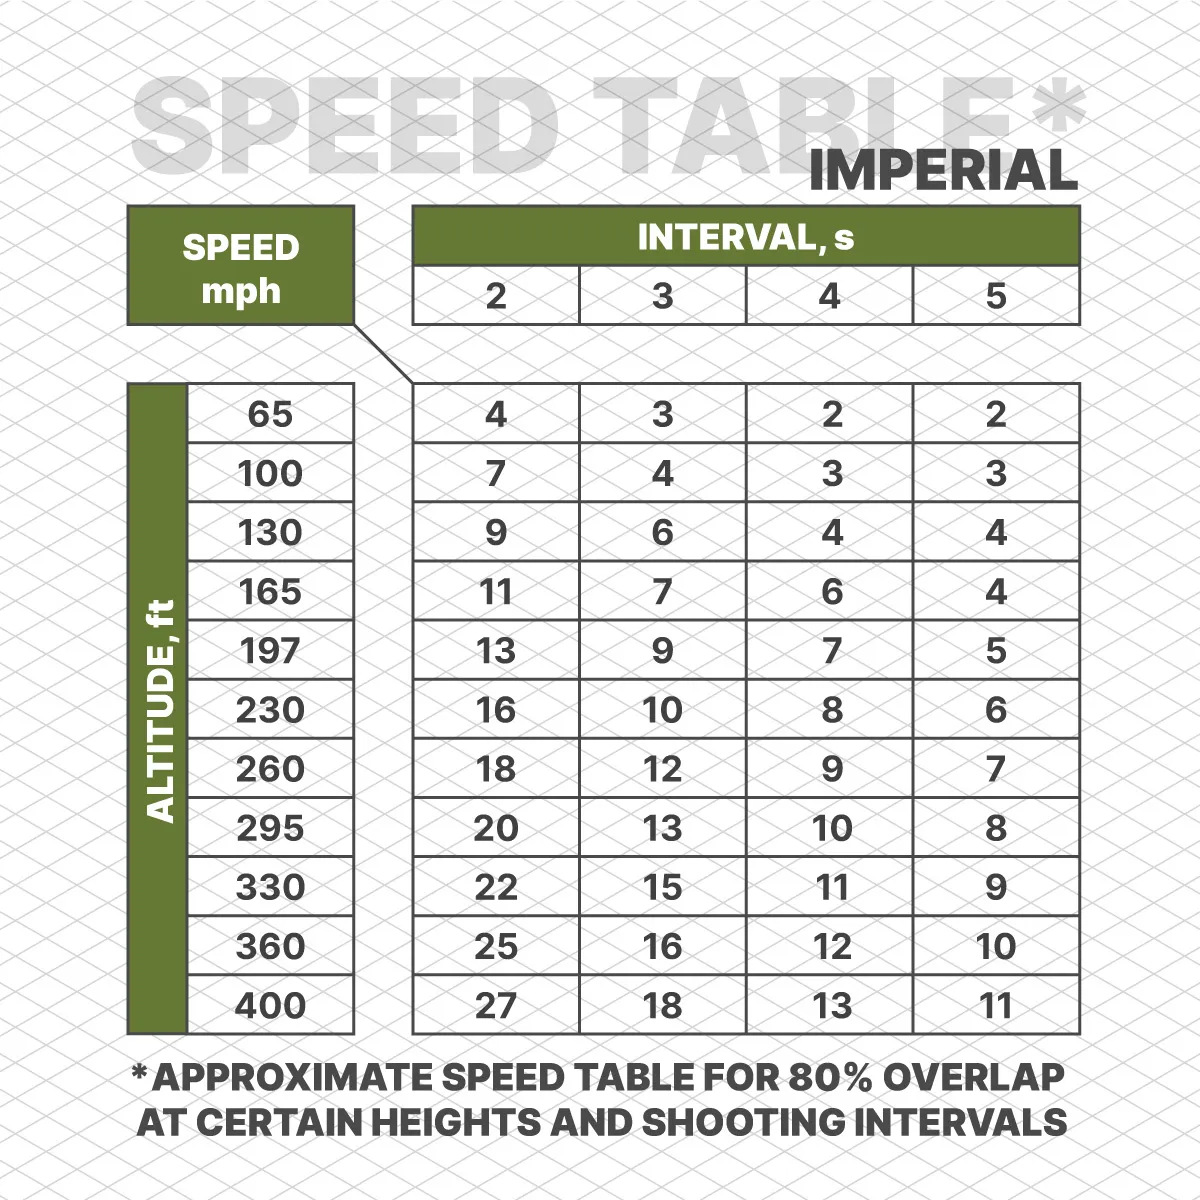
We must consider two other variables before setting our speed - photo interval and flight altitude. These are easy to control with a drone. Photo interval is a setting for interval shot or hyperlapse modes anywhere from 2 to 10 seconds. Altitude is how high you choose to ascend before starting the mission. The app permanently displays the approximate current flight height above the take-off point.
We can calculate the required speed for the desired overlap by knowing these variables. We always recommend 80 percent overlap for all photogrammetry missions. You can get a precise speed value for your drone using our photogrammetry calculator. Save the calculator to your personal Google account and enter your data as required. But if you need a quick and rough estimation, we prepared a table to achieve 80 percent overlap. This table will help you to get a speed value in meters per second for the standard 1x camera on your drone:
 |
 |
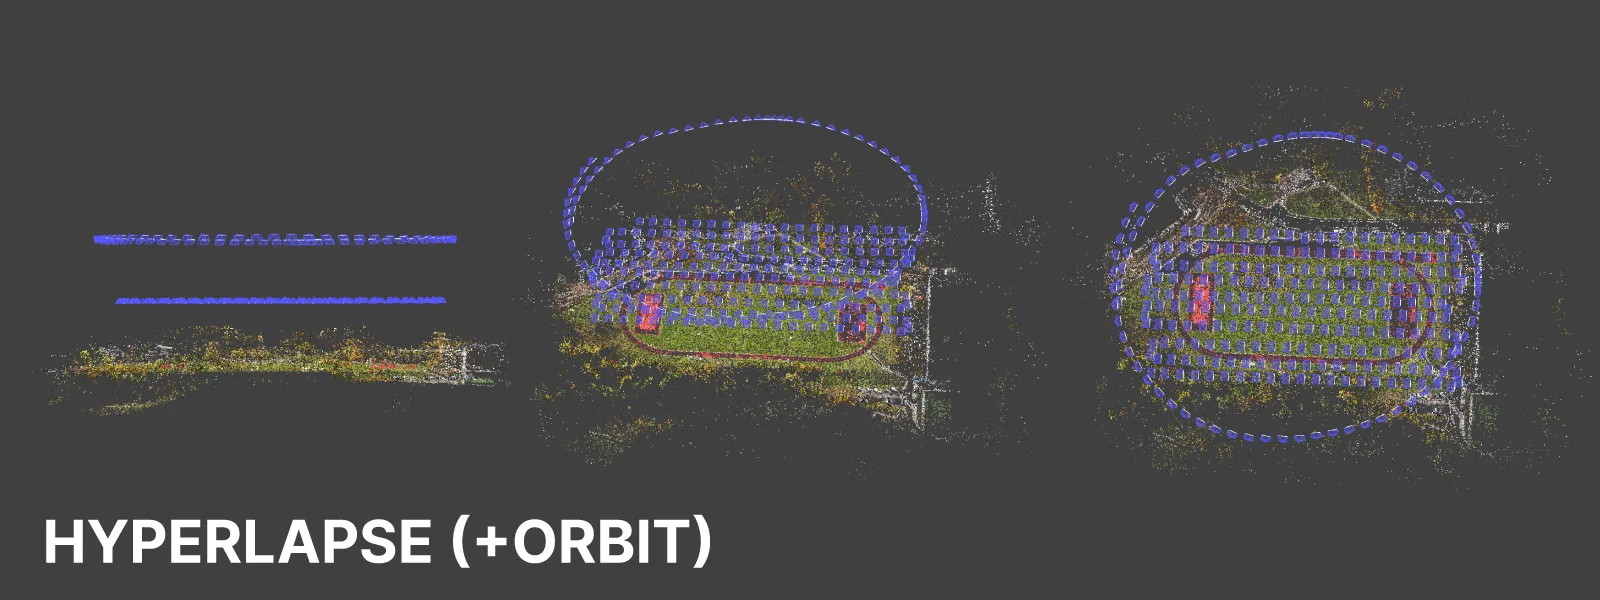
Hyperlapse vs. Timed Shot
We always recommend the technique used in our manual nadir photogrammetry article, which involves flying in a grid pattern at a constant speed. When we wrote that article - there were no such capabilities for setting the speed limit. Hence, the speed depended on the pilots' ability to steady the sticks. Now, we need not think about that and push the control stick to the maximum with the speed set precisely in the app.
It makes manual aerial photogrammetry even more accessible and more consistent for everyone. To limit our speed and take photos, we have two approaches:
1. Timed shot photo capture and a global maximum speed setting for the Cine flight mode.
2. Free hyperlapse capture mode with a speed limit set in the hyperlapse interface. This limit is set for each hyperlapse shot individually.
You can get similar results with both approaches, but the hyperlapse shooting mode has a few caveats. First, the maximum speed for all hyperlapse modes is 3 meters per second. So, if you are flying high and require a higher speed - this may not work. Second - you will have to wait until the drone completes the video from the photos you have taken before shooting anything else. And finally, hyperlapse modes do not limit the ascent or descent speed of the drone.
Keeping this in mind, we recommend using timed shot capture mode and flying regularly with a fixed speed limit for all grid-like missions. Hyperlapse mode is the most useful in orbital capture, and it is how we create most of our orbital scans because timed shot capture is not available during subject tracking POI mode (for some inexplicable reason).

Cruise Control
Another tool that may help for consistency is cruise control. If you do not want to hold the controller sticks - you can tap the cruise control button, and the drone will keep its current speed and course during the flight. It is handy for larger area scans when holding the stick at maximum position may be cumbersome. Combined with timed shots and speed settings - this is quite close to an autonomous flight. Remember that you will not be able to alter the course of the drone until you deactivate the cruise control.
Additional Notes
To avoid motion blur in the photos - camera shutter speed is a priority to flight speed. If necessary, increase the photo capture interval to reduce the flight speed or increase the camera shutter speed to avoid blurry photos. There is no point in having the correct overlap if your images contain motion blur.
When you set a maximum speed for Cine mode, the acceleration will also reduce. Therefore, the drone will take a few moments to reach the top speed, even if the top speed is as low as 3 meters per second—just a thing to keep in mind.
The speed tables or calculations do not apply to orbital flights. When flying around a target, the overlap calculation gets more complicated. The great thing is that orbital scans are less sensitive to lesser overlap, and it is usually relatively easy to take "enough" photos. Use a safe value between 1.5 to 3 meters per second for most orbital flights with a 2-second interval capture.
You can safely use the same speed calculation if you are doing any type of grid flight, including oblique grids with any camera angle and even vertical scans. Of course, with a vertical scan, the altitude becomes the distance to your subject while speed becomes your drone's movement speed up and down or side to side. Finally, all speed calculations apply to waypoint flights just as well.
Conclusion
Speed is a simple but essential concept in photogrammetry. Speed enables proper photo capture with required overlap impacts, motion blur in the photos and overall mission length. The control we get with the latest drones allows us to do consistent manual photogrammetry without needing third-party apps or expensive enterprise-grade drones with automatic flights. If you are unsure what speed will give you the required overlap for 3D reconstruction - use our calculator or the tables, and you will succeed.
Photographer - Drone Pilot - Photogrammetrist. Years of experience in gathering data for photogrammetry projects, client support and consultations, software testing, and working with development and marketing teams. Feel free to contact me via Pixpro Discord or email (l.zmejevskis@pix-pro.com) if you have any questions about our blog.
Related Blog Posts
Our Related Posts
All of our tools and technologies are designed, modified and updated keeping your needs in mind
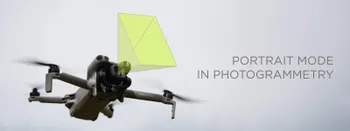
Portrait Orientation in Photogrammetry: When It Actually Helps
Is there anything to gain by scanning in portrait instead of the usual landscape? Sometimes, a little. But orientation is one of the least important decisions you make on a scan, and it is worth understanding why before you give it any more thought than that.

Better Photogrammetry Results Without Buying New Gear
Every time a new drone or camera comes out, the same thought appears: this is the upgrade that will finally fix my results. Sometimes it is even true. But in my experience, the gap between a mediocre scan and a great one is rarely the hardware.
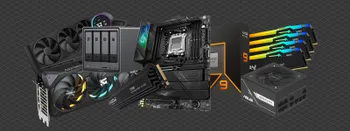
Workstation PC 2026 – PC Build Hardware Advice
Another year, another look at the workstation PC market. The thing is, last year's advice still mostly stands, and that tells you everything about 2026. Almost nothing got faster, and almost everything got more expensive.
Ready to get started with your project?
You can choose from our three different plans or ask for a custom solution where you can process as many photos as you like!
Free 14-day trial. Cancel any time.
Welcome to Pixpro
Sign in
And access your account.