.svg@webp)
RAW Photo Processing for Photogrammetry
 Lukas
Zmejevskis
Lukas
Zmejevskis
Input data is the most critical factor in photogrammetry, bar none. If we want to maximize the quality and flexibility of the photos we take for 3D reconstruction - we must do initial capture in raw format. In essence, the raw format provides all the valuable and redundant data captured by the imaging sensor. In most cases, we need to convert raw files to something compressed and usable by photogrammetry software after making various adjustments. This article will show our simple raw conversion workflow and philosophy by which we process raw photos for photogrammetry.
Software for Raw Development
From mid to high-end smartphones, drones and the vast majority of dedicated cameras will allow shooting photos in raw, jpeg, or both types of files simultaneously. While these devices will display raw images on their screens, we must process those photos to share or use them anywhere else. For that - most people use desktop computers with dedicated software.
There are over a dozen raw photo converters, most of which are not free. We stick with the Adobe Lightroom Classic - the original raw development desktop software. But all alternatives do the same thing and have identical features with similar names. There will be subtle differences in results depending on which software you use. Still, these should be fine with photogrammetric 3D reconstruction down the line.
For a free alternative to Lightroom Classic, you can go with Darktable. The software is not as smooth or refined as the paid alternatives. Still, it will allow you to take advantage of raw development for no additional cost.
Raw Photography Cons and Pros
Shooting raw does have its positives and negatives. Our summary:
Cons of shooting raw:
-
Larger file sizes - raw photo files are much larger than jpegs, and that will cost your storage and time during file transfer.
-
Additional workflow - more processing steps means the entire process takes longer to complete.
-
Additional software cost - most raw development software means more money spent and requires learning a new thing.
Pros of shooting raw:
-
Raw files allow for maximum image quality via control of various properties.
-
Raw files allow maximum visual consistency with white balance and general exposure control without significantly impacting image quality.
-
An additional process is an extra inspection step, which helps verify the photo set quality and catch any irregularities.
Should You Shoot Raw for Photogrammetry?
Whether you should bother shooting in raw format and going through the process of adjusting your photos is dependent on your needs and use cases. Suppose you mainly do measurements and technical photogrammetry for survey purposes. In that case, you only need to bother with raw processing if there are image quality issues. For example, if you need to work during more extreme lighting conditions - early morning or sunset and a high dynamic range scene is causing some trouble.
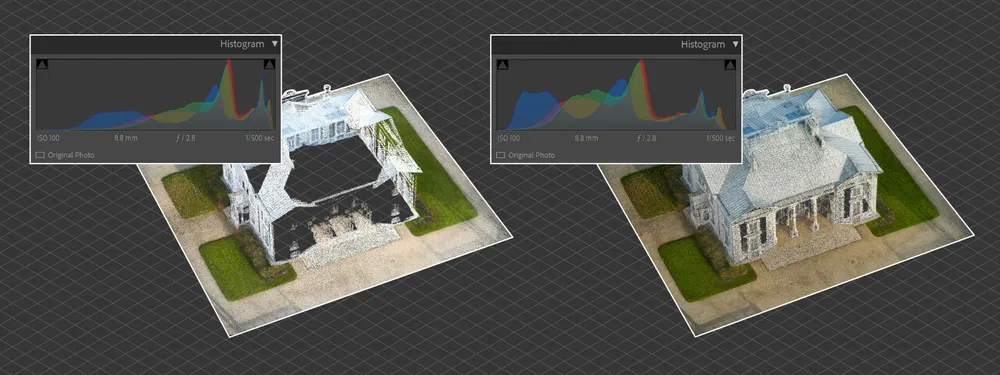
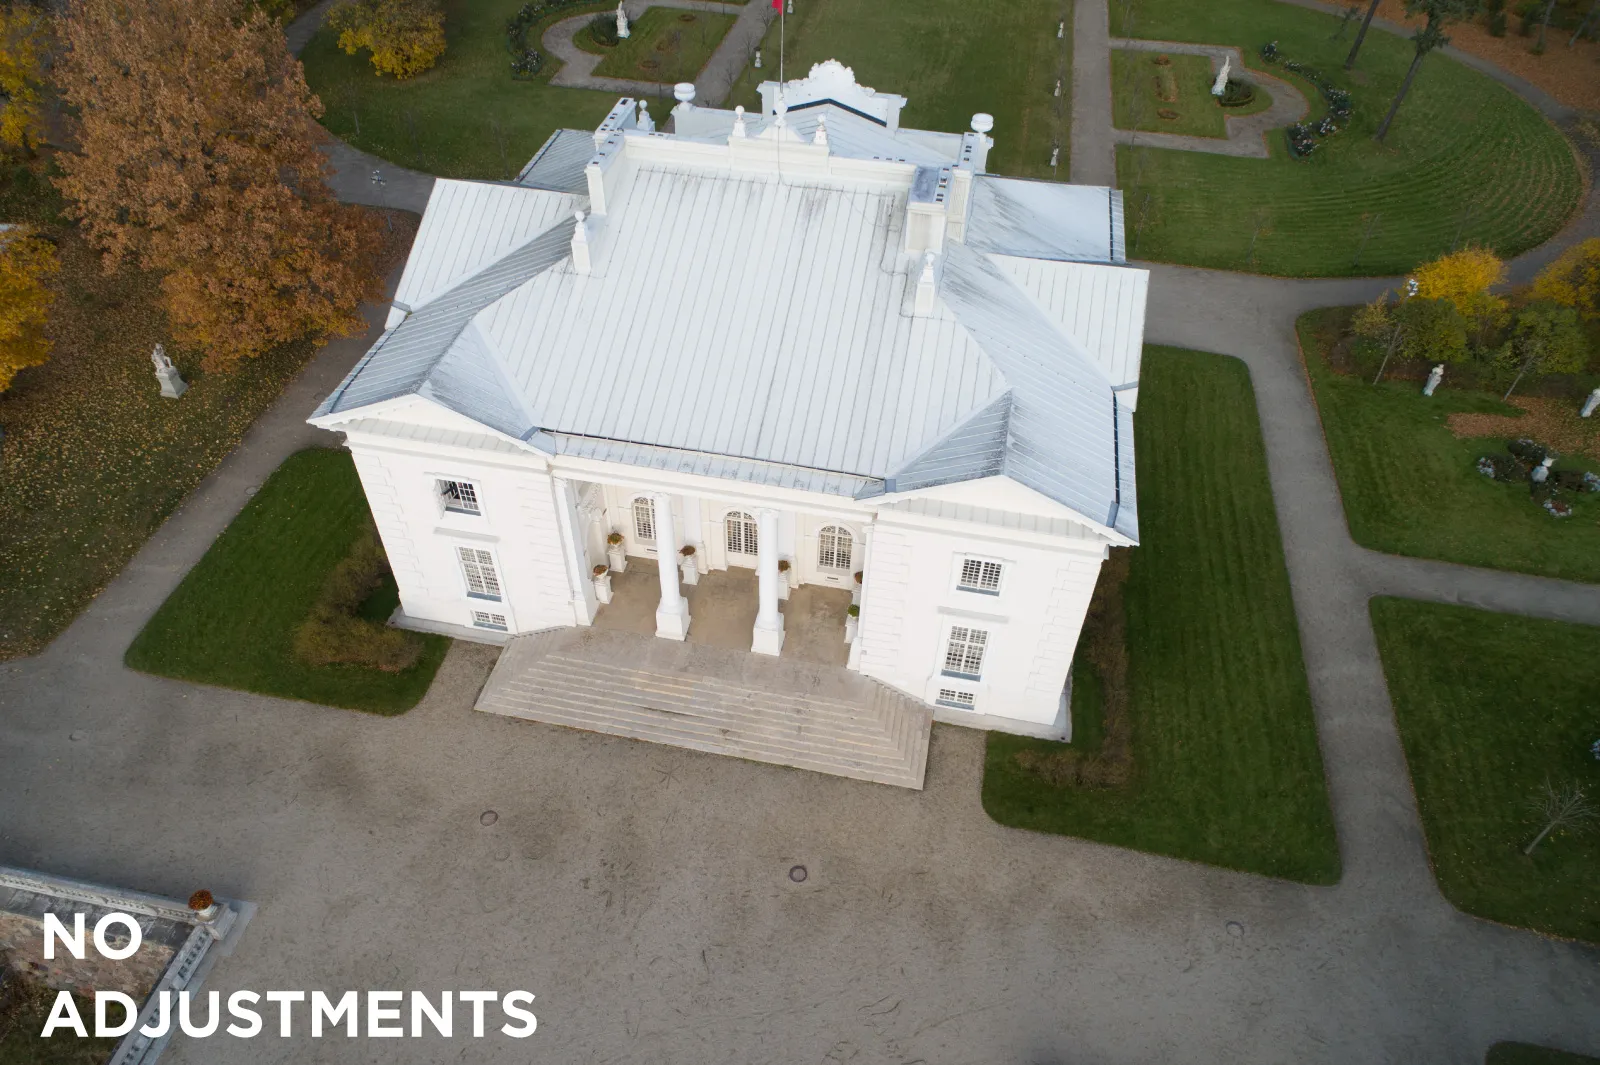
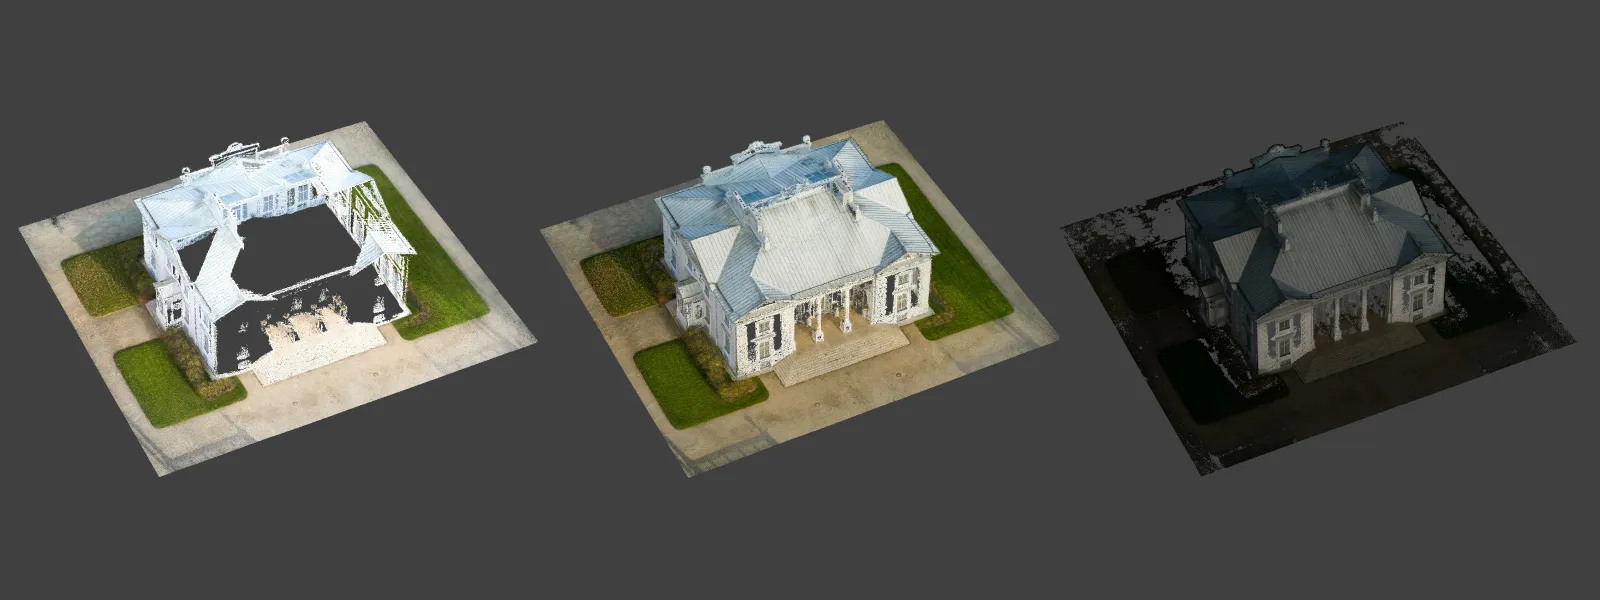
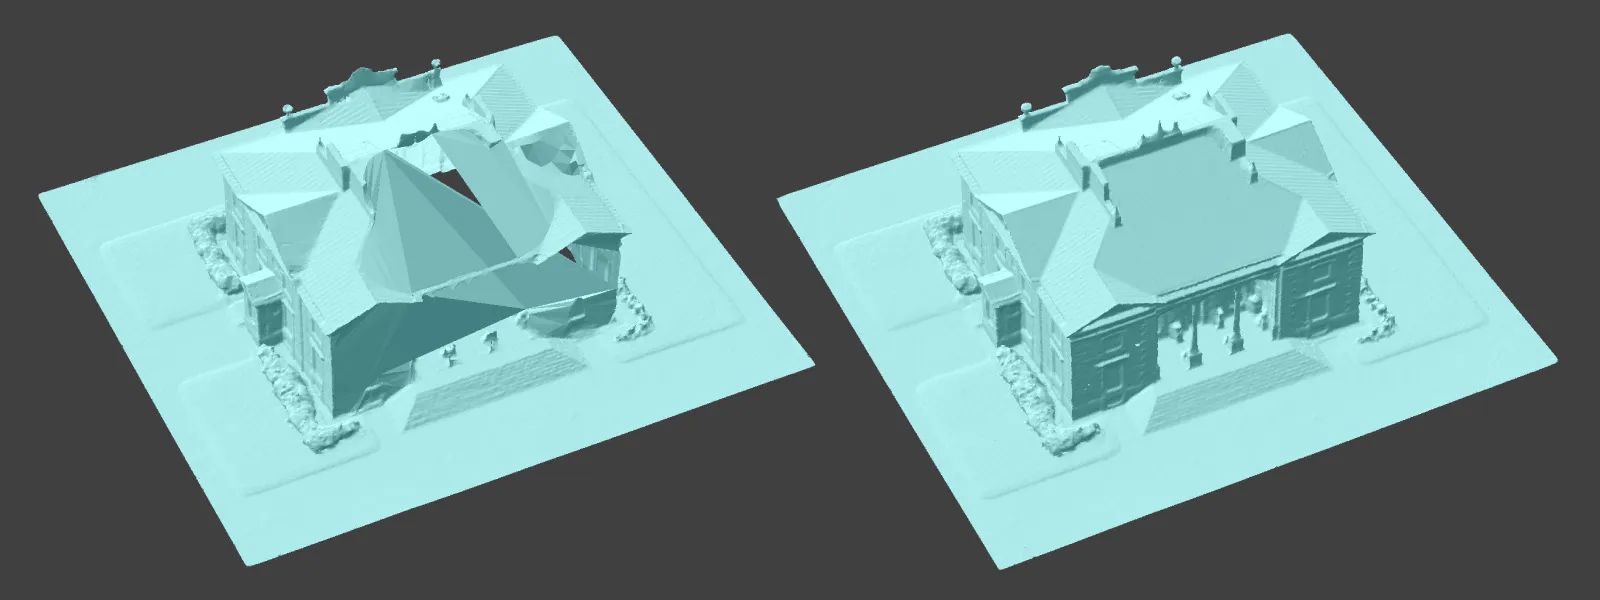
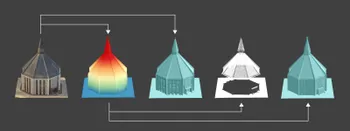
If you care about the overall appearance of your project, showing your client, friends, or a neat 3d mesh texture itself is very important - the raw processing step can be a great tool in your arsenal. Sound raw processing can also help with the 3D reconstruction by bringing details that would otherwise be lost. To illustrate the loss of detail, we made a few artificial examples showing how overexposed (too bright) and underexposed (too dark) photos look and what 3D reconstruction results they provide.
Our Raw Processing
Raw processing for photogrammetry is straightforward and technical, as we maximize image quality and realism instead of creativity or aesthetics. We shall demonstrate how we process raw images by showing what adjustments we make in the Lightroom Classic.
Basic Adjustments
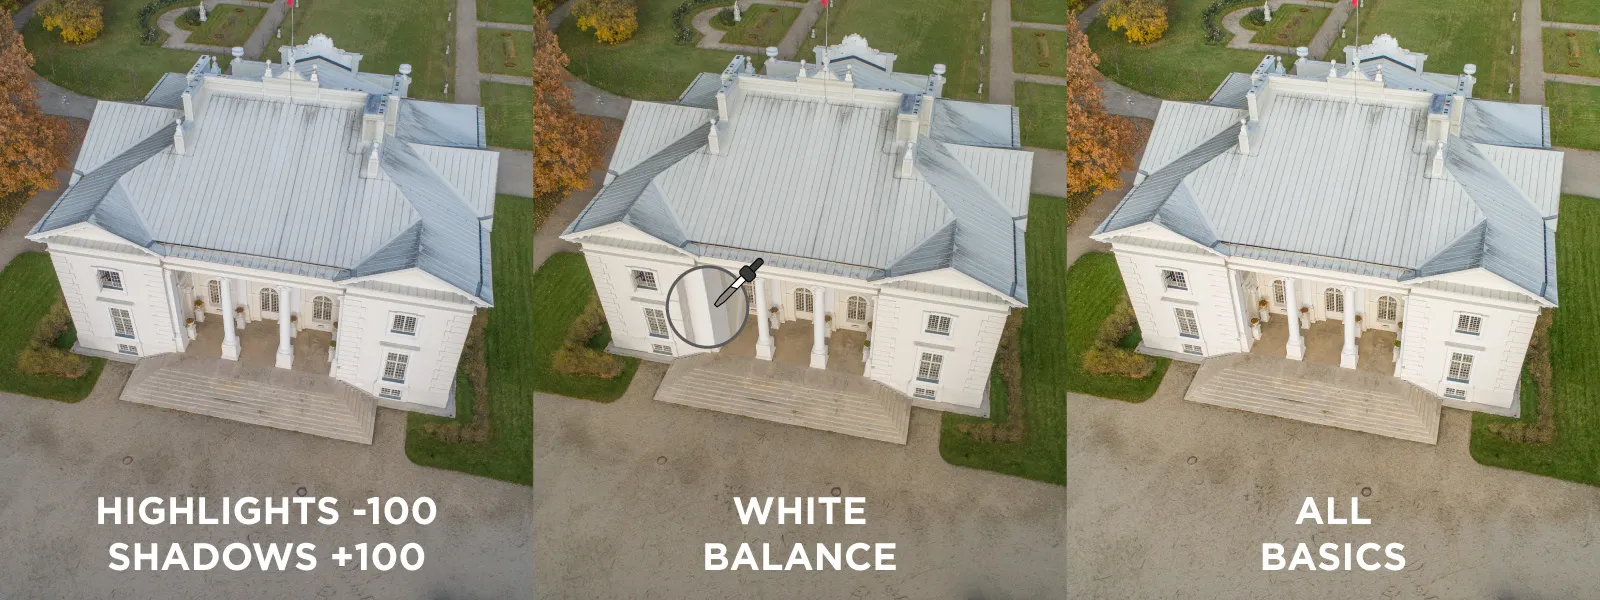
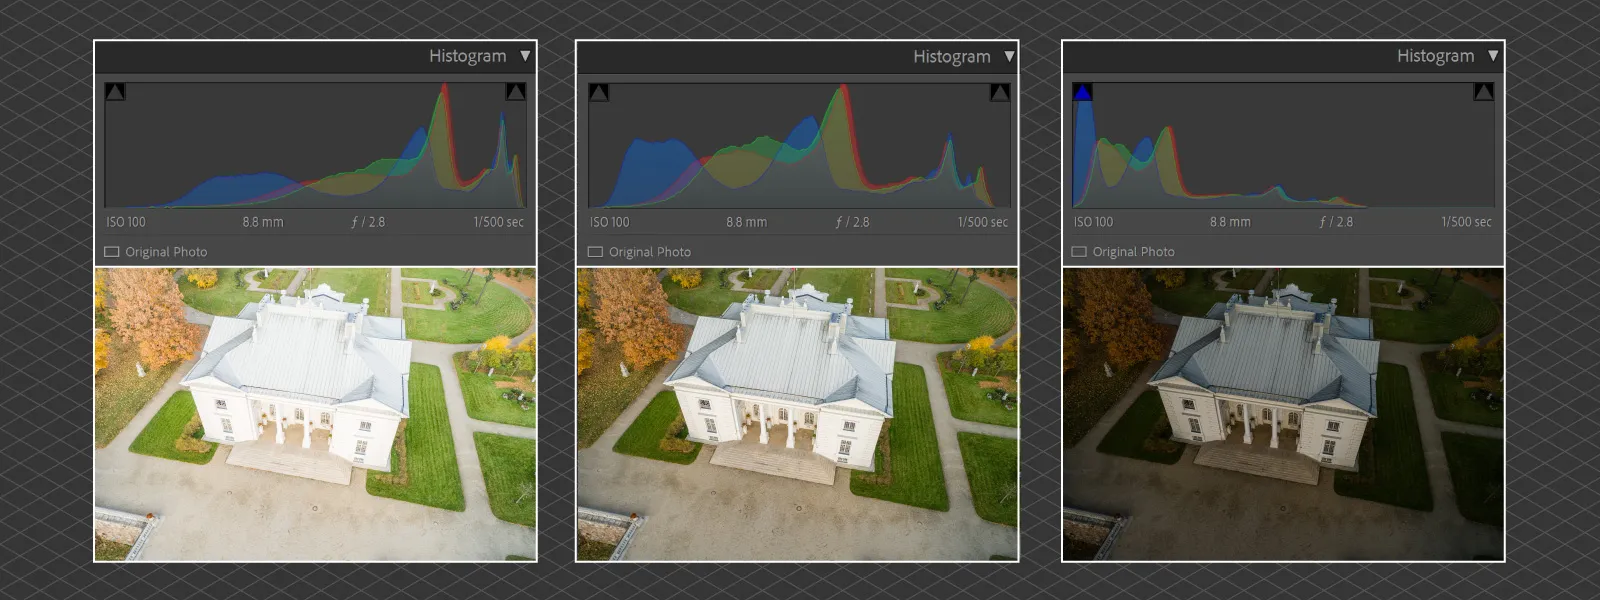
Our most extreme adjustment is pushing highlights and shadows to -100 and +100, respectively. It recovers all of the detail hidden in dark and bright areas of the image. The consequence of these adjustments is a heavily reduced contrast.
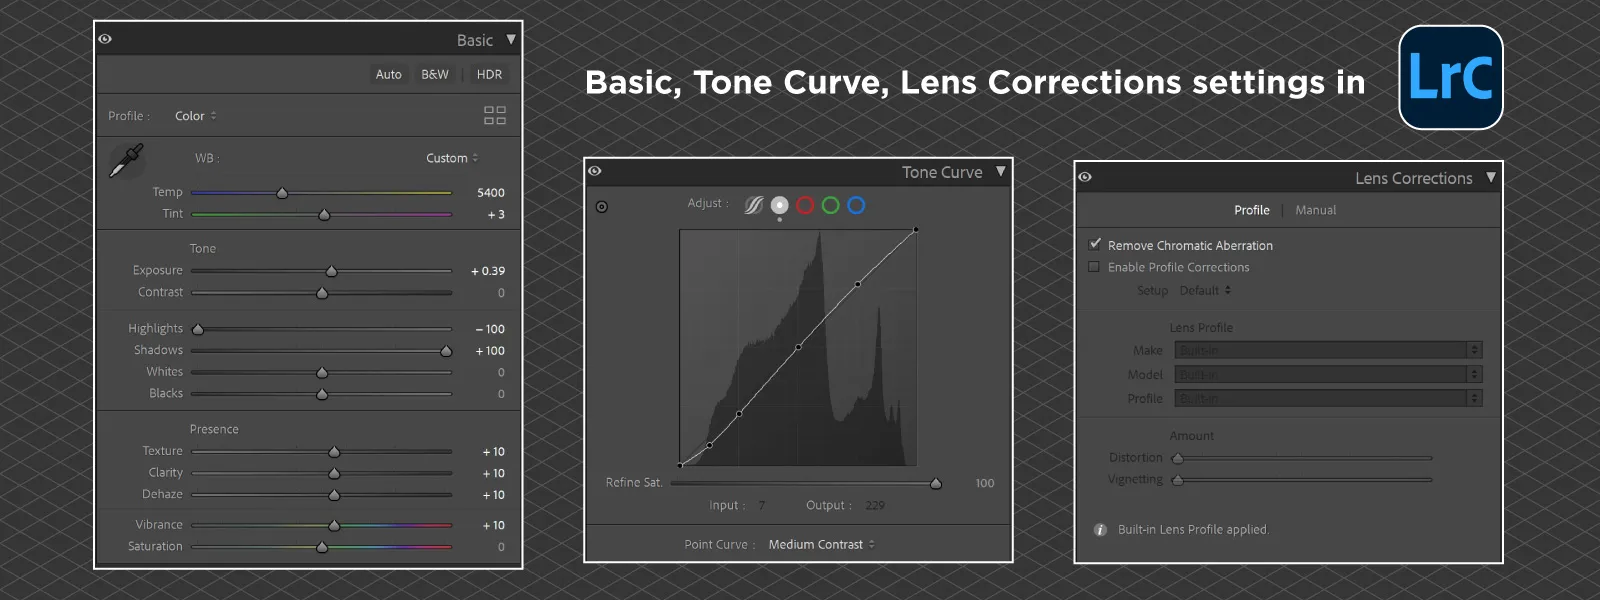
We choose either a custom value or use the picker tool on a neutral gray or white area for white balance. In the case of our example, the wall of the white manor in a shadowy area serves as a good reference. It gives us a warm tone for the entire image, which is also entirely accurate for our subject. We also add some texture, clarity, dehaze, and vibrance to give the photo more punch. But these are only +10, so we do not make things too artificial.
Lastly, the exposure slider represents the overall brightness of the photo. The exposure must be adjusted manually for each photo set if the images are too dark or bright. The best tool for evaluating that is the histogram. We will not delve deeper into how to use a histogram this time, but the essence is that you want to keep the graph in the middle of the scale, not bunched up to a single side. See examples below:
Tone Curve
We chose a medium contrast setting in the tone curve section to bring some contrast back. Manipulating the curve is the best way of controlling contrast in raw development software. You can use strong contrast instead if you are processing photos from a high-quality camera. Photos from large camera sensors have an even broader latitude for processing, and we can allow ourselves to have more contrasting images.
Lens Corrections
For lens corrections, we always enable chromatic aberration correction. But here, we have a few additional caveats. First - in our example, we see the Built-in Lens Profile applied tip on the bottom. It means that the distortion correction sits baked into the file, and there is no way of turning it off quickly. Our examples are from the DJI Phantom 4 Pro, and this is the way DJI handles photo distortion correction, even in raw files.
Otherwise, we would see the option to check the “Enable Profile Corrections” checkmark. It would use a profile available in Lightroom to correct for vignetting and distortion. Whether to use this option for photogrammetry is a point of discussion, and we do not have a definitive answer. For now, we suggest enabling this checkbox if the profile is present.

Other Adjustments
If you are familiar with Lightroom Classic, you immediately notice that we left a lot of potential adjustments untouched. That is because the default values of all other panels are OK and should not be touched unless you know what you need to achieve with further alterations. We avoid tools like brushes, transformation, and cropping altogether.
Synchronizing and Saving
We can synchronize the changes we made between all the photos in the set. You can select all pictures and click on synchronize in the develop tab. If you want to begin learning how to use Lightroom Classic - we suggest this video to start with:
The same settings for all of the photos may not work in some cases. For example, if the lighting changes drastically during the shoot. In a future article, we will explore how to deal with such situations and the value of the Match Total Exposures tool in Lightroom with more advanced tips.
Now that all the changes have been made and synchronized between the set photos, we need to export these photos as JPG format files. When exporting images for photogrammetry - there are a few essential options to keep track of:
-
Do not resize the images, ever. We always use original file dimensions for photogrammetry.
-
Include all of the metadata. Essential for aerial photos which contain GPS information in their metadata.
-
Do not add any watermarks.
-
Do not add any output sharpening.
File naming is a personal preference; it can help to track your project better, and for JPEG quality, we recommend a value of 70 - a good middle ground between file size and visual fidelity. You can input these photos into your photogrammetry software when the export is complete.
Conclusion
Post-processing is not a cure for a poorly captured photoset. But if you have your capture honed down and wish to push further, taking advantage of raw files is relatively easy to begin. By following our short guide and copying the settings and workflow, you are close to maximizing the benefits of raw photography for photogrammetry. If you do not like the results our settings give you - now you have the basic knowledge to process to your taste, but remember - a heavily creative look may differ from what you need for photogrammetry.
Photographer - Drone Pilot - Photogrammetrist. Years of experience in gathering data for photogrammetry projects, client support and consultations, software testing, and working with development and marketing teams. Feel free to contact me via Pixpro Discord or email (l.zmejevskis@pix-pro.com) if you have any questions about our blog.
Related Blog Posts
Our Related Posts
All of our tools and technologies are designed, modified and updated keeping your needs in mind

Why Choose Pixpro Photogrammetry Software? Practical Comparison
There is no shortage of photogrammetry software today. From well established industry tools to newer cloud based solutions, the choice is not exactly obvious, especially for someone just getting started. Most options promise high accuracy, automation, and ease of use, and to some extent they all del
3D Point Clouds in Pixpro: How to Convert and Export Spatial Data
Photogrammetry software produces several types of spatial outputs, but the dense 3D point cloud is the foundation of them all. In Pixpro, the dense point cloud acts as the base dataset from which every other derivative is generated.

How to Create and Import a KML File in Pixpro Waypoints
We are continuing our improvements to the Pixpro Waypoints service and bringing a few small updates. Pixpro Waypoints is a service that allows automatic photogrammetry flights with consumer grade DJI drones using a bit of workaround magic.
Ready to get started with your project?
You can choose from our three different plans or ask for a custom solution where you can process as many photos as you like!
Free 14-day trial. Cancel any time.