.svg@webp)
DJI Lito X1 for Roof Photogrammetry: Solar and Inspection Use Case
 Lukas
Zmejevskis
Lukas
Zmejevskis
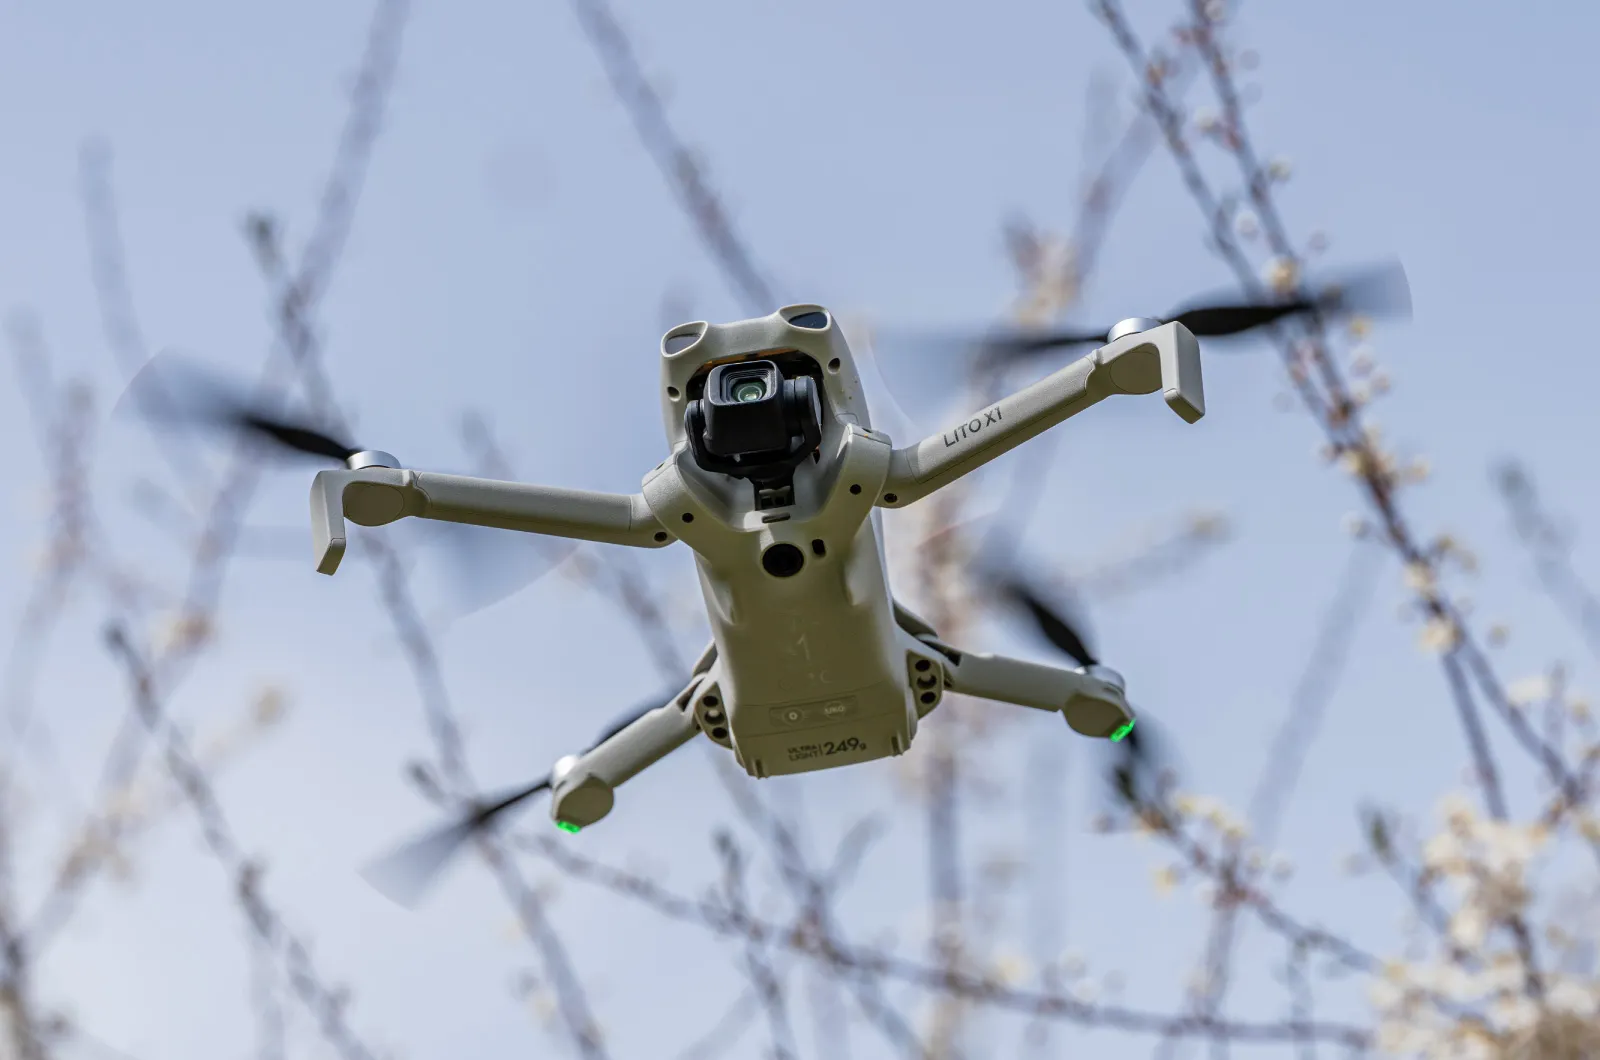
Small drones are the best tool for residential and even commercial roof photogrammetry. They are quiet, attract less attention, are easier to fly fully within regulations, and they are cheap. The best one available right now is the DJI Lito X1, the latest sub-250 gram offering from DJI, capable of essentially everything every other modern DJI drone can do, in a small and affordable package.
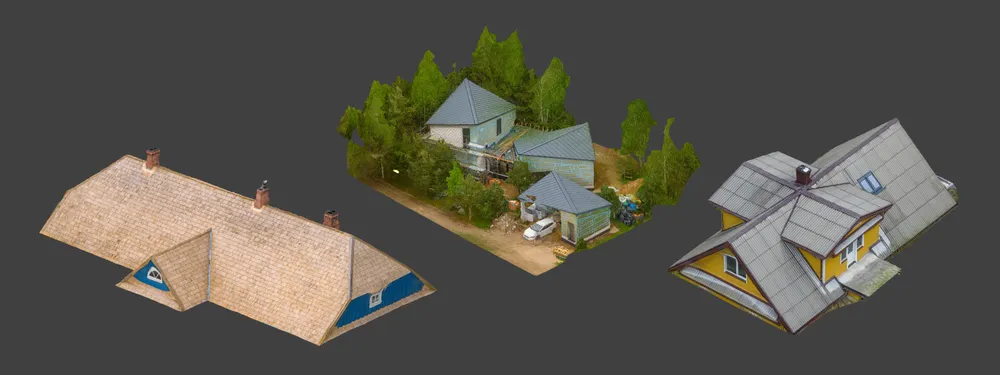
For this article I scanned three different roofs with the Lito X1: a recently renovated old building with traditional shingles, a simple residential house with an older but well-built roof, and a property with three modern metal roofs ready for solar installation. Each one used a different workflow, which gives a clean side-by-side of when to reach for which method.
 Three Photogrammetry Workflows for Roof Scanning
You can do aerial roof photogrammetry with the Lito X1 using three main approaches: fully manual flying and shooting, semi-automated hyperlapse circle scanning, and fully automated flights with Pixpro Waypoints. I covered all three in depth in the DJI Lito X1 for Photogrammetry article. Here is the short version, just enough so the rest of this post makes sense if you are reading it cold.
Manual photogrammetry is exactly what it sounds like. You fly the drone yourself, time the shutter yourself, and ensure the three fundamentals (image quality, overlap, and coverage) by hand. It is the most flexible approach, but also the least convenient. I find myself using it for close-proximity work or for filling in gaps where automated flights cannot reach. For the examples in this post I did not need it.
Hyperlapse circle scanning is the semi-automated middle ground. You select a subject on screen, the drone flies an orbit around it on its own, and you set a timed interval for photo capture. The cropped hyperlapse video that the drone produces is not the point. The point is the original full-resolution photos, which you can save if you enable the relevant setting before flying. This is the best method for spontaneous scans where you have no time to plan.
Pixpro Waypoints is the fully automated workaround made by us - photogrammetrists. It plans a grid, orbital, or multi-grid flight for you, calculates the correct photo intervals based on diameter and altitude, and exports a flight plan you load into the DJI Fly app. It is the most reliable method when you actually want predictable coverage and consistent overlap. Two of my three roof scans below used it.
Hyperlapse on a Renovated Traditional Shingle Roof
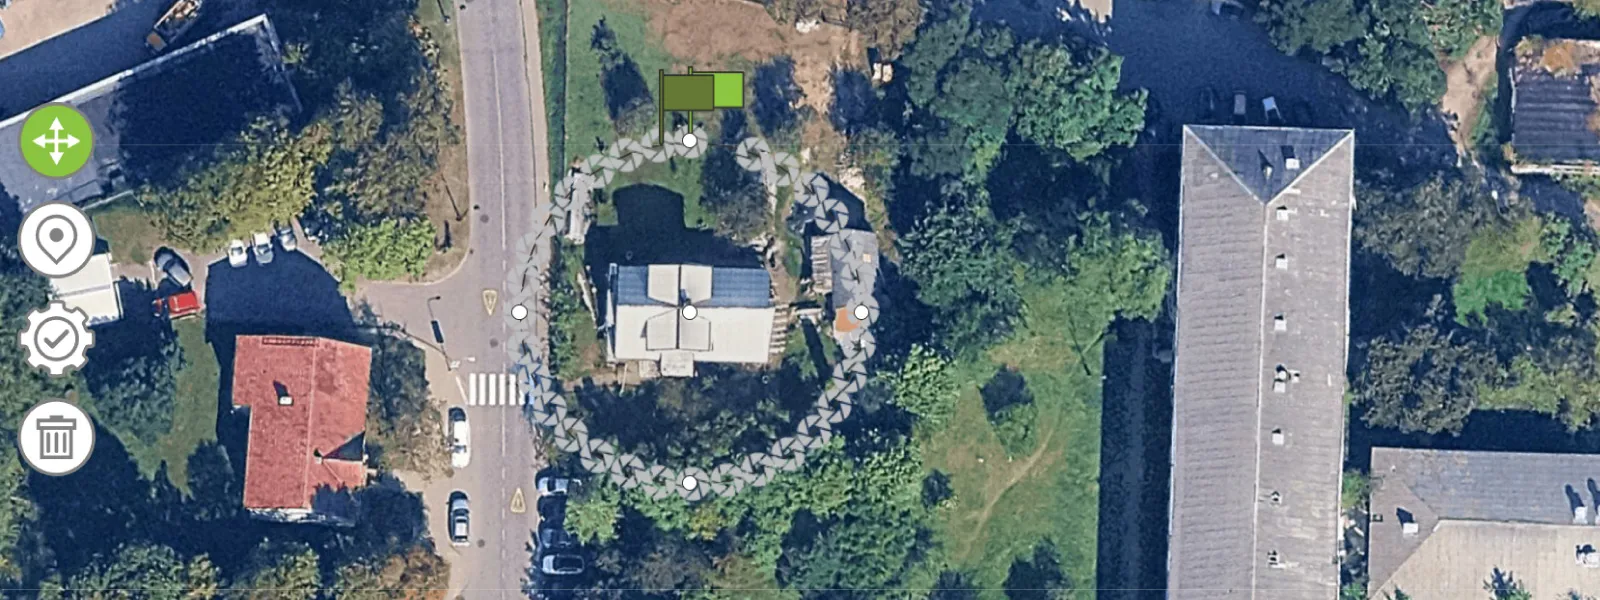
The first scan was a recently renovated old building with traditional shingles. I used DJI's circle hyperlapse mode. I selected the roof as the subject, set the photo interval to match the orbit speed, and let the drone fly around it on its own.
 The thing to balance in hyperlapse mode is the speed and the photo interval. Too few photos and you do not have enough overlap. Too many and you are wasting storage and processing time on near-duplicates. I always aim for at least 30 photos per orbit on small subjects, and proportionally more as the orbit diameter grows. This takes a bit of experience to get right, but once you have done it a few times it becomes intuitive. Most of my spontaneous photogrammetry sessions are combinations of hyperlapse orbits and a few manual passes filling in details, and that is exactly what happened here.
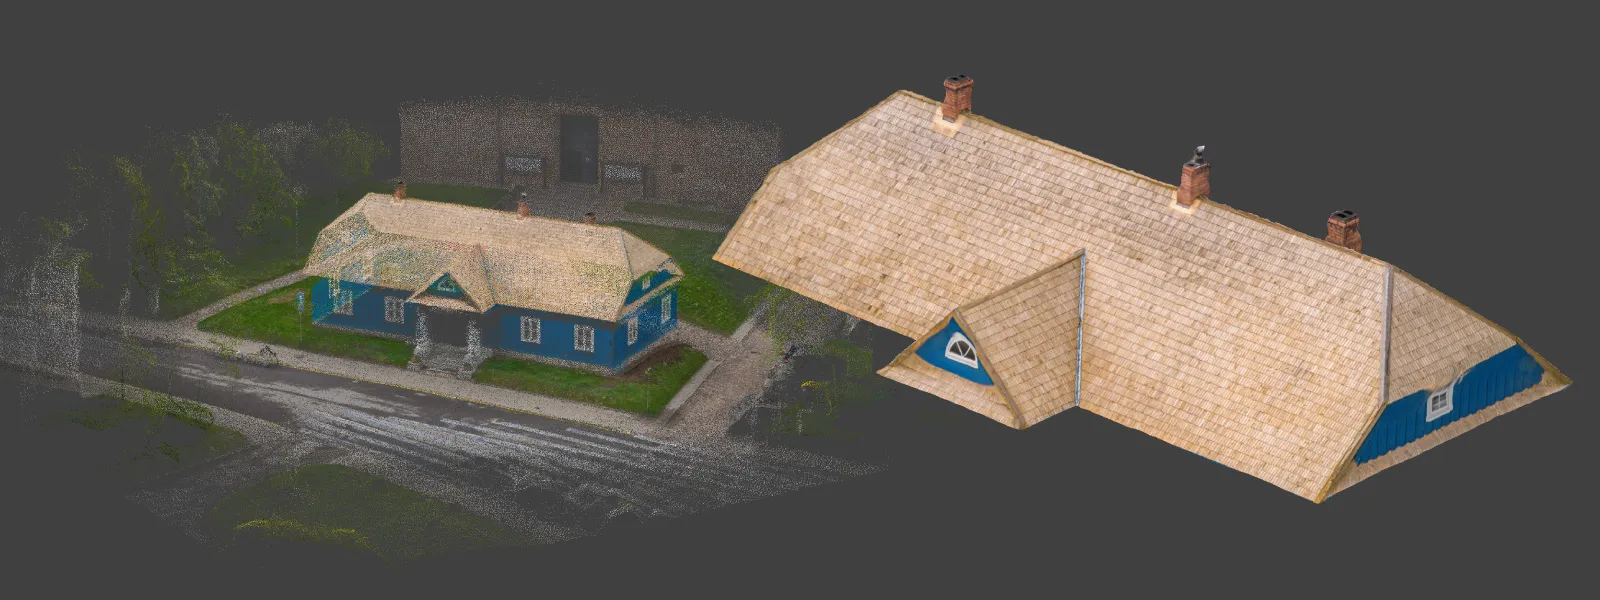 The big practical advantage of hyperlapse is that it needs zero preparation. You do not plan a mission. You do not draw a polygon. You just point at the subject and fly. For a renovated shingle roof with plenty of natural texture, the resulting 3D model came out clean and measurable.
Residential Roof Scan with Pixpro Waypoints Orbits
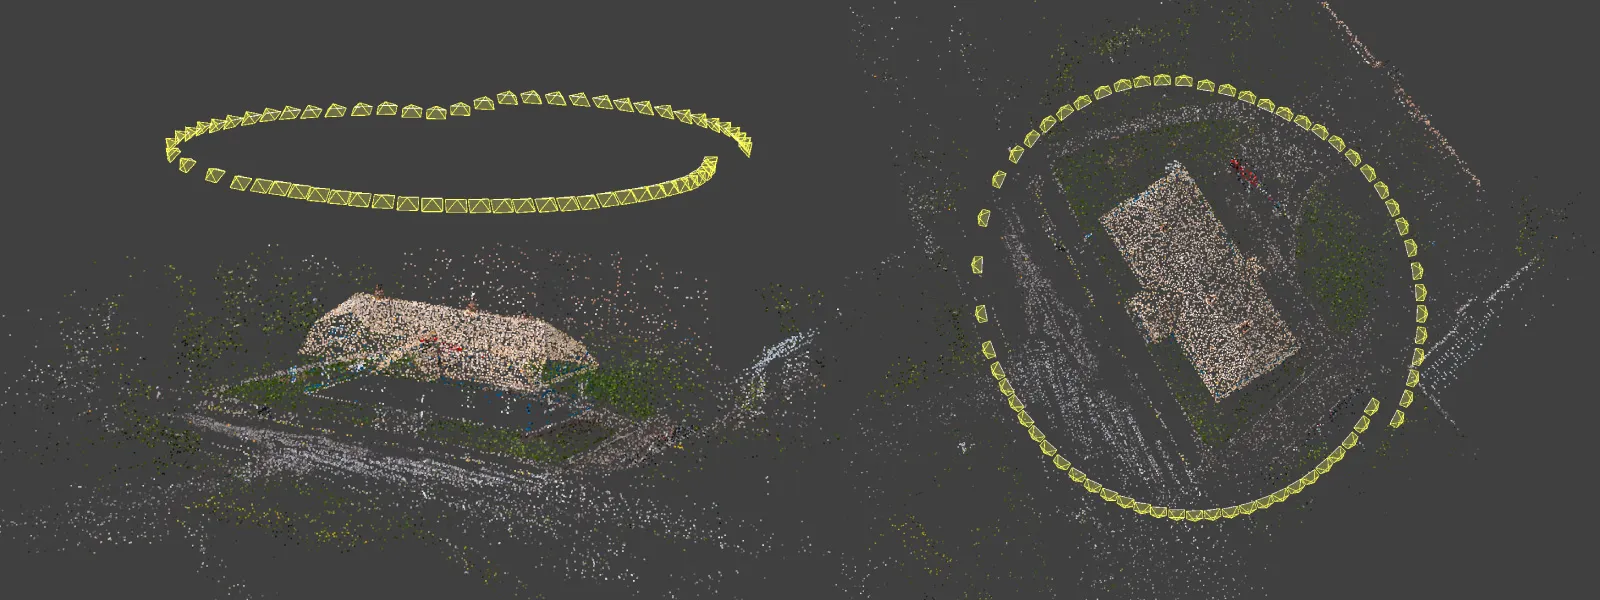
The second scan was a simple residential house, older roof, nothing exotic. I planned multiple orbits in Pixpro Waypoints and ran them through the DJI Fly app.
 Orbital flights in Pixpro Waypoints calculate the right number of photos for the orbit diameter automatically. There is no guesswork about the speed-to-interval balance because the service handles it for you. That alone is a meaningful advantage over hyperlapse mode if you actually care about coverage consistency.
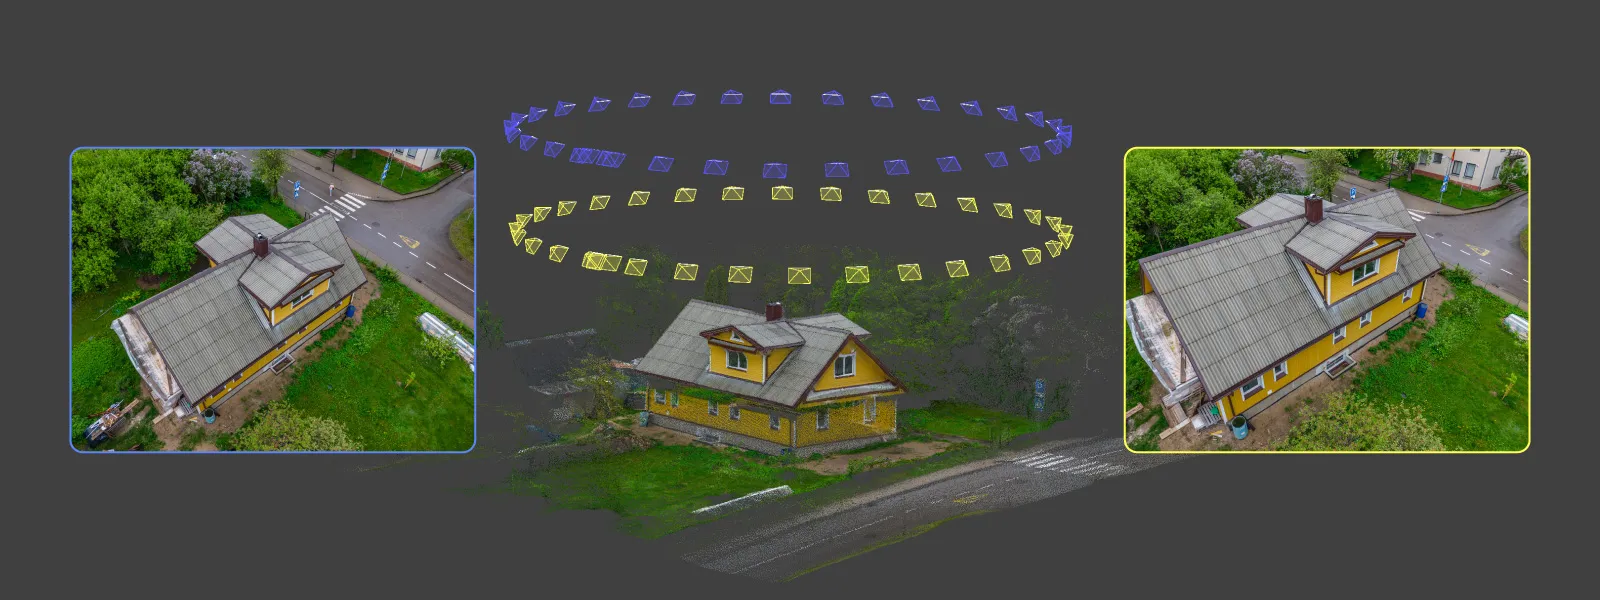 The feature that does not get talked about enough is that you can re-fly the same orbit at different altitudes. You set the diameter and the orbit center once in Pixpro Waypoints, fly it once at the planned altitude and camera angle, then bump the altitude up or down inside the DJI Fly app and re-fly the exact same path with a different camera tilt. The flight plan stays the same. You just stack more data on the same orbit footprint. For a roof this is excellent, because you can get a nadir-like sweep from higher up and oblique data from lower down without planning two separate missions.
 You can do that by just editing the flight altitude of a single waypoint and applying that to all waypoints. And then just rerun the flight, adjust the camera angle so it still faces the object and voila.
Solar-Ready New Construction with KML Import
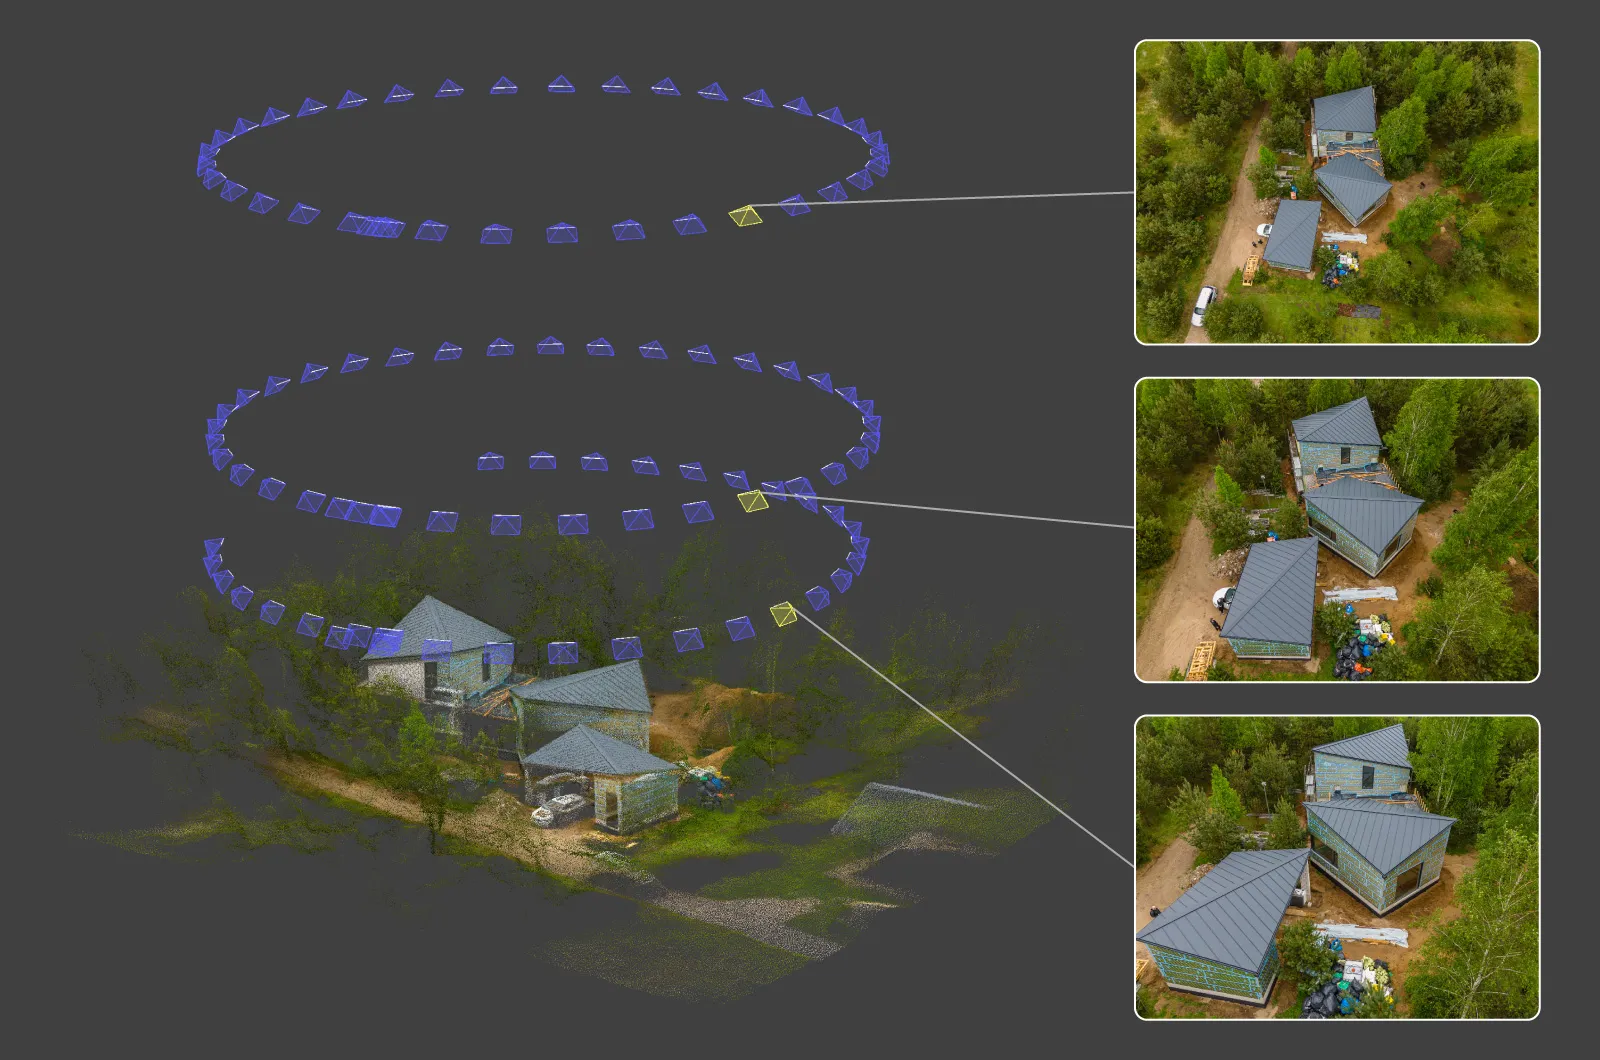
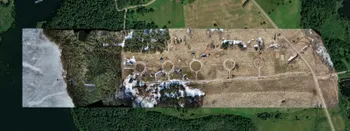
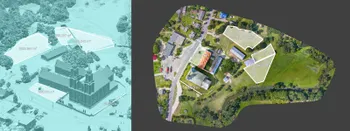
The third scan was a property with three modern metal roofs, freshly built, the kind of roofs a solar installer would actually be looking at. This one used Pixpro Waypoints again, multiple orbits, but with a twist: the buildings were too new to appear in any satellite imagery, which made placing the orbit center by eye impossible.
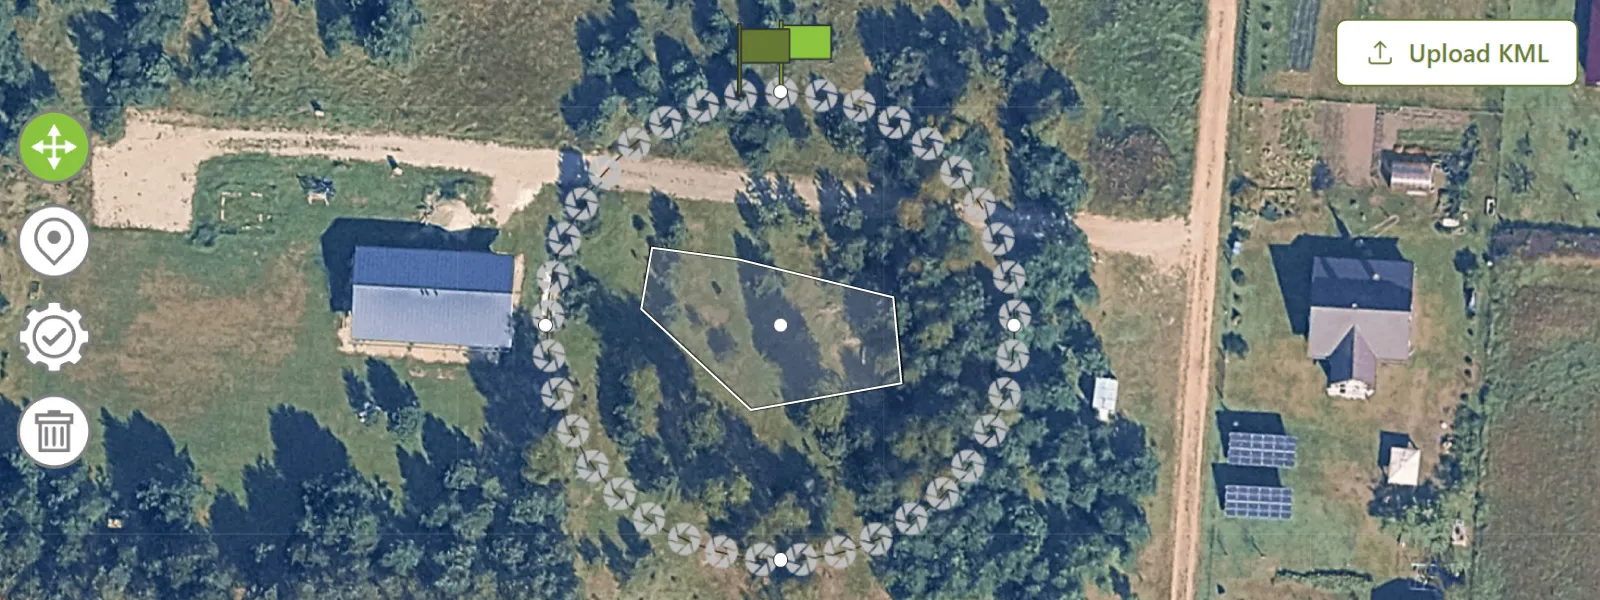 This is where the KML polygon import feature in Pixpro Waypoints becomes essential. I had the coordinates of each building. I generated a KML file containing a polygon made from those coordinate points, loaded it into Pixpro Waypoints and saw exactly where everything is. From there, placing an orbit center on each roof was trivial. Without that feature I would have been guessing.
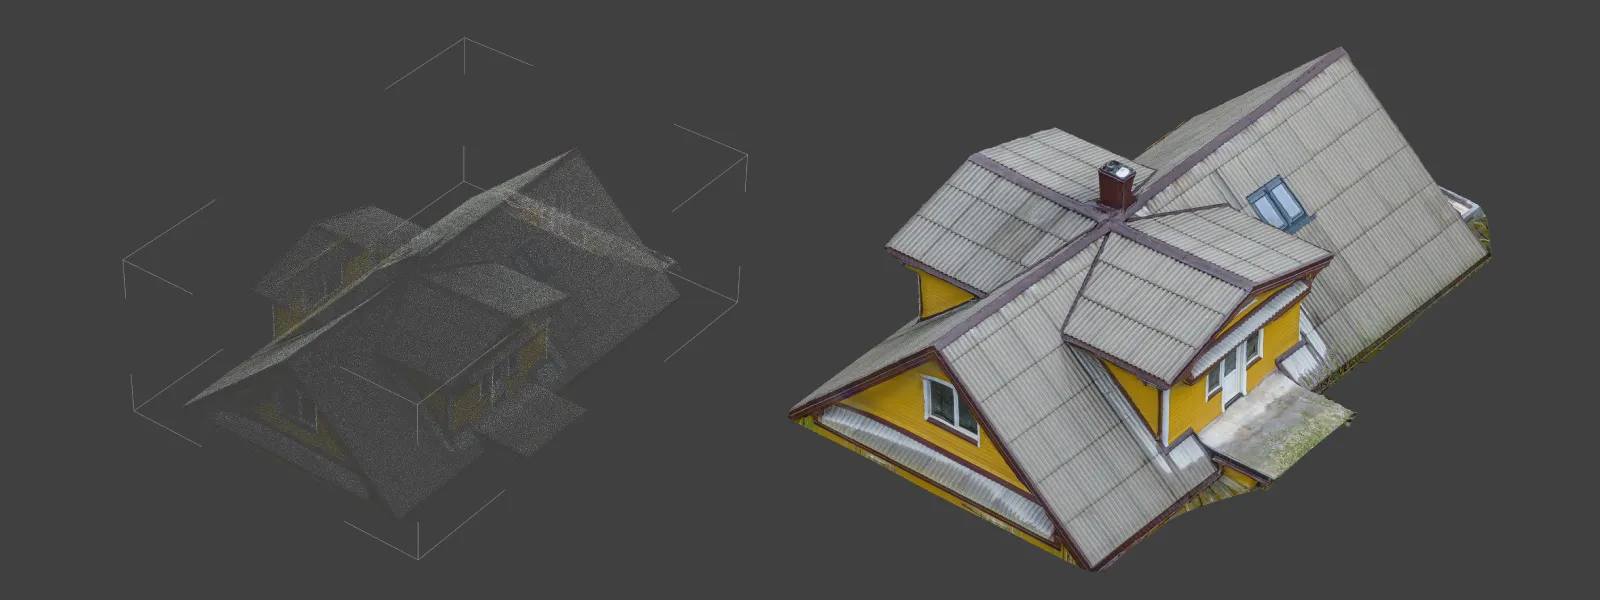
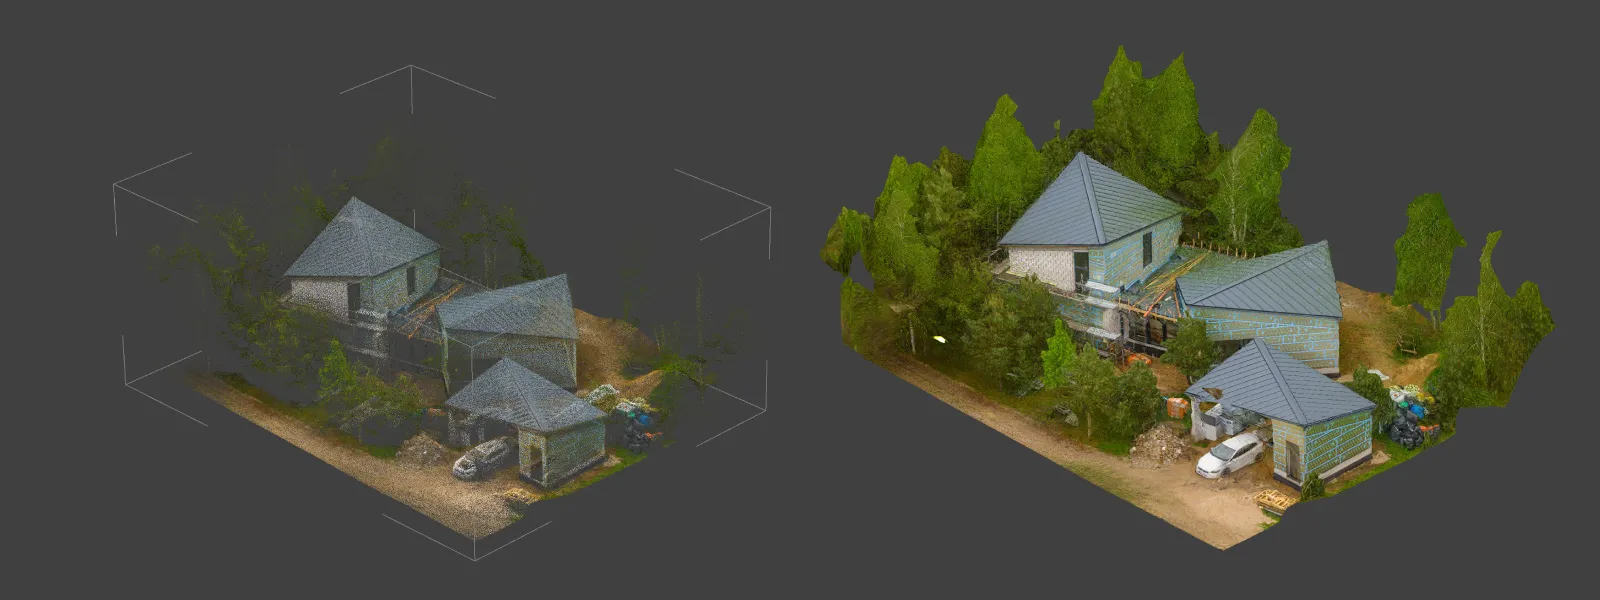
 Modern metal roofs are not the friendliest subject for photogrammetry. They are clean, often uniform in color, and have very little of the natural texture that the software relies on for feature matching. Despite that, the reconstructions came out surprisingly well. The combination of multiple orbits, sharp Lito X1 images, and Pixpro's processing pipeline was enough to handle even the smoother roof panels without obvious issues.
 I will publish a follow-up specifically on how to create your own KML files for scenarios like this one. The Google Earth method is fine when satellite imagery is current, but when you are working with surveyor-provided coordinates for new construction, you need a different approach.
Processing, Measurements, and Inspection in Pixpro
I shot in RAW photo format so image conversion was done in Adobe Lightroom Classic first. Then Jpegs from all three projects were processed in Pixpro photogrammetry software using default settings, no special tweaks required. Small projects like these take minutes to process. I upload every photo from a scan into one project regardless of whether it came from a single orbit, multiple orbits, or a mix of orbits and grid passes. The software figures out how the photos relate to each other, and you get one clean reconstruction at the end.
Once the model is built, the two analysis tools that matter most for roof work are measurements and inspection.
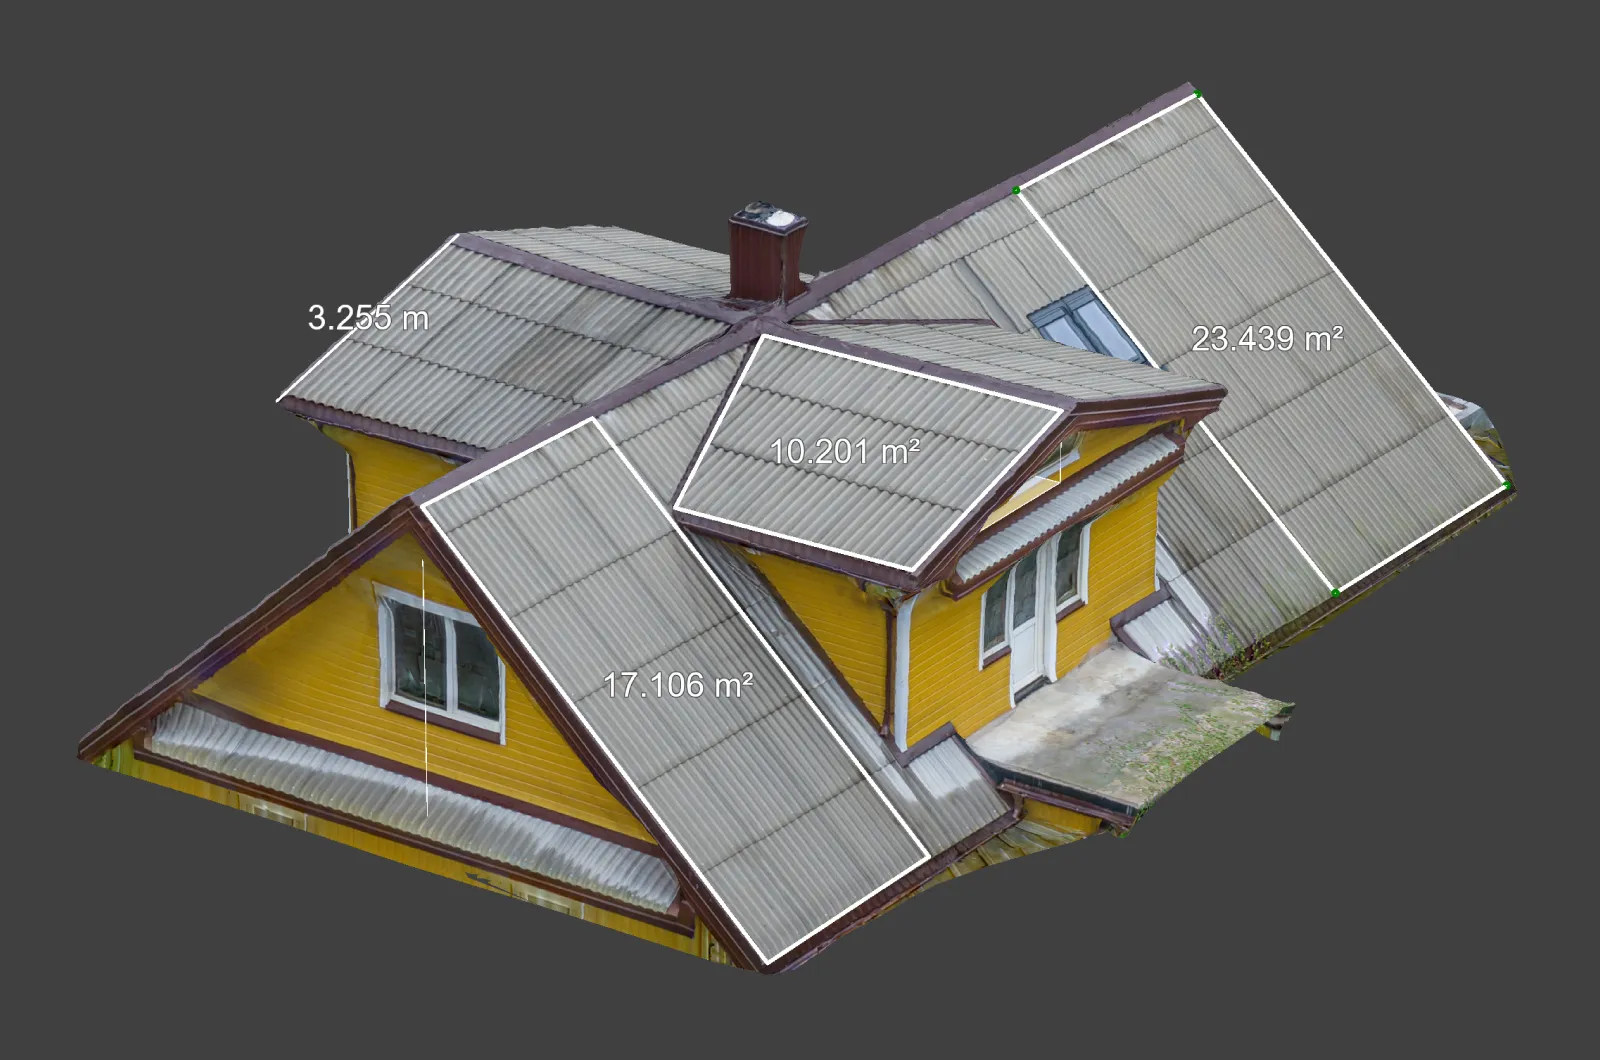
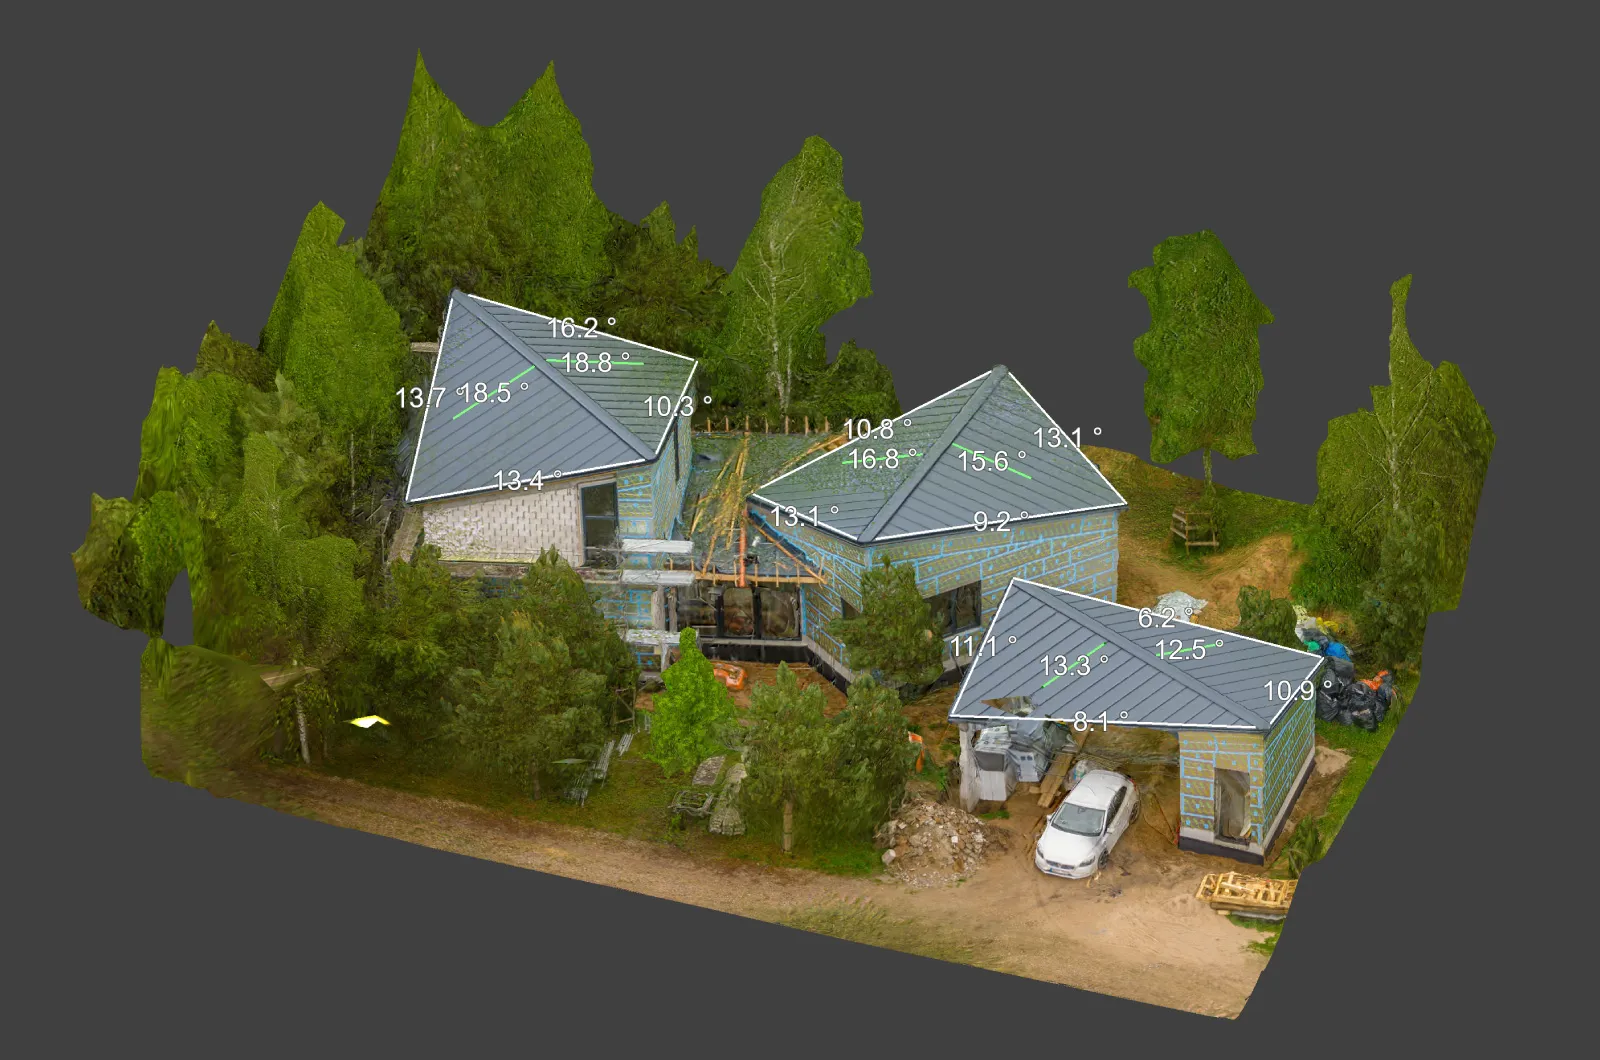 Measurements are a matter of drawing a line or a polygon in the 3D scene and choosing what you want to know: distance, area, slope, or volume. Roof pitch, panel surface area, distances between vents, all of it can be measured directly inside Pixpro without exporting anywhere. For damage inspection workflows, the inspection tool is the relevant one. Place a point on a feature of interest and Pixpro shows you the projections of that point in every source photo where it appears, at full resolution. This is how you confirm what you are actually looking at on the roof: a cracked tile, a loose flashing, a corroded fastener, a dent.
 For solar workflows, the deliverables that go outward most often are the 3D mesh and the dense point cloud. These import cleanly into software like PVsol for shading analysis and panel layout simulations, and they also work for general CAD documentation. If you only need a quick area number for a panel-layout proposal, you can stay inside Pixpro and never export at all.
Roof Scan Accuracy Without an Enterprise Drone
The relative accuracy you get from a Lito X1 scan is good enough that your measurements will hold up for the kind of decisions a roofer or solar installer needs to make. Pitch readings, surface areas, distances between obstacles, dimensions of vents and chimneys: all of these come out reliable when your overlap and coverage are solid.
You do not need an expensive enterprise drone or a GCP-and-RTK rig for typical roof work. Those tools are for when you need absolute geographic accuracy at survey grade. For a single roof or a small property, the Lito X1 gives you everything you need at a fraction of the cost.
There is a safety angle here too. Every measurement you take from a drone scan is one fewer measurement someone has to climb up and take by hand. For steep roofs, slippery materials, or anything more than two stories, that matters.
Conclusion
The DJI Lito X1 is excellent for what it costs and how small it is. Combined with Pixpro Waypoints and Pixpro photogrammetry software, roof jobs take literal minutes to capture and a few more to process. The output is accurate enough for solar installation planning, damage inspection, and general documentation, and you stay on the ground instead of on a ladder.
If you are in the solar, roofing, or inspection industries and you are not using drone photogrammetry yet, you are missing out. The barrier to entry has never been lower. A 250-gram drone, a free trial of Pixpro, and a bit of knowledge is all it takes.
Frequently Asked Questions
Can the DJI Lito X1 scan roofs accurately enough for solar and inspection work?
Yes. Relative accuracy on a roof scan is more than sufficient for pitch, area, distance, and damage assessment. For typical residential and small commercial work you do not need an enterprise drone or RTK.
What altitude should I fly for a roof photogrammetry scan?
Low enough to get the detail you need, high enough to keep the orbit safe. For a single residential roof, somewhere between 15 and 40 meters above ground works in most conditions. Adjust based on roof size and obstacles around the property.
Do I need ground control points or RTK to scan a roof?
For absolute georeferenced survey output, yes. For roof measurements, damage assessment, and solar layout work, the relative accuracy of a non-RTK Lito X1 scan is sufficient. GCPs are not required.
Can I scan modern metal roofs that do not have much texture?
Yes. Clean metal surfaces are harder for photogrammetry than textured shingles, but multiple orbits at different altitudes and angles produce usable reconstructions. The Lito X1 plus Pixpro processing handles this well.
Why use Pixpro Waypoints instead of just flying manually or in hyperlapse mode?
Predictable, consistent overlap on every orbit, accurate placement using KML import even when satellite imagery is outdated, and the ability to re-fly the same orbit at different altitudes for layered data. For repeatable roof work it is the most efficient option.
Photographer - Drone Pilot - Photogrammetrist. Years of experience in gathering data for photogrammetry projects, client support and consultations, software testing, and working with development and marketing teams. Feel free to contact me via Pixpro Discord or email (l.zmejevskis@pix-pro.com) if you have any questions about our blog.
Related Blog Posts
Our Related Posts
All of our tools and technologies are designed, modified and updated keeping your needs in mind
Large Property Photogrammetry – Real Estate Development Use Case
Property scans are one of the most common use cases, especially for our software. Pixpro is affordable and works well with RTK data and ground control points when necessary.

Handheld Photogrammetry Construction Interior Scan Use Case
Interior 3D scanning can be useful in a myriad of ways. In this article, I present a scan of a residential building construction site, with its foundation walls and roof almost complete. Further construction will require some visualizations and design according to “the fact.”
Event Planning with Photogrammetry – Use Case from A to Z
Photogrammetry for event planning was the first use case I wrote about on this blog. Now we are back with another venue and an event that will take place in a couple of months.
Ready to get started with your project?
You can choose from our three different plans or ask for a custom solution where you can process as many photos as you like!
Free 14-day trial. Cancel any time.