.svg@webp)
Photogrammetry Fails and Issues Part 2
 Lukas
Zmejevskis
Lukas
Zmejevskis

In the previous article, we have started our glance-travel through the most common photogrammetry fails and issues. There are many causes for inaccurate or failed 3D projects. Fortunately, extensive experience of the Pix-Pro team might be of help on how to deal with specific cases in your project. Let’s give it a try and cast our glance on several not-so-rare issues the surveyors would be glad to avoid in their 3D projects.
Looks vs. Precision
Even in visually good-looking point clouds, there is a chance that measurements and calculations may fail or turn out unsatisfactory. There can be several reasons, but it is worth looking into reconstruction settings under any conditions. It brings clarity to the whole project. Sometimes, it is the only aspect that may assure you maintain the best possible accuracy.
Let’s start with the ground sampling distance (GSD). The smaller the GSD value is, the more accurate the calculation of the volume and elevation on the 3D model is. That said, it is worth maximizing the GSD in your project to lessen the error in the measurements in relation to reality. For example, you had a 50 centimeter GSD value by default on your digital elevation map or any other measurable layer. Such a value is just not granular enough to provide reliable measurements.
What should I do?
Go back to your dense point cloud generation step and create a denser point cloud. Then you can push default values further when creating the elevation maps without introducing too many holes in your area of interest. If holes are starting to appear – it means you have reached your photo resolution limit. In the end, it all depends on your photo set – distance and quality. It is worth playing with settings if you do not have the time to do a more detailed scan. Getting better input data is the only way to redeem that if the results are still unsatisfactory.

Example of big GSD value – low detail DEM (on the left) vs small GSD value – high detail DEM (on the right)
Speed vs. Quality
So, you accept the challenge of speed versus precision. But still, the advice of having your workflow slowed down for more quality is not what you expect – need it fast and neat? Well, here’s one more hint on how to overcome the obstacle. Make the dense point cloud the best possible quality. Then crop the dense point cloud to isolate only the specific area in question. Perform the required measurements only on the target area. This way, saving time and increasing accuracy is in your hands. Still, it is noteworthy to mention that dense point clouds should be dense enough to ensure that you avoid ending up with holes on your layer. Most photogrammetry software fills the missing holes on the reconstructed layer to provide a more appealing result, but this will not help increase the accuracy of calculations and measurements.
Save time by cropping dense point cloud for processing other layers much faster
Precise Projections
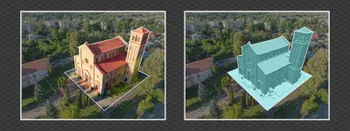
The next step is measuring using precise point projections. What if your generated layer is not visually clear enough to place measurement polygons where you need to? The visual aspect might be poor, but with a good overall 3D structure – the 3D coordinate frame is still there in the entire project.
Projections are the answer to the call for higher precision. Every point in the 3D space of the software can be precisely projected in the project photos and vice versa. In the case of Pixpro – you can mark a 3D point anywhere and then edit its projections in the photos. The projections placed on what is distinguishable in photos will correspond to the same spot in the 3D environment. Even if there is a distinct lack of automatically generated dense cloud points in that area, a measurement polygon snaps to these precisely placed points. When using snapped polygons, the calculations become as close to the actual target object as possible. Still, keep in mind that the photos you want to select for projection markup should be high quality, without any blurred areas where the point of interest is visible.
Placing points, adjusting their projections and snapping a polygon to set points for accurate measurements
Important Things to Remember
To sum up, there are many things to consider, such as camera parameters, camera angle, reconstruction settings, GSD values, georeferencing, and many more. All these things affect the reconstruction quality directly. What you process (your photos) is what you gain as a result (a 3D model or a separate layer) in terms of quality. So, to ensure that your project goes smoothly and you waste no time, you may find one of these insights essential to optimizing your work:
Tips:
- Get rid of repeating, blurred, too dark, or too bright images to avoid inaccuracies in calculations and failed processing.
- Get rid of all images that are not of the scanned object.
- Avoid perfectly clean, glossy, flat, monotonous, and uniform surfaces scanned without relation to something containing unique features (this includes glass, water, mirrors, etc.)
- Ensure perfect coverage of the scanned object with some buffer area. More overlap is better than less. More coverage is better than less.
- Combine and mix oblique, orbital, grid, and different altitude images of the same object. Maximum coverage of all surfaces is necessary for best quality.
- Try to plan 3D scanning with regards to lighting and time of day. Long shadows, high contrast, and insufficient light can render images useless for 3D reconstruction.
- Crop layers to focus only on the desired target for processing and calculations.
- Try different settings for different photo set volumes – e.g., Pix-Pro offers two types of processing algorithms (incremental and hybrid). Combining it with reconstruction speed selection (e.g., slow), you will get better point matching and more quality photo stitching. Say, a larger set of more than 1000 photos will show better results with hybrid mapping and speed.
- Do not be discouraged when photogrammetry fails you. The entire process of 3D scanning does have a learning curve. Be flexible, and you will get results.
Conclusion
All aspects of the imagery affect the project’s quality, whether hidden in the camera settings or physically present in the scanned scene. After the photos are taken and processed, each step of the 3D processing can be changed to optimize the result and reward you with the expected outcome in the shape of sleek 3D reconstruction.
Photographer - Drone Pilot - Photogrammetrist. Years of experience in gathering data for photogrammetry projects, client support and consultations, software testing, and working with development and marketing teams. Feel free to contact me via Pixpro Discord or email (l.zmejevskis@pix-pro.com) if you have any questions about our blog.
Related Blog Posts
Our Related Posts
All of our tools and technologies are designed, modified and updated keeping your needs in mind
Overlap Between Different Perspectives
Photogrammetry can be simple and rigid or complex and adaptable. Combining different scan patterns adds complexity to the work but improves detail and coverage. We often use examples of combined flights, of which the orbital + nadir grid is a classic. They provide great 3D structure while being easy
Pixpro Waypoints - Automated Photogrammetry Flights for Newest DJI Drones
The latest DJI drones are the most capable flying cameras on the market. If you need a tool like that or a competent machine for casual creation - DJI Mavic 3, DJI Mini 4, and DJI Air 3 series drones are the best.

Accuracy of Your Photogrammetry Project
Accuracy in photogrammetry is a multifaceted point of discussion. We can talk about absolute, relative, or even geometric accuracy, to name a few. No tool or technique can really prove anything beyond reproach.
Ready to get started with your project?
You can choose from our three different plans or ask for a custom solution where you can process as many photos as you like!
Free 14-day trial. Cancel any time.