.svg@webp)
Stockpile Volume Measurement With Drone Photogrammetry: A Practical Guide
 Lukas
Zmejevskis
Lukas
Zmejevskis
Measuring a stockpile sounds trivial until you actually have to do it on a real site. You need a number you can defend at the end of the month, and you would rather get it without sending somebody to scramble up a 10 meter mountain of gravel with a GPS pole. Drone photogrammetry handles exactly this, and it is one of the more satisfying things you can do with a drone and a laptop.
It is also one of the clearest, least controversial wins in the field of photogrammetry. There is no marketing magic here, just photos turning into a measurable surface. In this article I will go through the full workflow: what stockpile photogrammetry actually is, how to fly the site, how to turn the photos into a surface, and how to pull out a volume you can stand behind.
What Stockpile Photogrammetry Actually Does
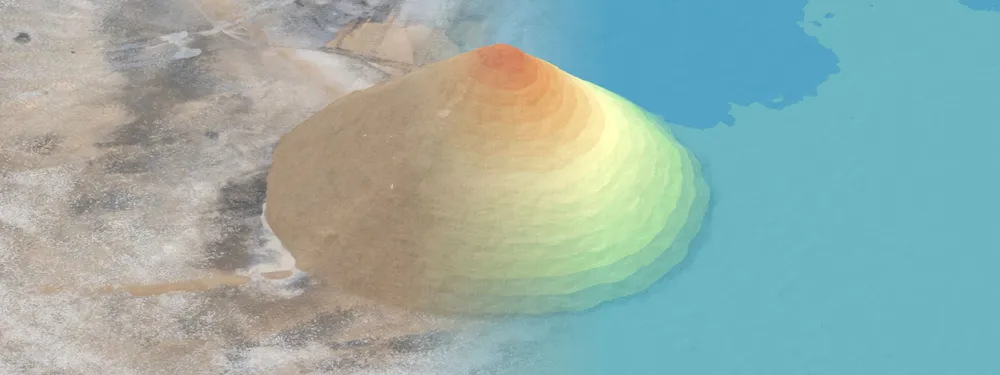
Photogrammetry is the science of taking measurements from photographs. A drone flies over the pile, captures a load of overlapping images from different positions, and the software matches common points across those photos to rebuild the surface in three dimensions. Out come a few layers you will get familiar with: a dense point cloud, a digital elevation map, and a true orthophoto. These are the same layers surveyors have leaned on for decades, just generated from a camera instead of a total station.
 Once you have a georeferenced 3D surface, the volume is just geometry. The software measures the space between the top of the pile and a base plane underneath it, and since the model is scaled to real-world coordinates, the answer comes out in cubic meters. A properly flown and processed survey lands within a few percent of ground truth, which is plenty for monthly inventory, production reconciliation, and arguing with an invoice. How close you get depends on your capture and whether you used ground control, more on that below.
Why Fly It Instead
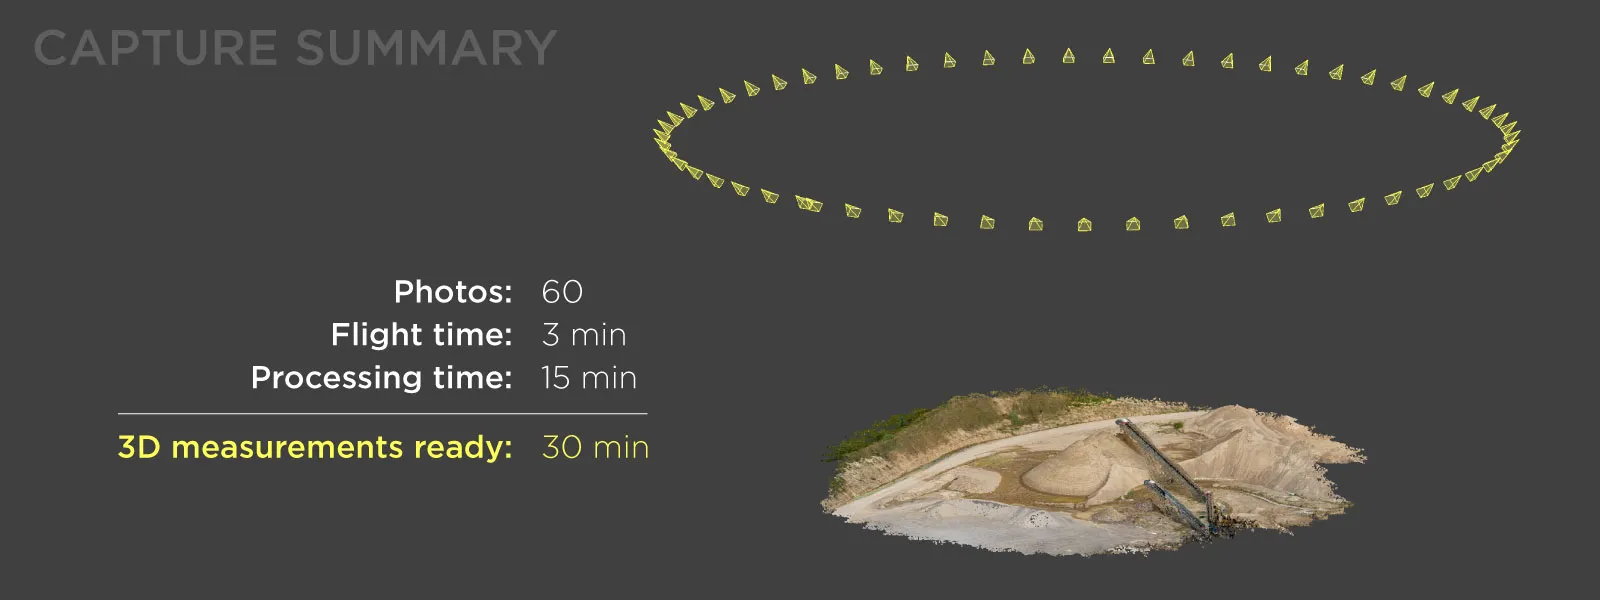
For stockpiles, flying the pile beats everything else in every way that matters. A survey that used to eat half a day is done in ten to twenty minutes, nobody has to stand on an unstable pile, and you get a complete 3D surface instead of a handful of points and a lot of hoping. Once it is that fast and that safe, the frequency sorts itself out. You can measure weekly instead of quarterly and catch problems while they are still small ones. The same workflow handles pits and excavations just as well, which I covered separately in pit volume measurement.
 Step One: Plan the Flight
Good volume data starts in the air. No amount of clever processing fixes a bad flight, so this is the part to get right. The goal is consistent, well-overlapped coverage of the whole pile, plus enough surrounding ground to define a clean base.
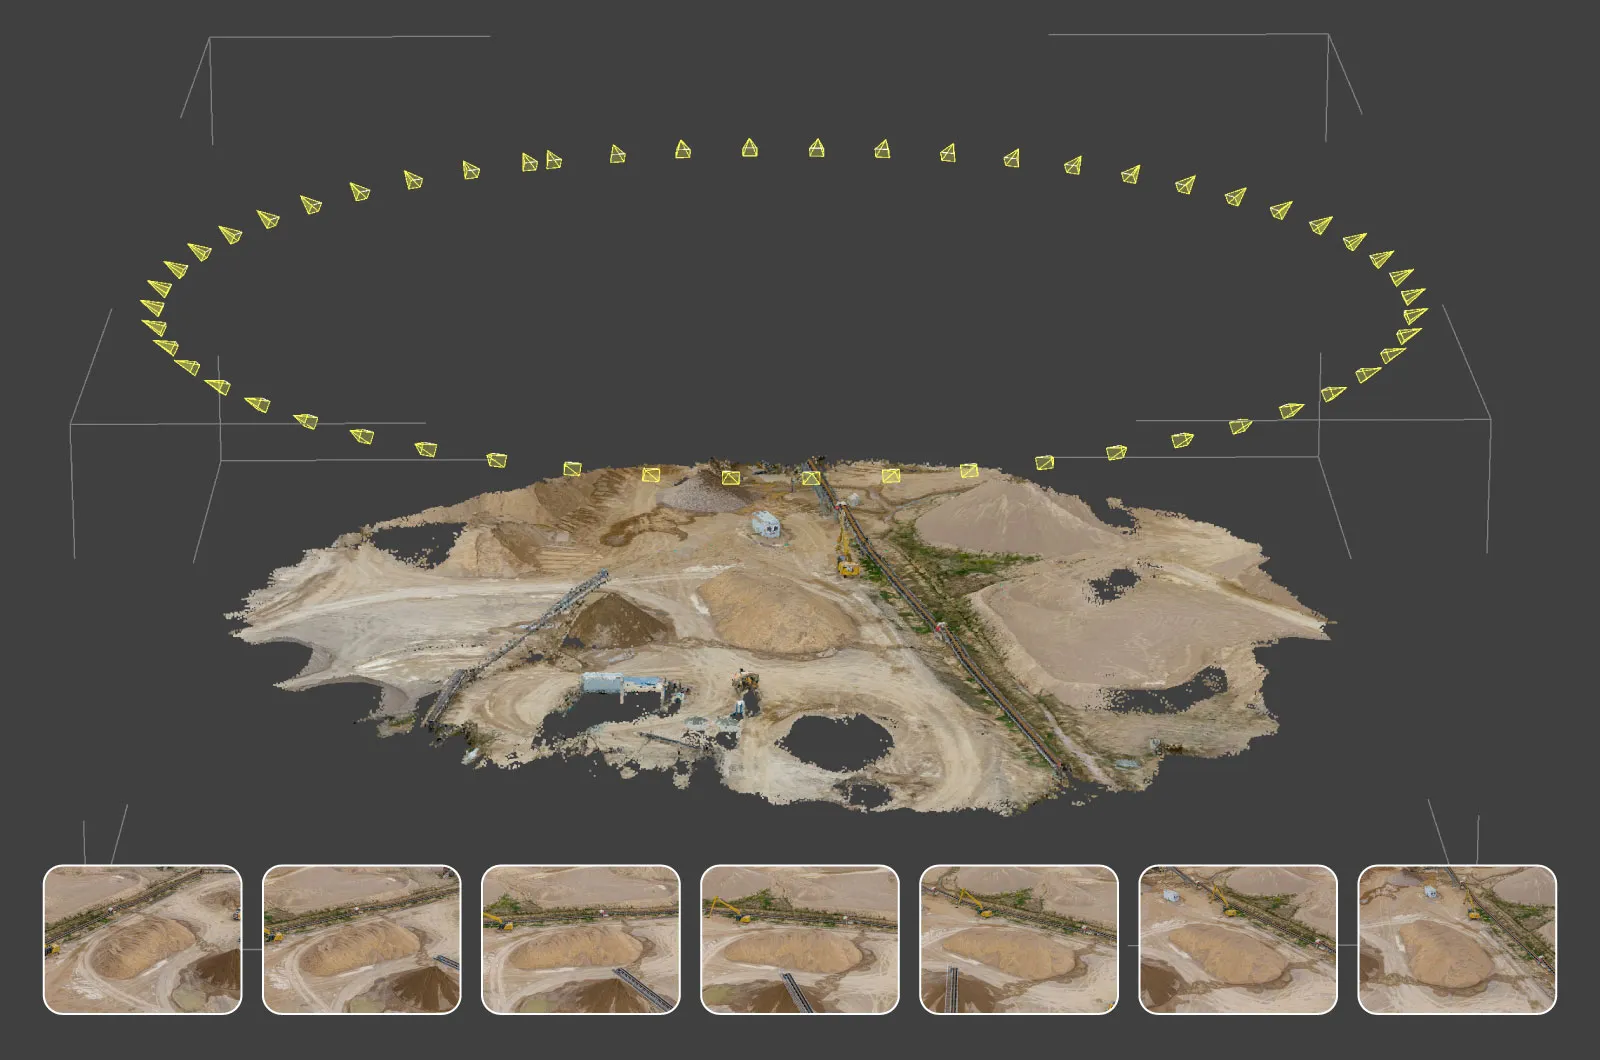
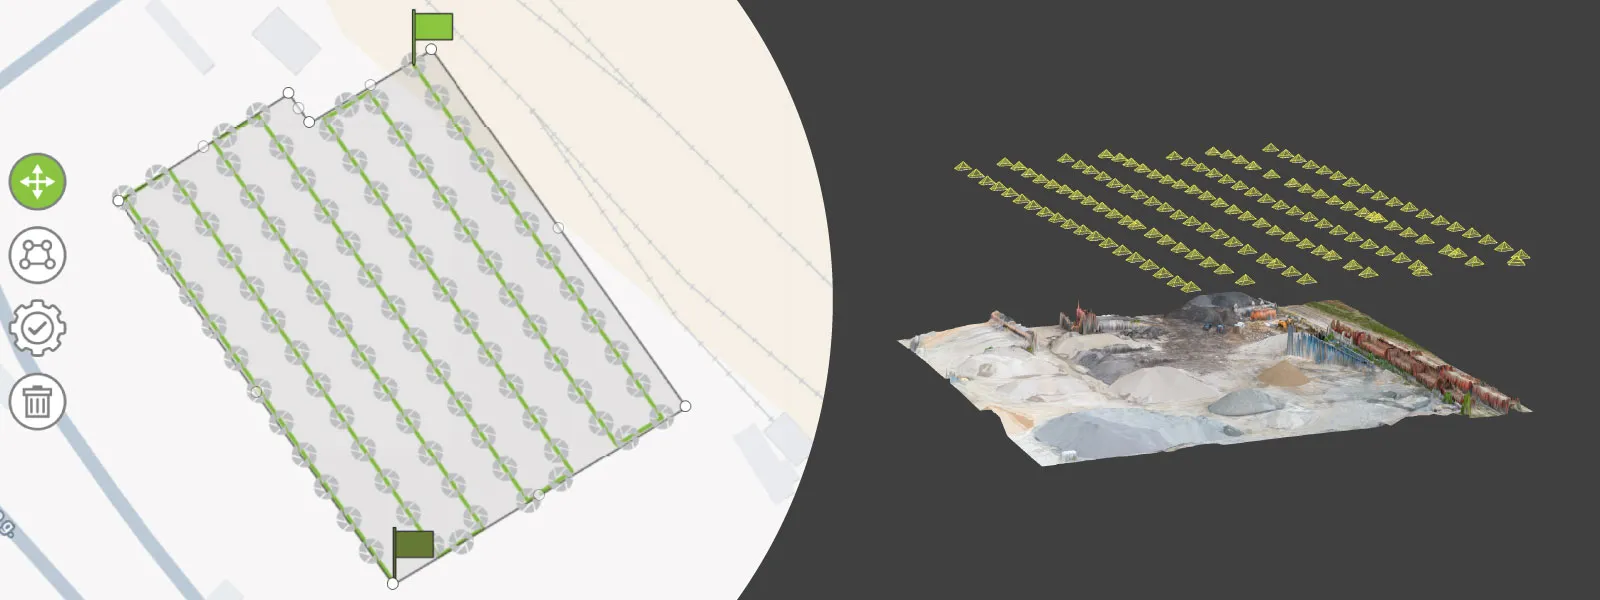
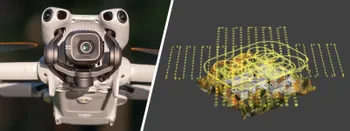
What you want is a nadir grid for the top and the ground around it, plus some oblique imagery for the sides. You can get those obliques with a proper multi-grid or with an orbital pass, and for stockpiles the orbit almost always wins. Flying a full multi-grid from all four sides of a single pile is overkill, like bringing a survey crew to measure a sandbox, while one orbit around it grabs the faces without burning through your batteries. A few fundamentals that actually matter:
-
Overlap is the thing that matters most. Go for 80 percent frontlap and 80 percent sidelap. Always 80/80. Stockpiles are textured and irregular, which is exactly what the matching algorithm loves, so do not be stingy with photos.
-
Fly somewhere between 30 and 120 meters above ground, depending on the detail you need. Lower gets you finer resolution and longer flights, higher covers more ground per battery. Let the required detail set the height, not the other way around.
-
Capture the sides. A straight-down pass cannot see near-vertical faces, so the orbit is what stops your pile from looking melted in the reconstruction.
-
Even light is ideal but not mandatory. Overcast is the dream, but you can get perfectly good measurements in sunlight. High midday sun is fine. The only thing to genuinely avoid is extreme, long shadows, the kind that turn into dark voids the software cannot reconstruct.
 You do not strictly need an automated planner. Full manual or semi-automated capture works fine for a single pile, and plenty of people do it that way. That said, Pixpro Waypoints makes planning these flights easier for everyone, not just the automation crowd, and repeatable routes are exactly what you want when you are measuring the same site month after month.
Step Two: Decide Whether You Need Ground Control
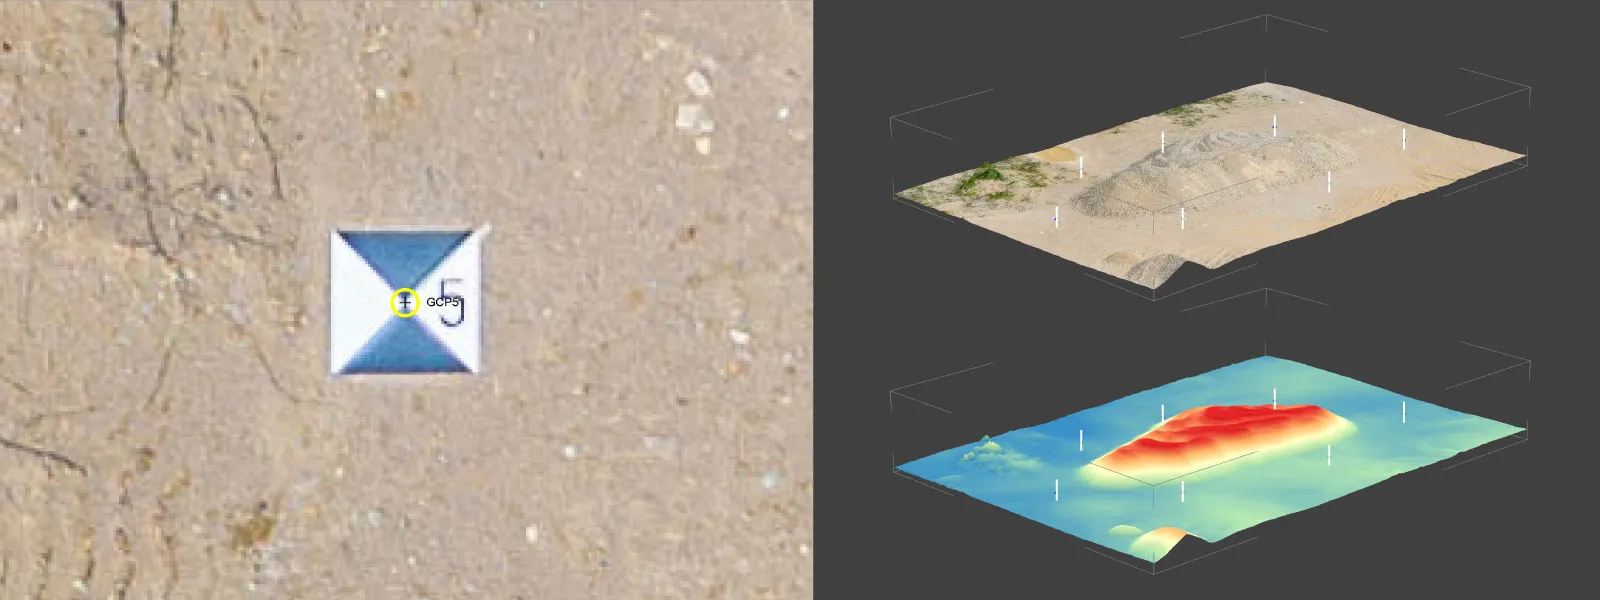
If your volumes feed financial reporting, audits, or contracts, you want survey-grade accuracy you can prove. That is what ground control points are for. You place marked targets on the ground, measure their coordinates with a GPS rover, then tag them in the software during processing.
Here is the nuance most people miss: a volume is a relative measurement. It depends on the shape of the surface compared to itself, not on where that surface sits on the globe. So even without any ground control, the relative accuracy of a well-flown model is usually good enough to measure a pile, and the drone's own GPS will happily carry you.
 That changes the moment the number has to survive an audit, a contract, or an argument. Professionals use GCPs, or an RTK drone with a few checkpoints to validate the result, because defensible accuracy is the entire point of the exercise. So it is not GCPs always or never, it is matching the effort to what the number is for. Accuracy is predictable once you know which factors drive it, and I dug into those accuracy factors in a separate article if you want the full picture.
Step Three: Process the Photos Into a Surface
With the images captured, the next step is turning them into something measurable. In Pixpro this is largely a one-button affair. You import the photos, and the engine builds the point cloud, digital elevation map, orthophoto, and mesh for you. It runs locally on a standard Windows PC and happily uses any Nvidia, AMD, or Intel GPU, so you do not need a workstation or a cloud subscription. Average-grade hardware is enough to chew through a stockpile project.
 For volumes, the layer you care about is the digital elevation map, because Pixpro calculates volumetric measurements directly on the DEM surface. Any dense point cloud can produce a DEM layer, so once processing finishes, you are ready to measure.
Step Four: Measure the Volume
This is where all that flying pays off. In Pixpro, volume measurement happens on the DEM in real time, with no separate processing step once the surface is built. The process is short:
-
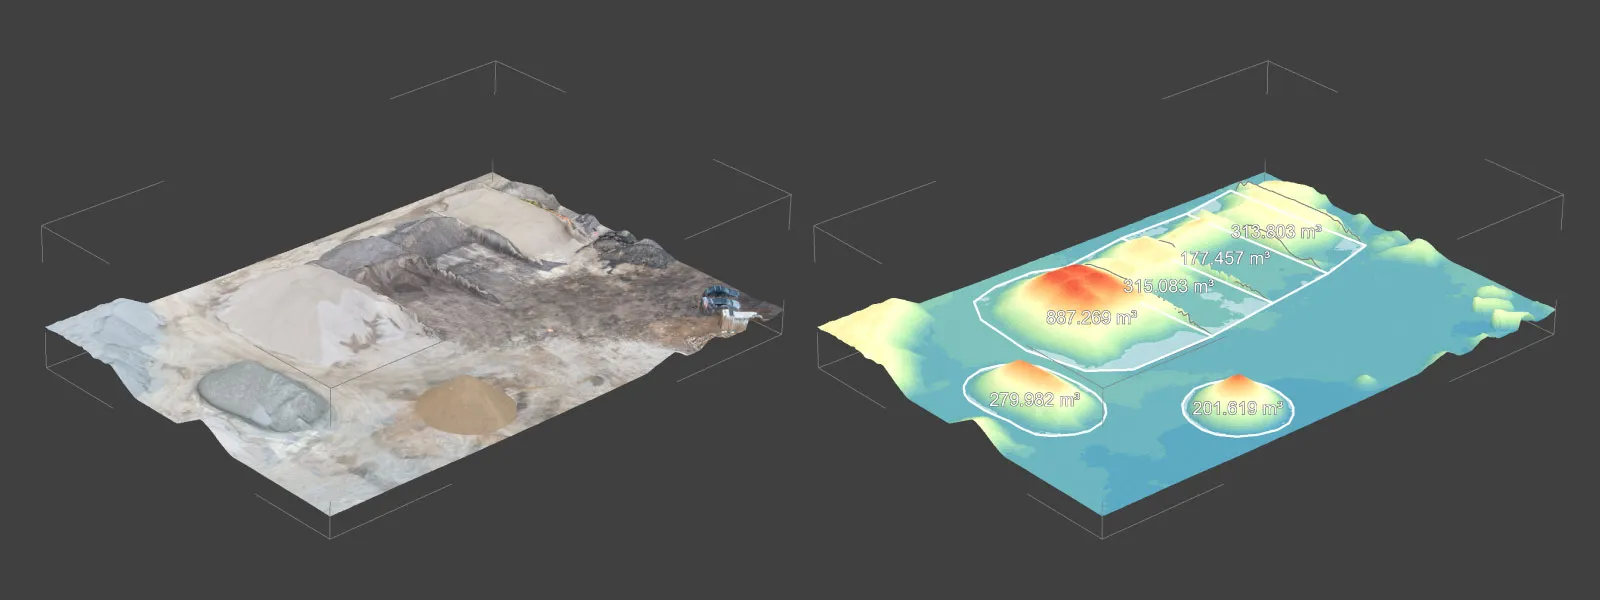
Draw a polygon around the base of the pile, tracing where the material meets the ground.
-
Choose a base plane. This is the imaginary surface beneath the pile that the volume gets measured against, and it is the single most important choice you make.
-
Read the volume above the base plane, which Pixpro hands back instantly in real-world units. It reports fill as well as cut, though for a free-standing pile the cut is the number you are after.
Picking the right base plane is where the measurement is won or lost. Pixpro gives you six of them, all covered in the base planes documentation. The fitted plane runs a best-fit algorithm on your polygon vertices and is the one to reach for on free-standing piles, level ground or not. Max, mean, and min height planes sit at the highest, average, or lowest vertex. Custom height lets you set the base wherever you want, and elevation model uses a separate surveyed DEM as the base, which is the move when the ground under the pile is itself lumpy.
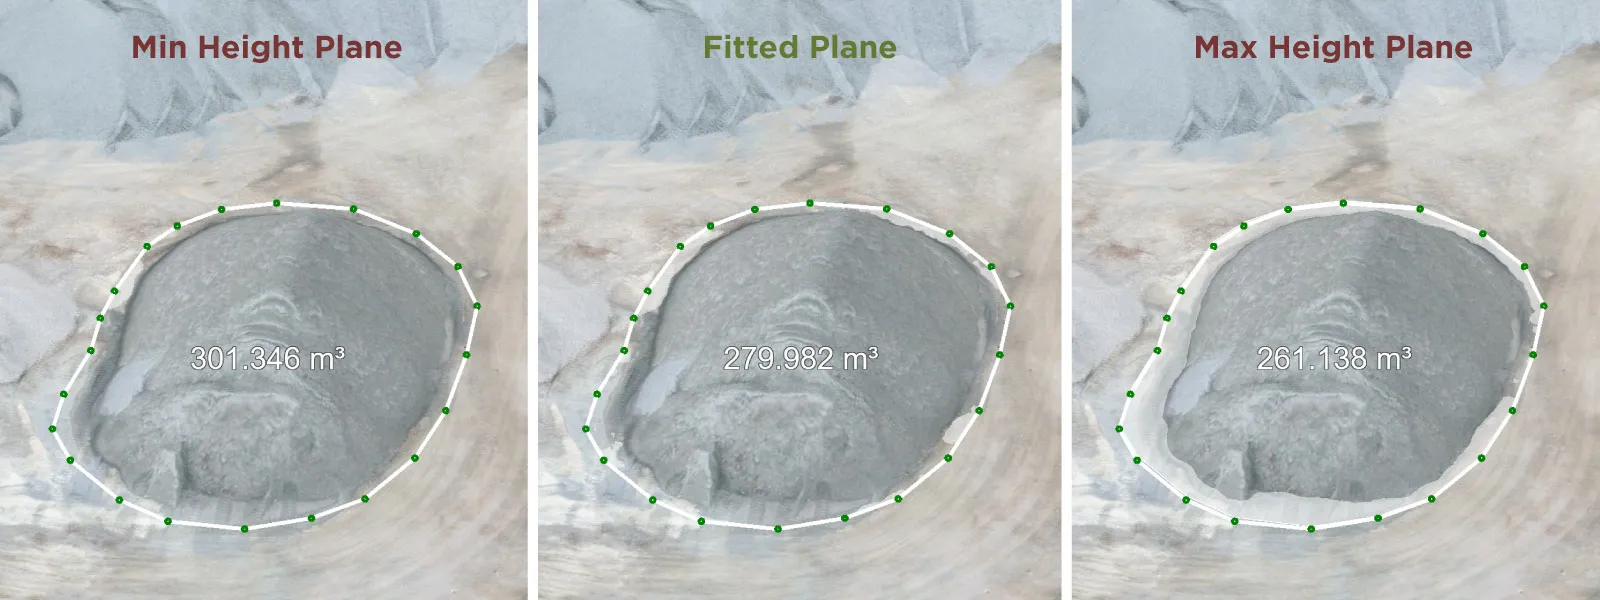 The base plane is where most measurement disputes are born, so match it to the site instead of leaving it on whatever was selected last. Pick the wrong one on sloping ground and you can over-count or under-count a pile by a large margin.
![]() One more thing worth knowing: a single volume is useful, but a trend is where this really earns its keep. Pixpro has a timeline that compares DEM layers from different dates so you can see exactly how much material went in or out over time. That is its own topic with a fair bit of nuance around georeferencing, so I will give it the dedicated article it deserves rather than cram it in here. When it comes to sharing, everything you make exports in the usual point cloud, 3D model, and raster formats, and the point cloud transformation tools handle coordinate systems so your data lines up with the rest of your survey work.
One more thing worth knowing: a single volume is useful, but a trend is where this really earns its keep. Pixpro has a timeline that compares DEM layers from different dates so you can see exactly how much material went in or out over time. That is its own topic with a fair bit of nuance around georeferencing, so I will give it the dedicated article it deserves rather than cram it in here. When it comes to sharing, everything you make exports in the usual point cloud, 3D model, and raster formats, and the point cloud transformation tools handle coordinate systems so your data lines up with the rest of your survey work.
Common Mistakes That Wreck Your Numbers
A handful of avoidable errors cause most bad volumes. Skimping on overlap leaves holes the software has to guess across, so stick to 80/80. Skipping the orbit on a steep pile gives you mushy faces. The wrong base plane throws the number off more than anything else on the list. Vegetation, parked excavators, or a curious worker standing on the pile all get baked into the surface, so clear the area or edit them out before you measure. And extreme shadows leave voids on the shaded side. None of this is hard to dodge once you know to look for it, and avoiding it is what keeps your volumes within a few percent of reality on almost any site.
Conclusion
Stockpile measurement is the easiest case to make for drone photogrammetry. It is faster than the old methods, nobody has to climb the pile, and the numbers are good enough to trust for inventory and reporting. The workflow barely changes from site to site: fly a grid plus an orbit for the sides, process the photos into a DEM, draw a polygon, pick the base plane that matches the ground, and read the volume off the screen.
The part worth remembering is how little it costs you once the routine is set. Fly it right, keep the records, and the pile stops being a guess and starts being data.
Frequently Asked Questions
How accurate is drone photogrammetry for stockpile volumes?
A properly flown and processed survey lands within a few percent of ground truth, and a solid ground control workflow tightens that further. Accuracy comes down to image overlap, the base plane you choose, and whether you used ground control points for georeferencing. Lighting matters too, but only at the extremes.
Do I need ground control points to measure a stockpile?
Not always. For internal estimates, the drone's GPS is usually good enough. For volumes that feed audits, contracts, or financial reporting, ground control points or an RTK drone give you the defensible vertical accuracy you want.
Which base plane should I use for a stockpile?
For most free-standing piles the fitted plane is the right call, level ground or not, since it best-fits the points you draw around the base. Pixpro also offers max, mean, min, custom height, and elevation model planes for other situations. The base plane is the biggest single factor in measurement accuracy, so match it to the site.
How many photos do I need to measure a stockpile?
Enough to keep 80 percent overlap across the whole pile, plus an orbit for the steep faces. For a typical pile that is usually a few hundred images: a nadir grid over the top and surrounding ground, plus one orbital pass around the sides. When in doubt, take more photos, not fewer.
Photographer - Drone Pilot - Photogrammetrist. Years of experience in gathering data for photogrammetry projects, client support and consultations, software testing, and working with development and marketing teams. Feel free to contact me via Pixpro Discord or email (l.zmejevskis@pix-pro.com) if you have any questions about our blog.
Related Blog Posts
Our Related Posts
All of our tools and technologies are designed, modified and updated keeping your needs in mind
DJI Lito X1 for Photogrammetry
Can the Lito X1 be used for photogrammetry? Yes it can. Can it produce good results? Yes it can. How to do it? Yes it… well, that is what the rest of this article is for.
DJI Mini 5 Pro For Photogrammetry – Aerial Scanning With Pixpro Waypoints
DJI Mini 5 Pro is a 250-gram flying camera equipped with a 1-inch type sensor. Nine years ago, the Phantom 4 Pro was released as the first consumer drone to feature the same sensor format.

Pixpro Waypoints – Frequently Asked Questions Part 2
Pixpro Waypoints service is a workaround solution providing automated photogrammetry flights for the latest DJI drones. The service came about when DJI officially discontinued SDK support — and therefore third-party app development — for consumer-grade drones.
Ready to get started with your project?
You can choose from our three different plans or ask for a custom solution where you can process as many photos as you like!
Free 14-day trial. Cancel any time.