.svg@webp)
Pixpro to Gaussian Splatting: How to Export Your Project to Postshot
 Lukas
Zmejevskis
Lukas
Zmejevskis
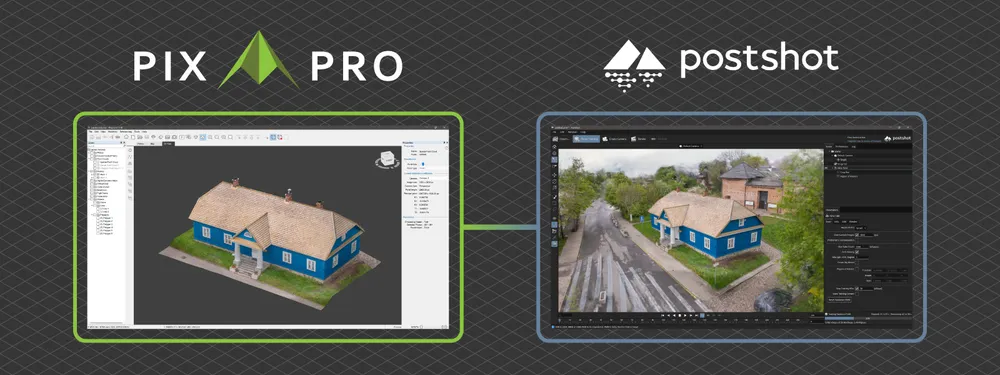
Gaussian splatting is no longer a curiosity. People are using it for walkthroughs, marketing visuals, virtual environments, and increasingly as a pretty companion to a scan they already flew. The question I keep getting is a practical one: if I already processed a project in Pixpro, can I reuse that work for a splat instead of starting from scratch?
Yes. Pixpro can export the camera poses and the sparse point cloud in the standard COLMAP format, which is exactly what every Gaussian splatting trainer wants to be fed. There is no menu button for it yet, so it runs through a Python script you can download below. If the word Python just put you off, do not worry about it. You will not be writing anything, and I have written the setup out from zero for people who have never opened a Command Prompt in their lives.
In this article I will explain what splatting actually is, where it parts ways with photogrammetry, why the two share more than people assume, and then walk through installing Python, running the export, and importing the result into Postshot.
The Short Version
If you only have a minute:
- Gaussian splatting and photogrammetry start from the same thing: a set of overlapping photos and the knowledge of where each one was taken from.
- Pixpro already solves that second part when it builds the 3D structure, so a splatting trainer does not need to solve it again.
- A Python script, pixpro2colmap.py, converts a processed Pixpro project into a standard COLMAP dataset: undistorted images, cameras.bin, images.bin, points3D.bin.
- Postshot, Brush, Nerfstudio, gsplat and the reference 3DGS trainer all read that format directly.
- The export uses Pixpro's own lens correction code, so nothing beyond Pixpro and Python needs to be installed.
- No programming knowledge is required. You install Python once, paste one line into a Command Prompt, and press enter. The steps are below.
- There is also an optional tool with a window and two folder pickers, for anyone who would rather not touch a command line.
What Gaussian Splatting Actually Is
A splat scene is not geometry. Instead of a mesh or a point cloud with solid surfaces, it is millions of small fuzzy blobs of color and transparency, each one a 3D Gaussian, arranged and tinted until the whole set looks correct from every angle the camera saw. The training process is an optimization: it keeps nudging the blobs until the rendered view matches the original photos.
That is why it looks the way it does. Soft edges, natural light, reflective surfaces that behave believably, and no holes where a photogrammetric mesh would have failed. It renders in real time on a GPU, which is the other half of its appeal.
The idea grew out of NeRFs, or Neural Radiance Fields, which learn the same thing about how light and color behave from different viewpoints. Splatting drops the slow neural rendering step and bakes the result into discrete blobs a GPU can throw on screen immediately, which is why it took over from NeRFs in practice.
I wrote a longer plain-language explanation of the technique in Gaussian splatting vs photogrammetry, so I will not repeat all of it here. The short version of my position has not changed: it is a rendering method, not a measurement method.
Where It Differs From Photogrammetry
Photogrammetry is mathematically constrained by geometry. Rays from known camera positions intersect on real surfaces, which is why the output has scale, can be georeferenced, and can be measured with confidence. You get a dense cloud, a DEM, an orthophoto, and a number you can put in a report.
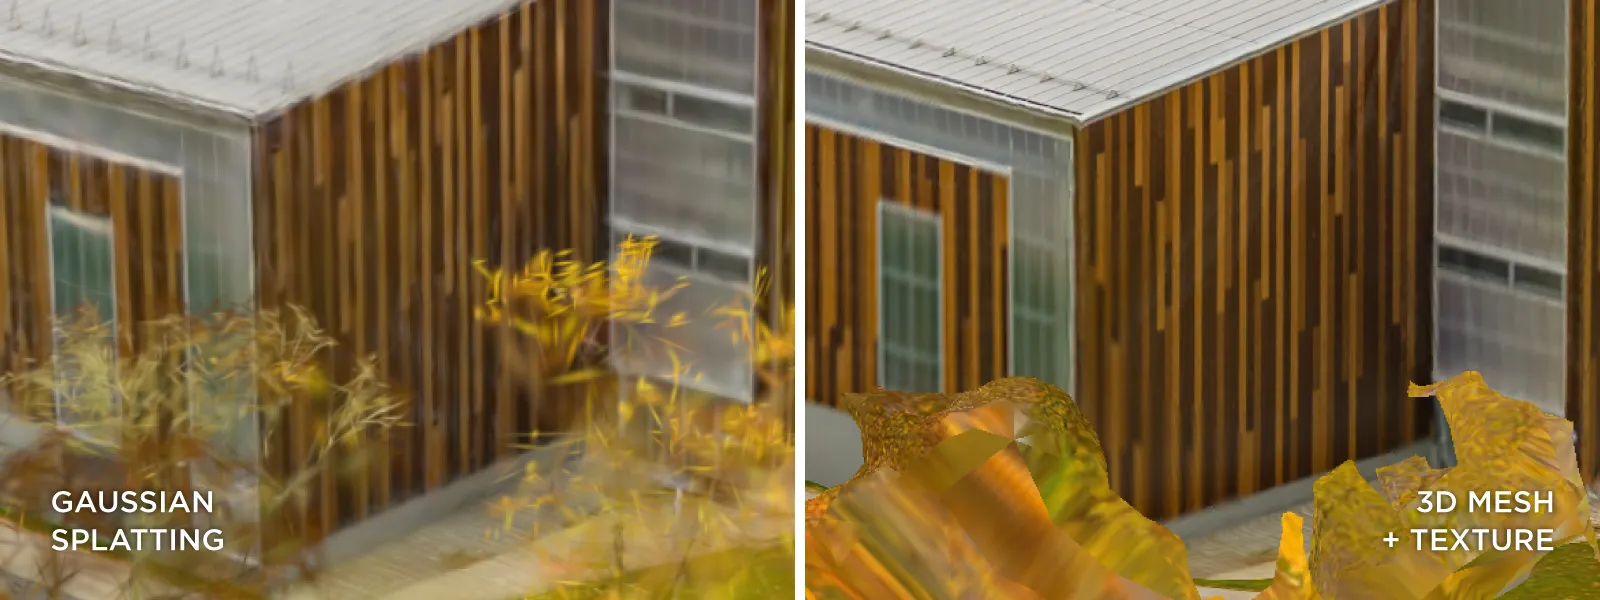 A splat has none of that by default. There is no watertight surface, no reliable scale, no absolute accuracy, and nothing you can meaningfully measure with a tape tool. It also fills gaps by blending through them, which looks good and quietly hides the fact that the data was not there. For visualization that is a feature. For inspection or volumes it is a problem.
So they are not competitors. One produces a measurement, the other produces an impression. The useful thing is that you can get both from one capture.
What Photogrammetry and Gaussian Splatting Share
This is the part people miss, and it is what makes the export possible in the first place.
Before a splatting trainer can place a single blob, it has to know where every photo was taken from and which way the camera was pointing. Working that out from a pile of images is Structure from Motion, and it is the slowest, most fragile step in the whole pipeline. Most splatting tutorials start by running COLMAP for an hour or more just to get there.
Photogrammetry solves that same problem, because it has to. When Pixpro builds the 3D structure, it computes the camera poses, the lens calibration, and a sparse point cloud of tie points. That is precisely the input a splat trainer is looking for. The capture requirements line up too: good overlap, sharp photos, consistent lighting, coverage from enough angles. A set of images that makes a good photogrammetric model makes a good splat.
So the export is not a conversion of the 3D model. It is handing over the solved camera geometry so the trainer can skip straight to the interesting part.
What the Script Exports
pixpro2colmap.py turns a processed Pixpro project into a COLMAP dataset laid out like this:
It uses pxpCore.dll from your Pixpro installation for the lens correction, which is the same code Pixpro uses internally, so the undistorted images and the PINHOLE intrinsics agree with each other exactly. Nothing else needs installing.
You need a processed project (the folder with the .pxp file, containing Photos and Sparse) and any Pixpro 1.7.x installation. Budget roughly 1 to 1.5 times the size of your photos in disk space, and about two seconds per 20 megapixel image for the undistortion, so around ten minutes for 350 photos. Projects processed in the Pixpro cloud work as well once downloaded.
You can download the script here:
Installing Python if You Have Never Used It
You do not need to know any programming for this. Python is only the thing that runs the script, and the script does all the work by itself. You install it once, type one line, and press enter. If Python is already on your machine, skip to the next section.
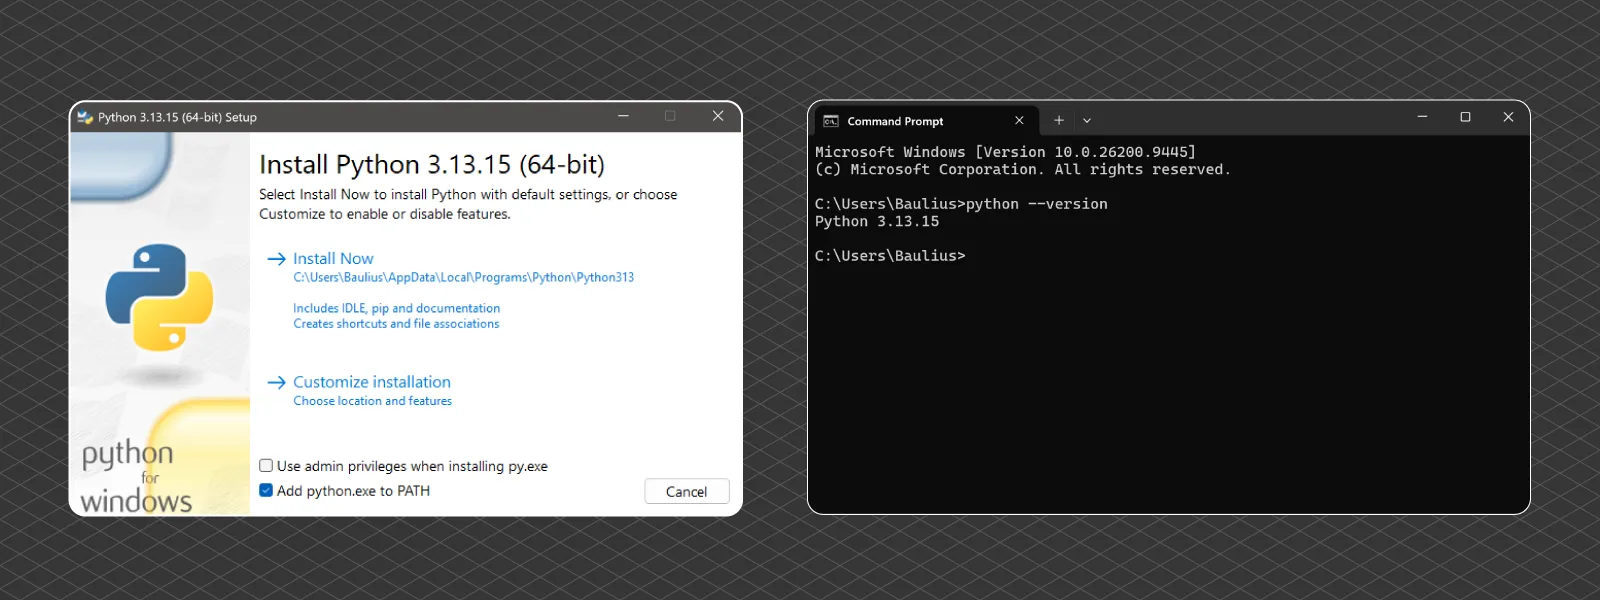
Get the installer. Go to python.org and open the Downloads page. Take the standard Windows installer it offers you. The default download is 64-bit, which is the one that works. Anything from Python 3.8 onward is fine, so the current version will do.
Tick the PATH box. At the bottom of the installer's first screen there is a checkbox that says Add python.exe to PATH. Tick it before you click Install. This is the step people miss, and missing it is why the command later says that python is not recognized. Then click Install Now and let it finish.
Check that it worked. Press the Windows key, type cmd, and press Enter. That opens Command Prompt, the black text window. Type this and press Enter:
If it answers with something like Python 3.13.2, you are set. If it says python is not recognized, or the Microsoft Store opens instead, the PATH box was not ticked. Run the installer again, choose Modify, and tick it.
 Put the script somewhere simple. Download pixpro2colmap.py and save it in a folder you can find again, C:\Splat for example. Leaving it in Downloads only makes the next part more annoying.
Exporting From Pixpro Step by Step
Step 1. Process the project. The export needs the 3D structure, so run at least that stage in Pixpro. If you also built a dense cloud, mesh, DEM, orthophoto or texture on the same machine, the undistorted images already exist and the script will reuse them and skip the slow step entirely.
Step 2. Open Command Prompt in the right folder. Open the folder where you saved pixpro2colmap.py in File Explorer. Click into the address bar at the top, type cmd over whatever path is there, and press Enter. A Command Prompt opens already pointed at that folder, so you do not have to navigate anywhere by typing.
Step 3. Copy your two folder paths. The script needs two: your Pixpro project folder, and an output folder for the result. The output folder does not have to exist yet, the script creates it, and it should sit outside the project folder. To get a path without typos, hold Shift, right click the folder, and choose Copy as path. That copies it with the quotation marks already around it, which matters because folder names with spaces break the command otherwise.
Step 4. Type the command. It has four parts in this order: the word python, the script name, the project folder, then the output folder. Type python pixpro2colmap.py , paste the project path, type a space, then paste or type the output path. It ends up looking like this:
Press Enter and leave it alone. It looks frozen while it undistorts the photos, which is normal, and a large project can take an hour.
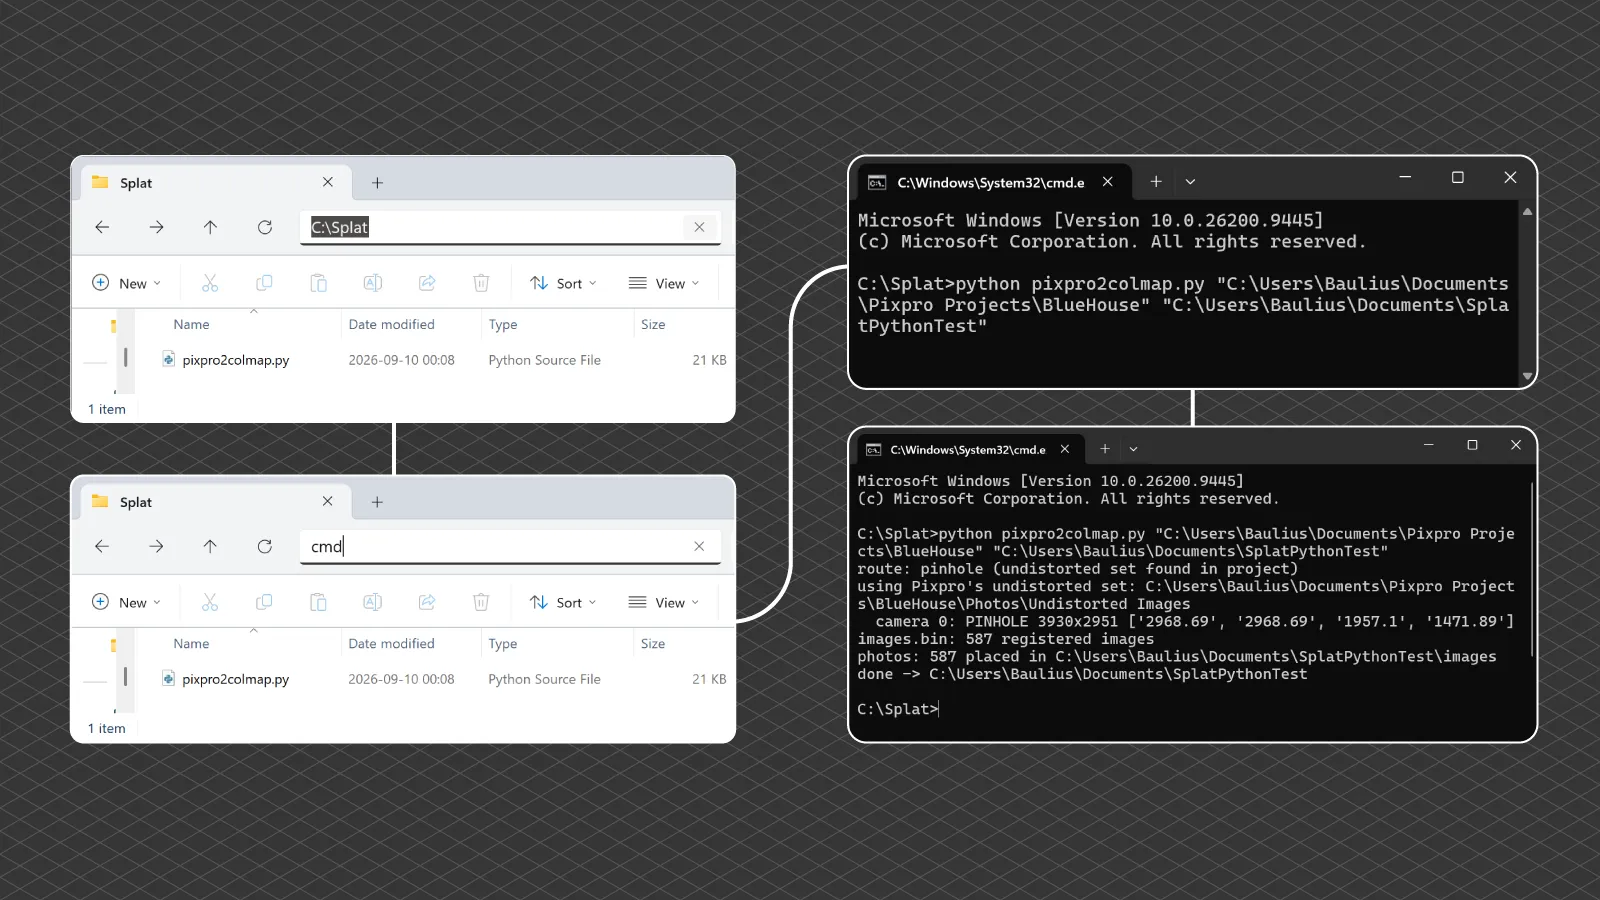 Step 5. Read what it tells you. The output reports which route it took, the camera model, the resolution and intrinsics, and how many images were registered. If it says something like images.bin: 1758 registered images and finishes with done, you have a valid dataset sitting in your output folder.
That is the whole export. Only photos that made it into the 3D structure are written out, so anything Pixpro could not register is silently dropped, which is what you want anyway.
Which Photos to Export, Undistorted or Original
Every camera lens bends straight lines a little. Photogrammetry measures that bending precisely, and there are two ways to hand the result over. Either the export straightens the photos itself and gives the trainer clean images with a simple camera model, or it leaves your photos exactly as they are and passes the lens measurements along for the trainer to apply.
Undistorted photos is the safe answer. The export writes out corrected copies of your images with a PINHOLE camera model, which every splatting tool understands. It is the only option Nerfstudio, gsplat and the reference 3DGS trainer will accept. The cost is time and a little quality: it re-encodes every photo as a new JPEG, at roughly two seconds each, and the copies come out at a slightly different pixel size because the software crops them so no blank corners appear. This is the default, and if you are unsure, take it.
Original photos is faster and cleaner, and it only works in Postshot 1.1 or newer and in Brush. Nothing is re-encoded, your images go across untouched, and the exact lens model travels with them as FULL_OPENCV parameters. On the command line it is two extra pieces on the end:
The --images hardlink part is worth adding whenever your output folder is on the same drive as the project. Instead of copying the photos it points at the existing ones, so they appear instantly and take up no extra disk space.
One shortcut worth knowing on the undistorted route: if you already built a dense cloud, mesh, DEM, orthophoto or texture for that project on the same machine, Pixpro made the corrected images at the time and the export just reuses them. No re-encoding, no waiting. So on a project you have already taken through to an orthophoto, the safe option is also the fast one.
Importing Into Postshot
Postshot is the easiest destination and the one most people ask about. It is free to download, and it needs an Nvidia card, an RTX 2060 or better, which is worth checking before you get invested.
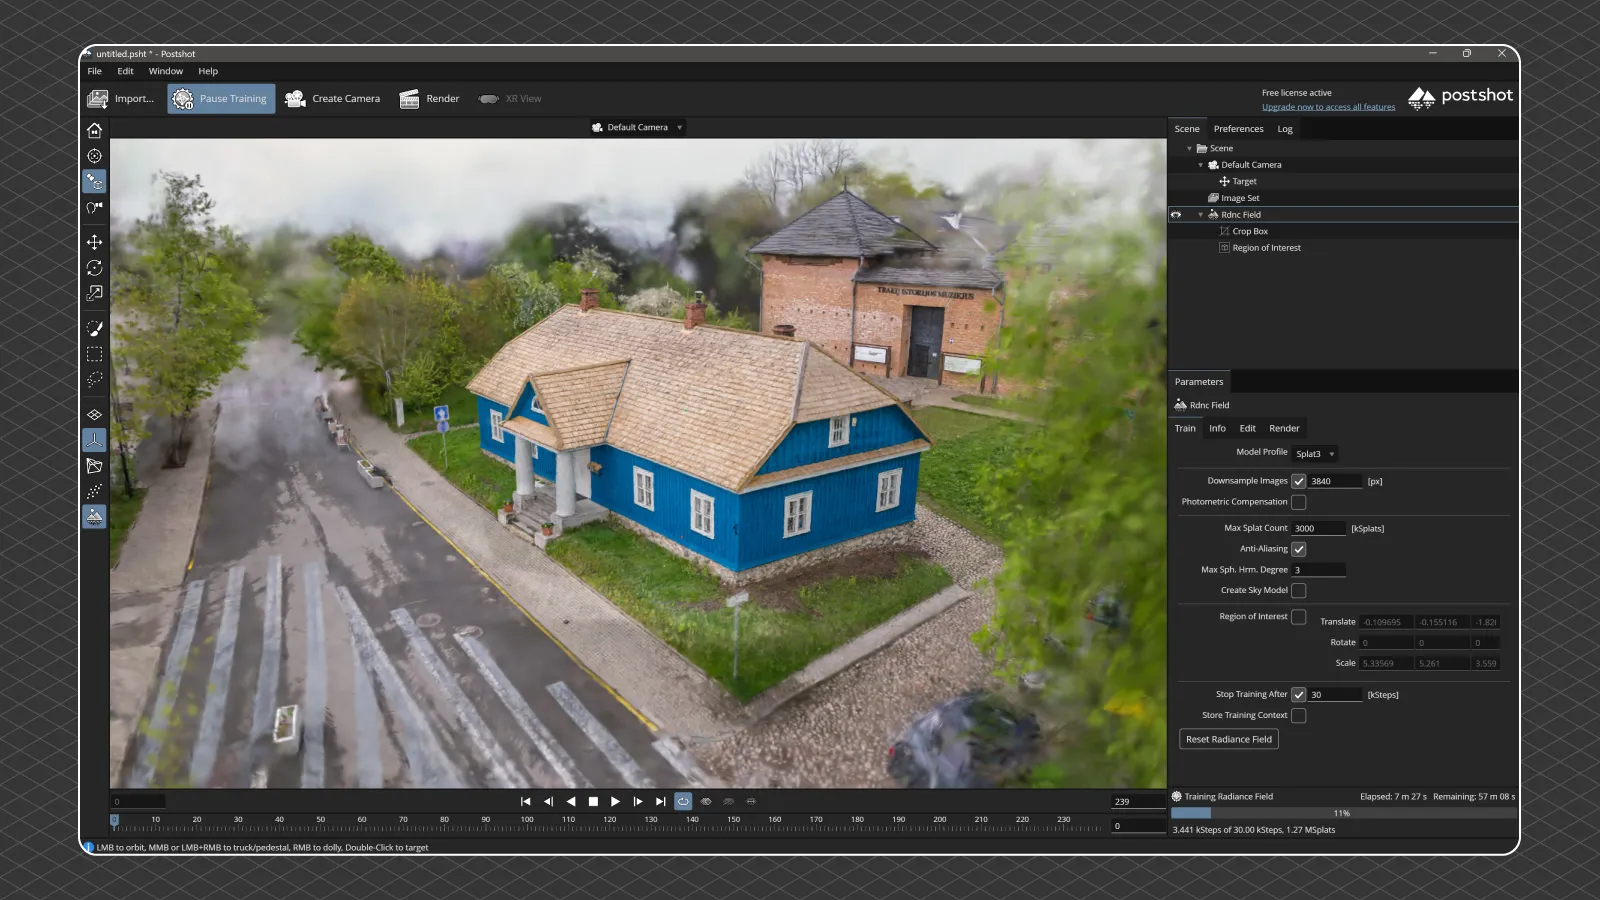
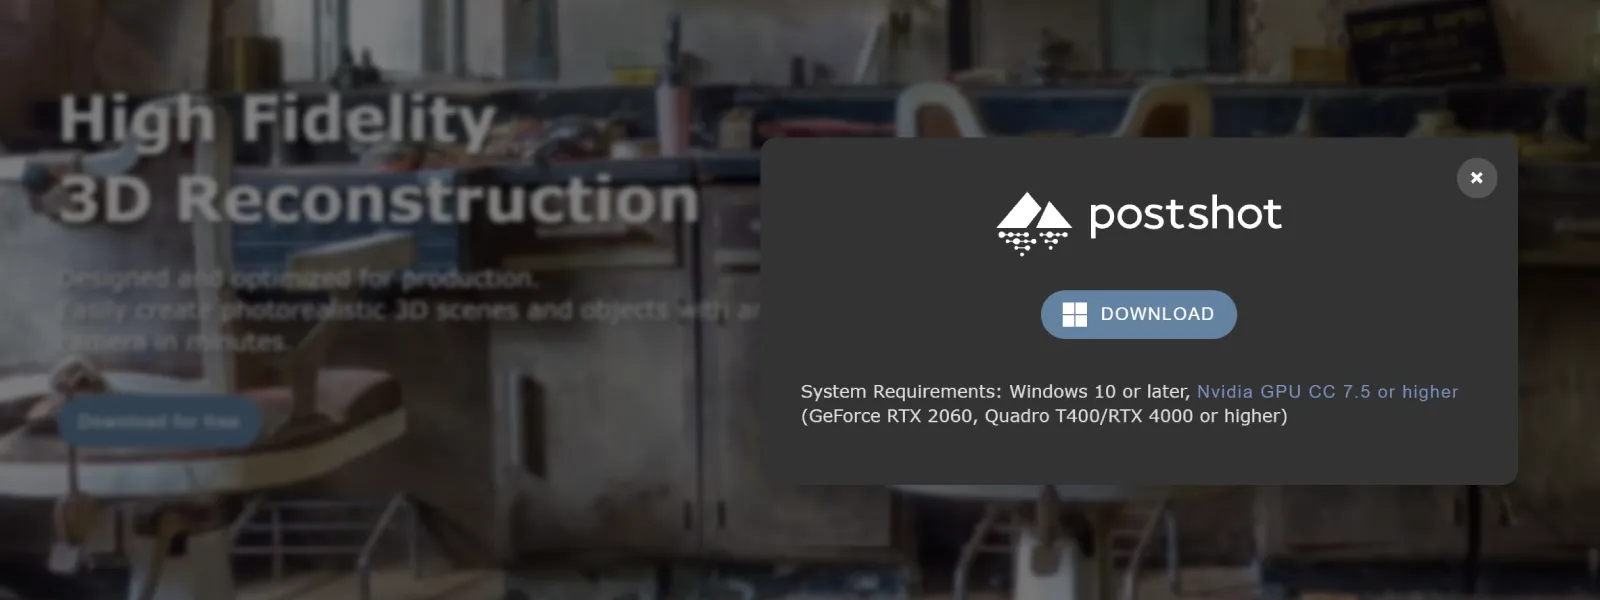 There is no command line involved and barely any procedure: drag the whole output folder into Postshot and that is it. It reads the images folder and the camera poses in sparse\0 on its own, so there is nothing to import separately and nothing to point at. Start the training and it works from your Pixpro solve instead of spending an hour computing its own.
If you are on Postshot 1.1 or newer, this is where the original photos route pays off. I have taken a scan through it that way and Postshot accepted the FULL_OPENCV cameras without complaint, with the export finishing in seconds rather than minutes because nothing had to be re-encoded. Older versions of Postshot do not read that lens model, so anything before 1.1 needs the undistorted route.
 Photos shot with a fisheye lens are handled either way. They come across as OPENCV_FISHEYE on the original photos route and as plain PINHOLE on the undistorted one.
One caution: do not drop extra .txt or .csv files into the images folder, because Postshot may refuse it.
Other Splatting Software
The output is a standard COLMAP dataset, so it is not Postshot specific. These four are more developer-oriented, so if you are already using one of them the commands below will look familiar, and if you are not, Postshot remains the easy way in.
 Brush. Open the output folder. It finds images and sparse\0 on its own. It also accepts the FULL_OPENCV route.
Nerfstudio. ns-train splatfacto --data "<out>" colmap --colmap-path sparse/0 --images-path images
gsplat. Point --data_dir at the output folder in examples/simple_trainer.py.
Reference 3DGS. python train.py -s "<out>"
Nerfstudio, gsplat and the reference trainer do not accept FULL_OPENCV, so those three need the undistorted route.
Bonus: The Same Export With a Window
The command line is the reliable way to do this, and it is what I would recommend. But the script is also wrapped in a small program with two folder pickers, a photos dropdown, and a log window that fills in as it runs. Same script inside, same output, no Python installation needed because the whole thing is packaged into one file.
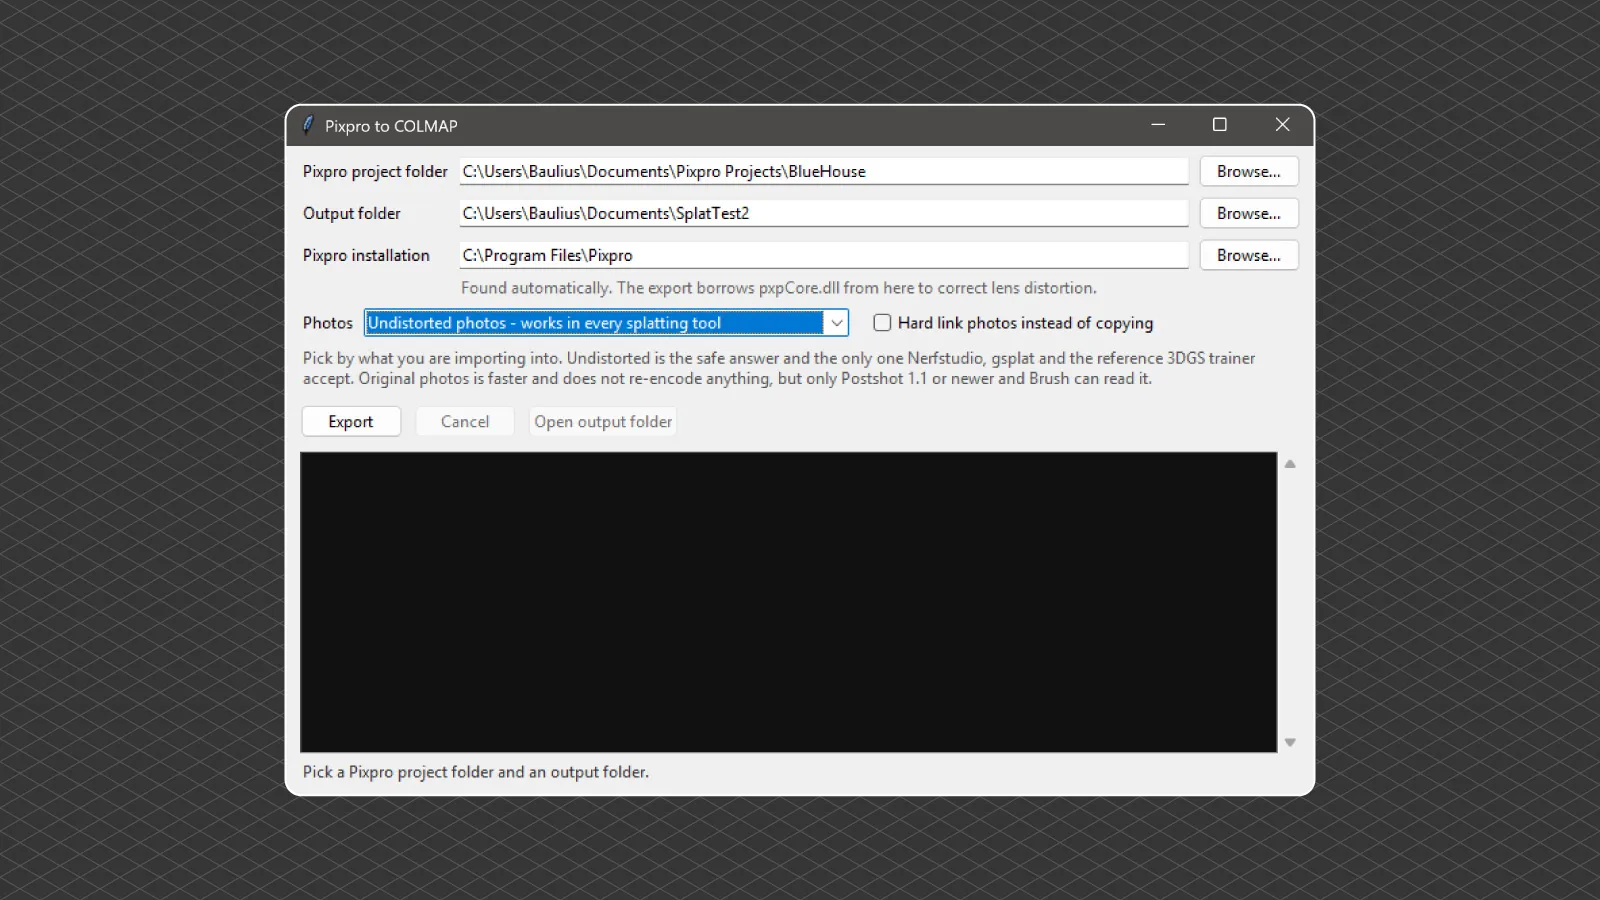 There is a catch, and I would rather say it plainly than have you find out by double clicking. It is not code signed. Windows will stop it on first run with a blue "Windows protected your PC" box, and you have to click More info and then Run anyway to get past it. That message means Windows does not recognize the publisher, not that it found anything wrong with the file. Some antivirus software may grumble at it for the same reason, since packaging a program this way is also what some malware does.
So use it if you trust me enough to click through that warning, and use the script above if you do not. Both do exactly the same job, and there is nothing in the tool that is not in the script.
Things Worth Knowing Before You Train a Splat
The coordinates are Pixpro's local reconstruction frame, not the georeferenced system of your project. It is meter-like and centered on the scene, but the scale and orientation the trainer sees are the local ones. For a visual output this does not matter. Do not expect to measure the splat, which was never the plan.
The undistorted photos are re-encoded JPEGs. They come out at a slightly different pixel size than the originals, because COLMAP scales them so no blank borders appear, and they carry no EXIF or GPS. The intrinsics in cameras.bin match the new files, so everything stays consistent. If that bothers you, use the full_opencv route and keep your originals untouched.
And the obvious one: the splat can only be as good as the capture. All the usual rules still apply, 80 percent overlap, sharp images, even light, and enough angles on the subject. A weak dataset that produced a mediocre photogrammetric model will produce a mediocre splat as well.
Conclusion
The gap between these two techniques is smaller than the marketing on either side suggests. They eat the same photos and both need the same hard problem solved first, so once Pixpro has computed the camera poses, handing them to a splatting trainer is a file format question rather than a reprocessing job. Reality Capture has offered this for a while, and now there is no reason to leave Pixpro out of that workflow.
What I like about it is that it stops the choice from being a choice. Fly the site once, process it in Pixpro, take your measurements from the model that was built to be measured, then export the same solve to Postshot and get a scene that looks good enough to put in front of a client. Two outputs, one flight, and the slow part only happens once.
Frequently Asked Questions
Can Pixpro export to Gaussian splatting software?
Yes. A Python script converts a processed Pixpro project into a standard COLMAP dataset with undistorted images, camera poses, and a sparse point cloud, which Postshot, Brush, Nerfstudio, gsplat, and the reference 3DGS trainer all import directly. There is no dedicated menu item for it in Pixpro yet.
Do I still need to run COLMAP?
No, and that is the point of the export. Pixpro has already solved the camera positions and lens calibration while building the 3D structure, so the trainer receives that solve and skips the slowest stage of the usual splatting pipeline.
Can I measure a Gaussian splat made from Pixpro data?
No. The export carries Pixpro's local reconstruction coordinates rather than the georeferenced project system, and a splat has no reliable surface or scale to measure against. Take measurements from the photogrammetric model and use the splat for visualization.
Do I need to know Python to use the export?
No. You install Python from python.org, save the script in a folder, and run one line in a Command Prompt with your project folder and an output folder after it. Nothing has to be edited or written, and the whole interaction with Python is that single line. There is also an optional tool with folder pickers if you would rather avoid the command line entirely.
Command Prompt says python is not recognized. What now?
The Add python.exe to PATH checkbox was not ticked when Python was installed, so Windows does not know where to find it. Run the Python installer again, choose Modify, tick the box, and finish. The same fix applies if the Microsoft Store opens when you type python.
Why does the export fail with a Win32 application error?
You are running 32-bit Python. The script loads Pixpro's 64-bit pxpCore.dll, so it needs a 64-bit Python 3.8 or newer. The standard Windows installer on python.org is 64-bit, so reinstalling from there fixes it.
What if the script cannot find my Pixpro installation?
It looks for the newest folder matching C:\Program Files\Pixpro\*. If yours is installed elsewhere, pass the path with --pixpro-dir "D:\Apps\Pixpro_1_7_18".
Should I export undistorted photos or the original ones?
It depends on the software you are importing into. Undistorted works everywhere and is the only option Nerfstudio, gsplat, and the reference 3DGS trainer accept, at the cost of re-encoding every photo. Original photos are faster and untouched, but only Postshot 1.1 or newer and Brush can read the FULL_OPENCV lens model they come with.
Why does Windows warn me about the download tool?
Because it is not code signed, so Windows does not recognize the publisher and shows a "Windows protected your PC" box. It is a warning about the absence of a signature, not a detection of anything harmful. Click More info and Run anyway if you are comfortable, or use the Python script instead, which does the identical job.
Photographer - Drone Pilot - Photogrammetrist. Years of experience in gathering data for photogrammetry projects, client support and consultations, software testing, and working with development and marketing teams. Feel free to contact me via Pixpro Discord or email (l.zmejevskis@pix-pro.com) if you have any questions about our blog.
Related Blog Posts
Our Related Posts
All of our tools and technologies are designed, modified and updated keeping your needs in mind
The Top 10 Pixpro Blog Articles So Far
We have been publishing on this blog every week for years now, on everything from stockpile volumes and coordinate systems to scanning a cake. So it seemed like a good time to look at the numbers and see which posts people actually read, rather than which ones we enjoyed writing.
 Pixpro Team
Portrait Orientation in Photogrammetry: When It Actually Helps
Is there anything to gain by scanning in portrait instead of the usual landscape? Sometimes, a little. But orientation is one of the least important decisions you make on a scan, and it is worth understanding why before you give it any more thought than that.
Pixpro Team
Better Photogrammetry Results Without Buying New Gear
Every time a new drone or camera comes out, the same thought appears: this is the upgrade that will finally fix my results. Sometimes it is even true. But in my experience, the gap between a mediocre scan and a great one is rarely the hardware.
Pixpro Team
Ready to get started with your project?
You can choose from our three different plans or ask for a custom solution where you can process as many photos as you like!
Free 14-day trial. Cancel any time.