.svg@webp)
Industrial Building and Roof Scan - Use Case Details
 Lukas
Zmejevskis
Lukas
Zmejevskis
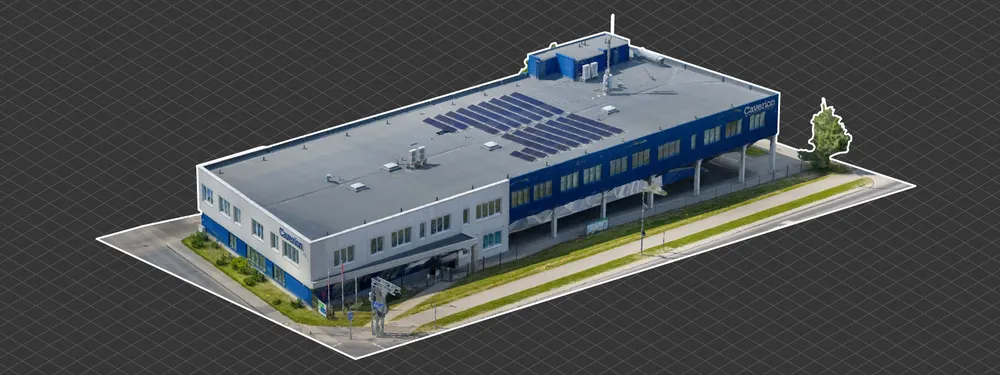
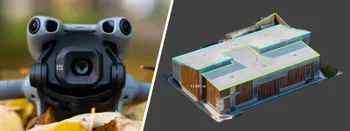
Photogrammetric scanning is the most accessible way of getting a digital twin of any technically scannable scene in the real world. For this use case, I have an industrial building requiring a reasonably detailed 3D reproduction for inspection, solar panel expansion, and general documentation. I made a serviceable scan in a few attempts. I will share the challenges and issues I encountered and the workflow process.
Main Challenges
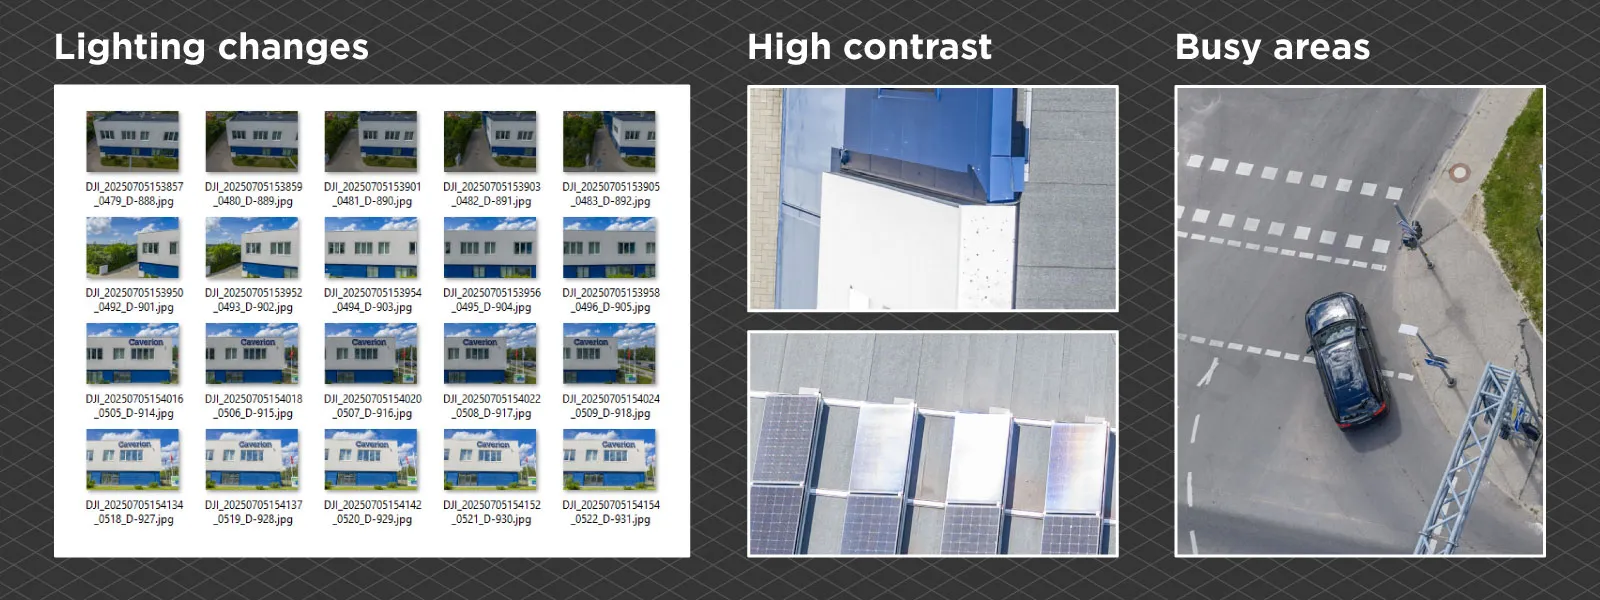
We encounter the usual culprits of photogrammetric challenges. Some are dynamic, some more static and easier to prepare for. Let me make a short list:
-
The building is relatively new and, therefore, clean. Cleanliness means the surfaces contain fewer visual features (such as dirt, grime, and weathering artifacts). Fewer visual features = harder photogrammetry. Visual features between photos taken from different perspectives are the cornerstone of photogrammetric algorithms.
-
Changing weather conditions and lighting. It was windy during the scan, so I had to be careful, and the cloud cover was changing constantly. Relying on auto exposure was hard, so I had to adjust exposure parameters by hand or continually tweak the EV plus or minus value for auto exposure. I chose to change the shutter speed mainly.
-
A relatively busy area. Lots of people, traffic, and movement in general. An overall safety concern but nothing out of the ordinary.
-
GPS jamming/spoofing issues. We have these issues nowadays, stemming from the geopolitical factors and conflicts in the area. Fortunately, I did not have any significant problems with the GPS.
 Initial Scan Issues
This use case was unique because there was a previous scan that did not go too well. I was tasked with identifying the underlying issues and properly scanning the building. We aimed to obtain aesthetically pleasing quality alongside good technical accuracy for planning and visual representation.
The first scan had two common issues that I identified:
-
Overlap reduction due to low-altitude flying. This issue occurs when we do not account for the relative distance change due to the height of the building. If we fly at an extremely low altitude of 30 meters and calculate the overlap at the takeoff point (which is the default for all drones and flight planners), a 10-meter building reduces the adequate overlap by 30 percent (unless, of course, we take off from the roof of the building). Such a reduction—not accounted for—can invalidate a scan on its own.
-
Lack of connective tissue between different altitude flights. The initial scan had a good idea of making multi-level and other types of flights for good 3D reconstruction; however, the perspective shift between these was too significant, and the software recreated two components that did not mesh well. When we combined that with issue number one, we could not get a usable 3D scene at all.
Fixing the Issues
Of course, to obtain a better scan than the initial one, I avoided the two issues mentioned above. I ensured that the overlap calculations in the flight planning solution (Pixpro Waypoints in our case) were offset by the height of the building, so the selected 80/80 percent overlap was applied to the roof of the building (which was 10 meters higher than the takeoff area).
Secondly, I ensured that there was plenty of connective tissue between different types of flights. To do that, I did not make these flights too different from each other—meaning I did them at similar altitudes. A similar flight altitude with the same camera means a similar overall perspective, even if some photos are nadir and some oblique.
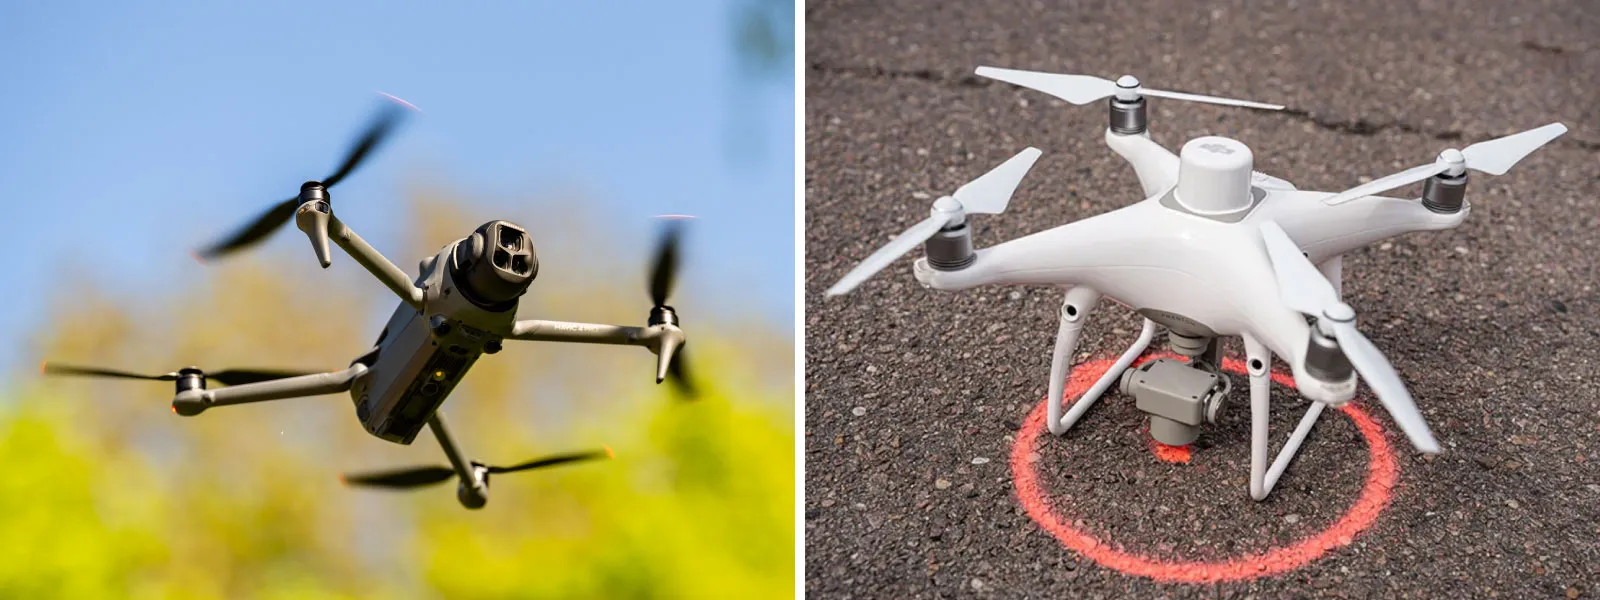
For this project, I used the DJI Mavic 4 to take photos and the DJI Phantom RTK to collect ground control points. The drone works just fine as any RTK rover if it can get a stable RTK GPS connection, which was possible in this case.
 Data Collection – Flight and Ground Control Points
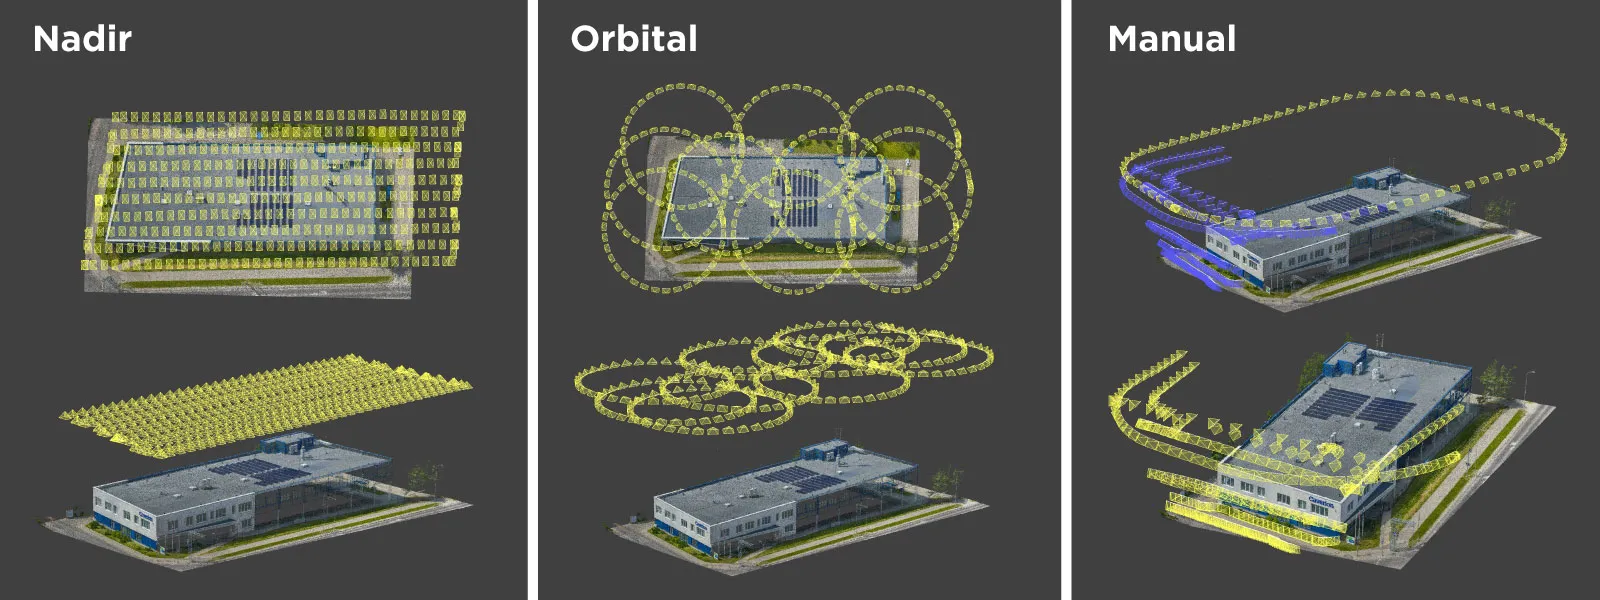
The flights I did consisted of three major parts:
-
Nadir scan for orthophoto needs and roof detail. I used Pixpro Waypoints to plan a single grid at a low 27-meter altitude, with overlap calculations offset by the height of the building.
-
Oblique orbital scans for good 3D structure. I did 10 orbits at low altitudes around the corners and both axes of the building, with the camera pointing at our subject at an angle that varied between 60 and 45 degrees.
-
Manual additions. We aimed to capture the facade in more detail than orbits and nadirs provide. So, I captured additional data for the white facade and logo part, as well as a single perimeter for the walls of the entire building.
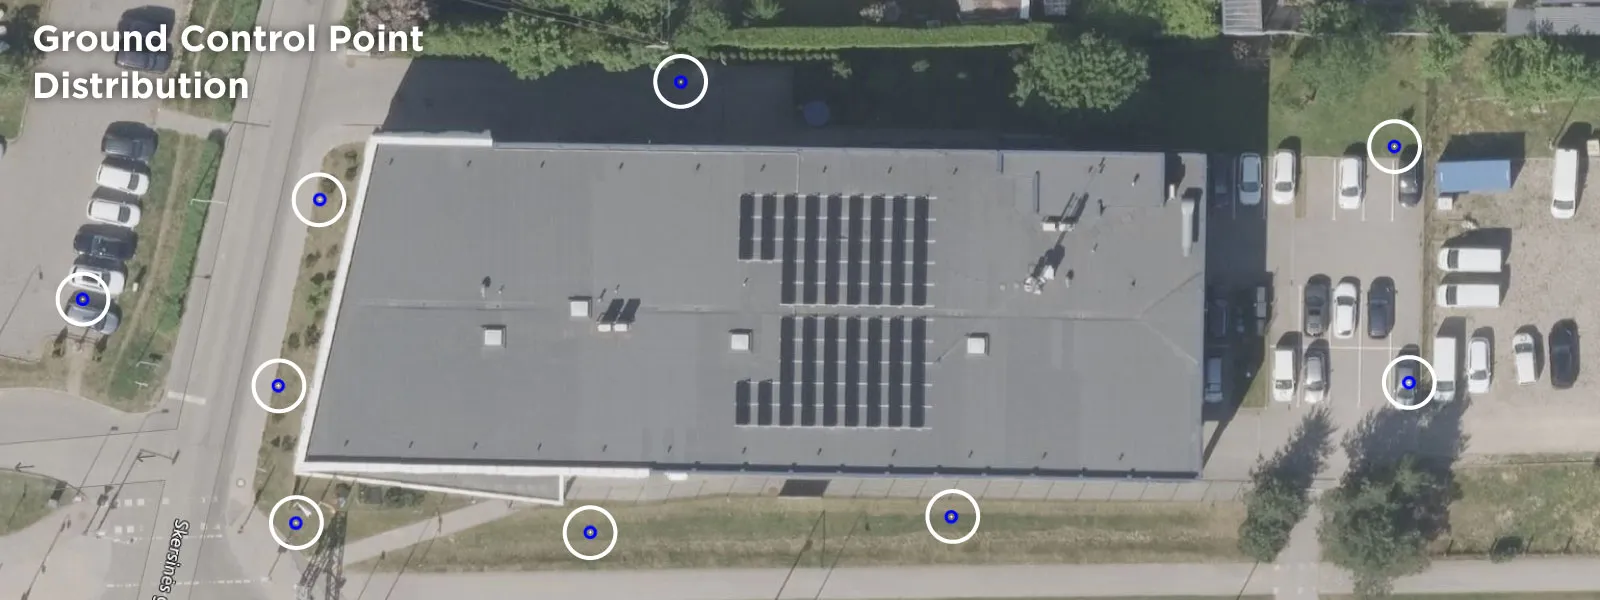
 In total, I obtained 1,148 26-megapixel RAW photos. In addition to these, I collected GCPs using my trusty Phantom RTK. I got 9 of those scattered equally around the building.
 Data Processing
The first step of data processing is to convert RAW photos to JPEGs. Because of the variable weather conditions, shooting RAW was a no-brainer choice. The contrast between the white facade and the dark blue and black parts of the building is stark, and weather conditions varied from direct sunlight to thick cloud cover, which exacerbated the issue. I always suggest shooting RAW and processing the images by recovering shadows and highlights in these situations. I did that in Adobe Lightroom Classic, as always, according to my general RAW processing tips.
Raw Photo Processing for Photogrammetry
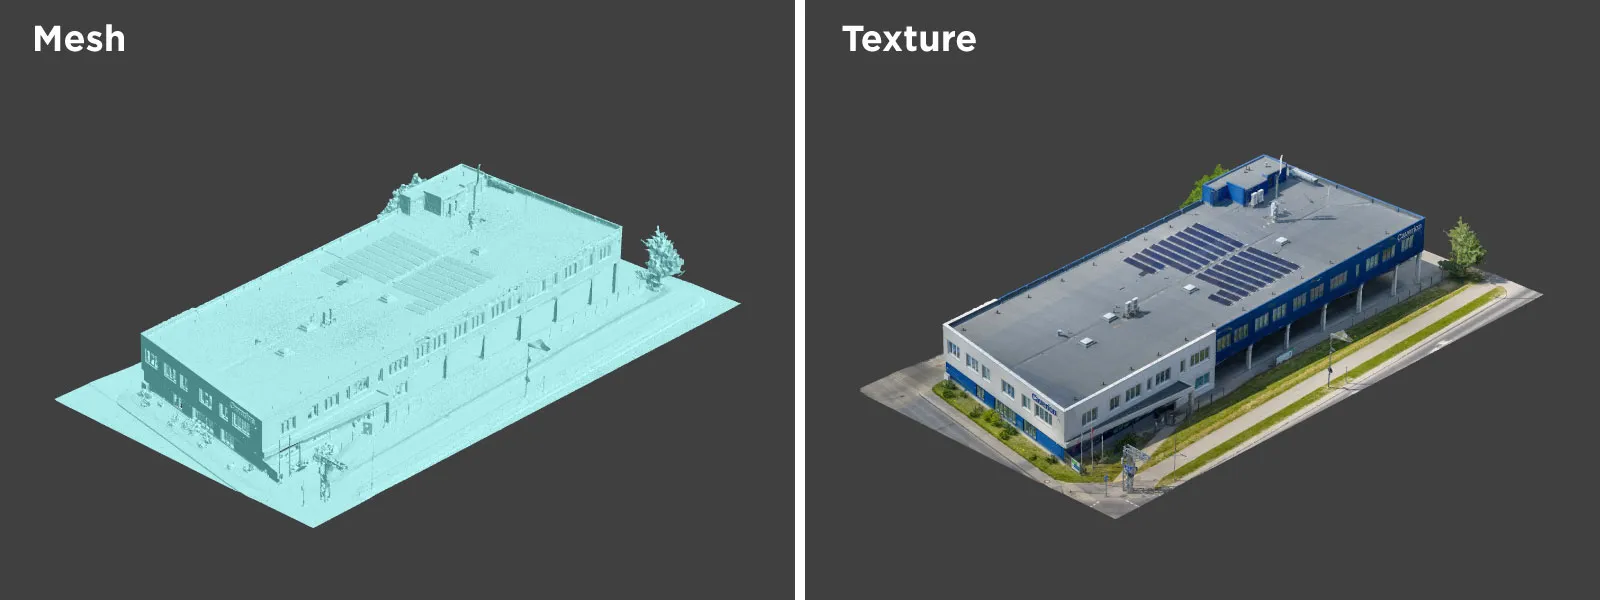
I put all the converted photos into Pixpro Photogrammetry software and processed them all simultaneously. There were no issues during this process. I did the usual steps of cropping the point cloud and selecting a larger texture size just for the show.
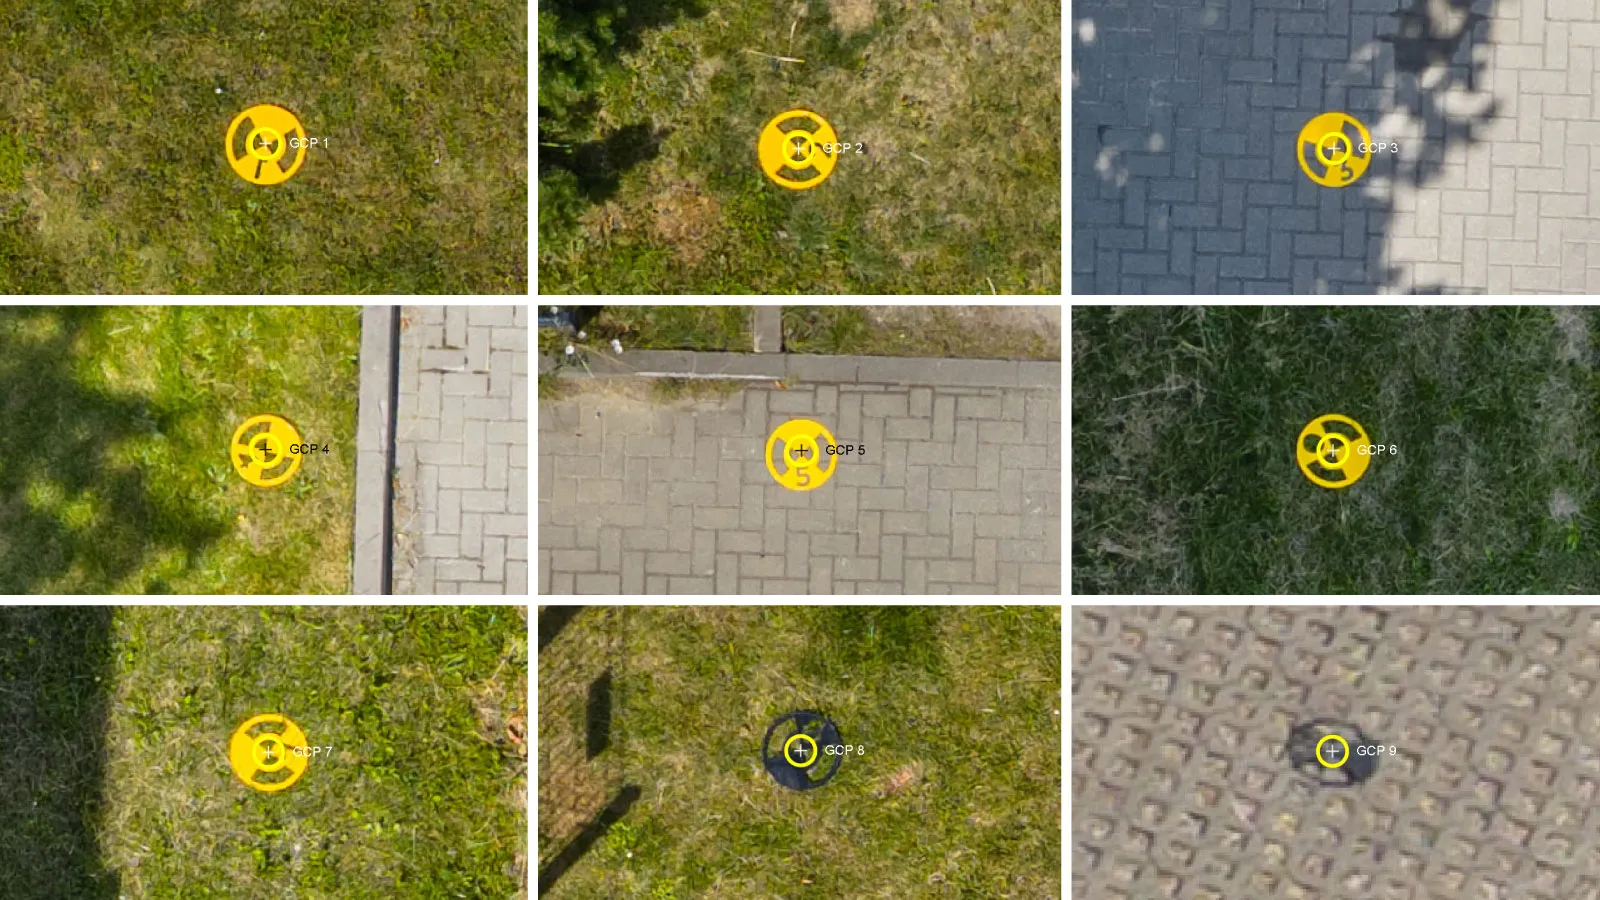 Ground Control Points (GCPs) were added after the successful 3D reconstruction using the software's "photos to GCPs" tool. This tool is seamless and works excellently—I only need to select the photos I made of the GCP collection, and everything else is done for me. After that, I projected the GCPs and ran the reoptimization step. After that, it's business as usual—dense point cloud, mesh, texture, DEM, and orthophoto if necessary.
GCP Workflow in Pixpro
How to use an RTK Drone as a GNSS Rover?
3D Processing Results
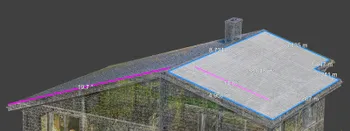
The result is an adequate-quality 3D model with good relative and absolute accuracy because we used ground control points. It is by no means aesthetically perfect, but given the building's intrinsic characteristics, it is pretty acceptable.
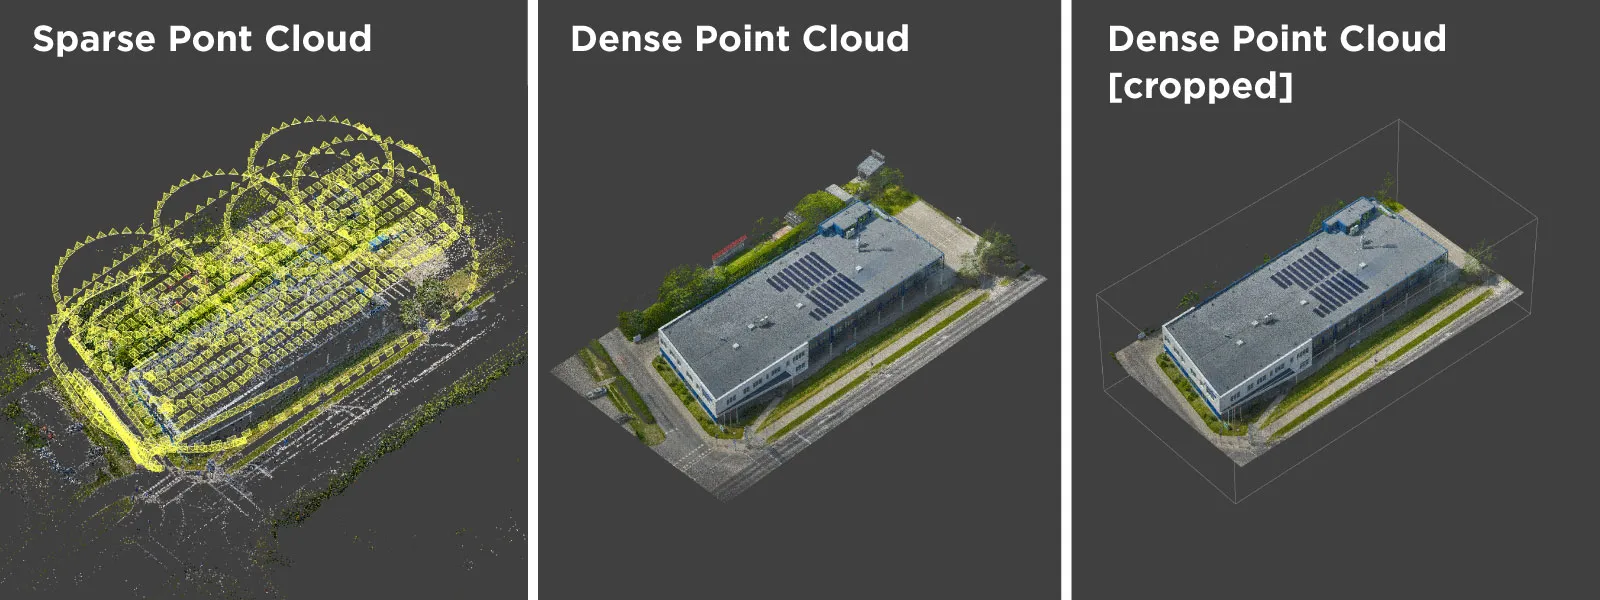 The changing weather conditions complicated things a little. Still, the texture does not seem bad, and the software did a good job of blending everything together. This 3D scene is ready for data analysis and export.
 Conclusion
Another use case for photogrammetry is complete. I hope this article gives insight into my thought process, which inevitably has been shaped by my experience in photogrammetric scanning. The case is not particularly special but represents some challenges you may encounter. I hope my solutions can help you in such cases. In fact, that is the entire purpose of the Pixpro Photogrammetry Blog in general—so check out other articles if you are interested in photogrammetric 3D scanning and all adjacent topics.
Photographer - Drone Pilot - Photogrammetrist. Years of experience in gathering data for photogrammetry projects, client support and consultations, software testing, and working with development and marketing teams. Feel free to contact me via Pixpro Discord or email (l.zmejevskis@pix-pro.com) if you have any questions about our blog.
Related Blog Posts
Our Related Posts
All of our tools and technologies are designed, modified and updated keeping your needs in mind
3D Roof Scanning with the DJI Mini 5 Pro
Another entry in our ongoing exploration of roof photogrammetry workflows. This time, the subject is the DJI Mini 5 Pro — DJI's latest 250g drone with a 1-inch sensor, omnidirectional obstacle avoidance, and Pixpro Waypoints support.
Residential House Scan Use Case - Complete Exterior
Dealing with a moderately complex request: a brand-new home building scan for documentation and solar panel installation planning. I had no opportunity to preplan any flights – just grab the drone and head to the location, with only a few listing photos as reference.
Observation Tower Inspection – Dual Lens Hyperlapse
Orbital flights are fundamental in photogrammetric scanning, especially when working with isolated structures such as towers, chimneys, monuments, or small buildings. They allow for detailed, wrap-around imagery of a subject using relatively simple flight paths and minimal setup.
Ready to get started with your project?
You can choose from our three different plans or ask for a custom solution where you can process as many photos as you like!
Free 14-day trial. Cancel any time.