.svg@webp)
Manual vs Automated Photogrammetry Flights – When to Use What
 Lukas
Zmejevskis
Lukas
Zmejevskis
Photogrammetry flight planning has never been more accessible. With new tools like Pixpro Waypoints and a slew of dedicated enterprise drones, the options for capturing a photogrammetric dataset are more flexible than ever. But that also raises the question: Should I fly manually or rely on automation? The answer, as usual, is: it depends.
This article provides a quick overview of how I personally decide when to use fully manual methods, when to rely on semi-automated tools, and when full automation makes the most sense. There is no single right approach, but there are clear use cases where one method is simply more efficient, safer, or more controllable.
Automation Tools
Automated flight plans are the backbone of consistent, high-quality photogrammetry at scale. This includes flight planning solutions like Pixpro Waypoints, where everything from overlap to flight height to camera angle is controlled and consistent. Once set up, you launch the drone, and it executes the plan with no deviation.
This is ideal for large roofs, fields, or building complexes where you want total control over coverage and minimal pilot stress. For example, a full city block scan with orbitals, multi-grid flights, and a nadir pass can be split into logical chunks and executed one after another. Repeatability is high, and the quality of the resulting model reflects that.
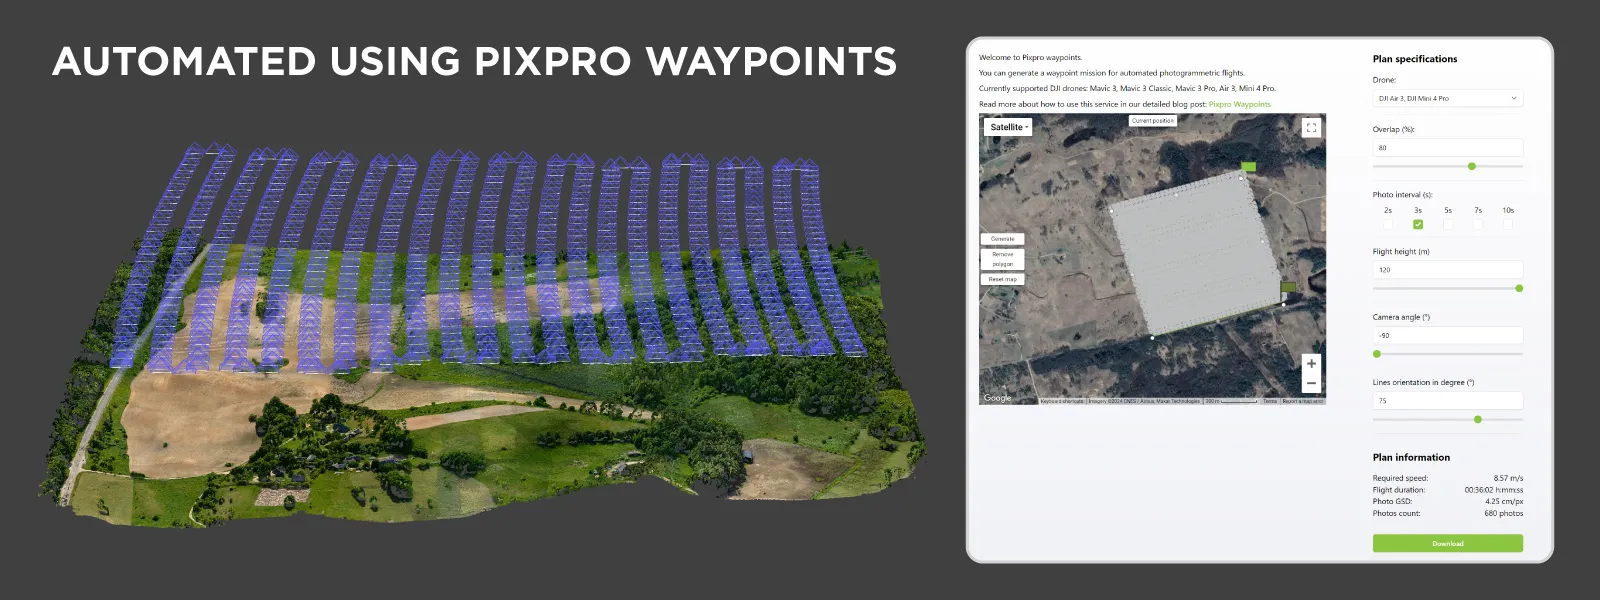 With Pixpro Waypoints specifically, the key benefit is having the precision in consumer-grade drones: it handles overlap and perspective control in a way that is hard to match manually, without the premium tax of enterprise-grade products.
Pixpro Waypoints - Automated Photogrammetry Flights for Newest DJI Drones
Pixpro Waypoints - FAQ Part 1
Pixpro Waypoints - FAQ Part 2
Semi-Automated Flights
Then there is the middle ground. Semi-automated flights are those where you still fly manually, but lean on some level of automated flying. Think hyperlapse orbit mode, or interval shooting with a fixed heading.
 This is my preferred approach when I do not have time to preplan or the job is too small to justify full automation. I will launch the drone, fly in a circular motion manually or using hyperlapse tracking, and let the camera do its thing at a 2-second interval.
This method shines in tight spaces, tower tops, monuments, or terrain obstacles where a waypoint grid is simply not an option. It is faster to deploy, easier to control visually, and allows you to adapt on the fly.
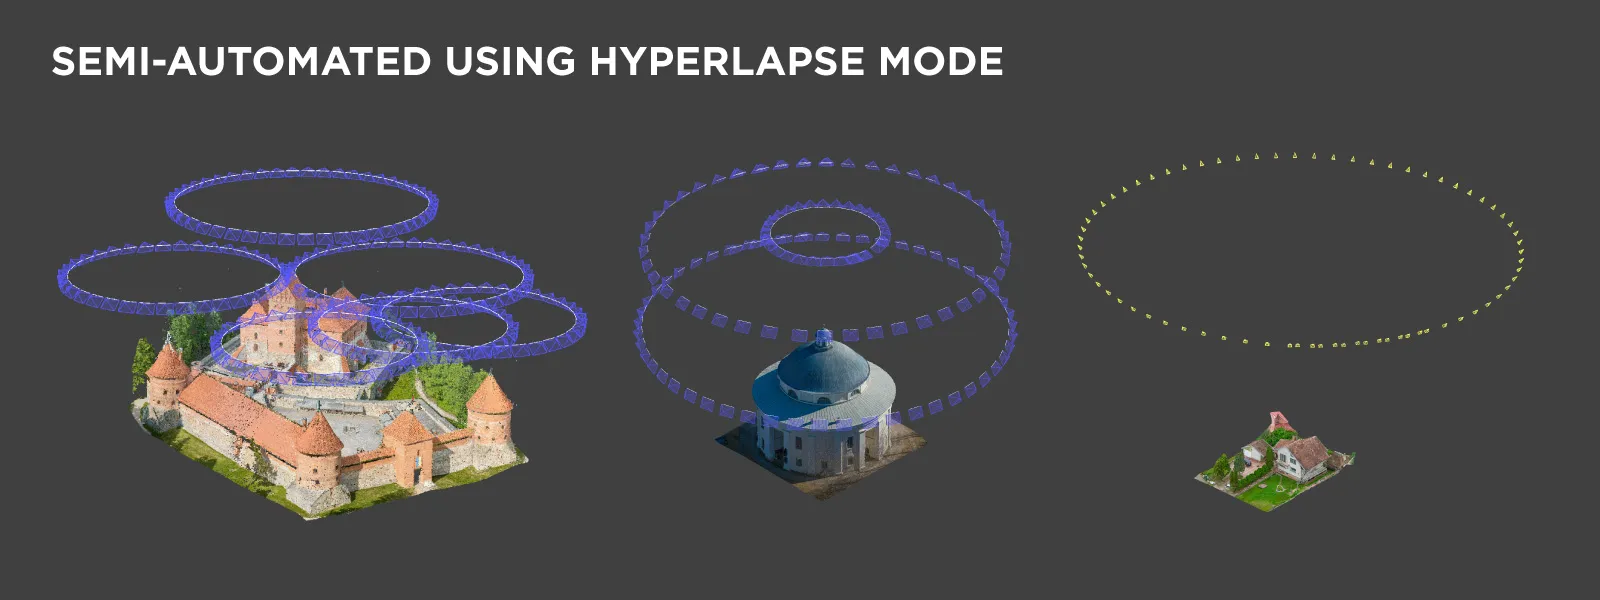 However, the trade-off is that you need experience and a basic understanding of coverage and overlap. Hyperlapse modes do not measure or let you control overlap in any meaningful way. We just need to select the working shooting interval and flight speed combo and track in our heads the approximate number of photos we take as a sanity check. This requires a whole lot more thinking than full automation but much more flexibility.
Manual Flying
Finally, there is full manual. This is where you fly and shoot entirely by hand—no flight plans, hyperlapse modes, or interval timers—just pure line-of-sight flying and real-time photo capture.
I do this frequently for smaller structures, roof inspections, and odd-shaped objects where even hyperlapse orbiting does not give the angles I want. Manual flying gives you the most flexibility and creative control.
You can combine low passes, fly-throughs, top-downs, or any angle you want in one mission. You react to lighting, obstacles, or unique geometry in real time. It is also the only reliable method for hand-held drone walking capture or interior shots where the GPS signal is unreliable.
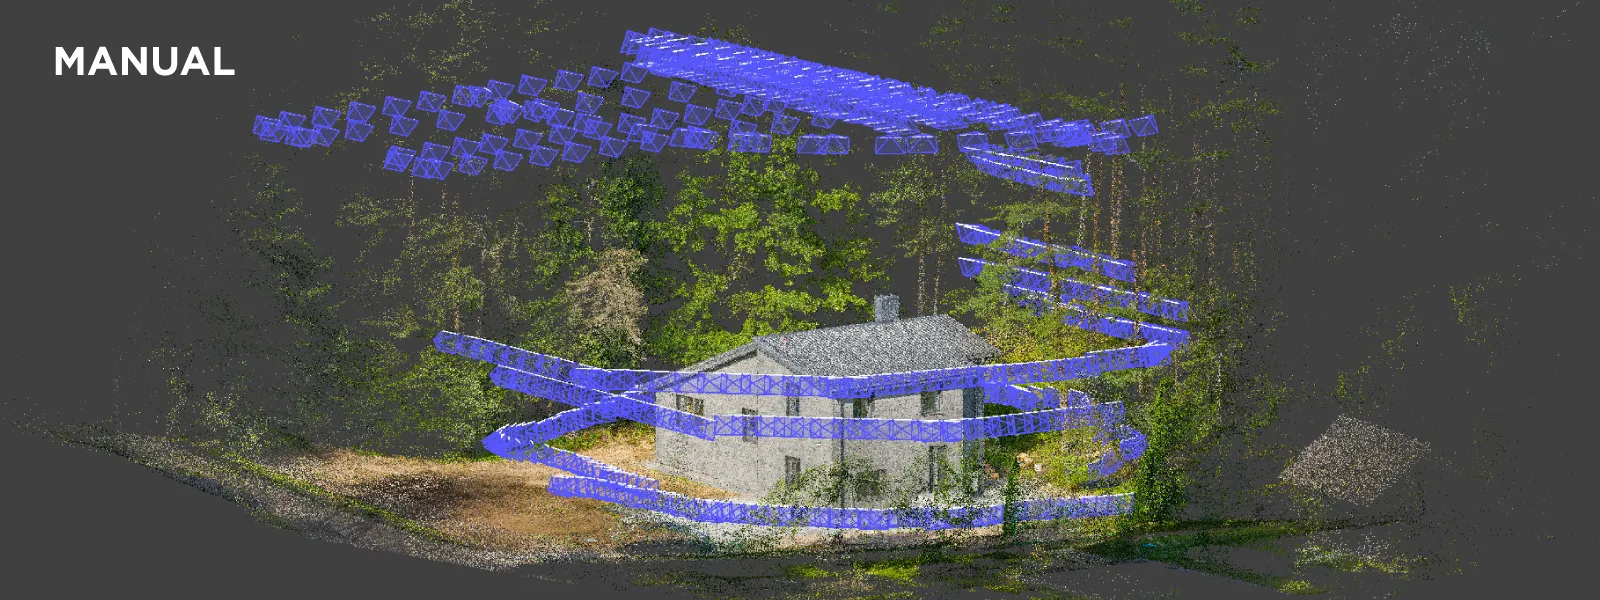 The downside? It is easy to mess up and requires further experience and a general understanding of photogrammetry. If you miss a few key angles or forget to take a photo, you might break the model. There is no overlap calculation and no spacing guides. You need to have a good sense of camera coverage and surface structure or be ready to revisit the site.
My Decision Process
So how do I choose which one to use?
-
If the subject is large, flat, or follows a predictable pattern, I default to Pixpro Waypoints. Nothing beats having an optimized grid or orbit plan already calculated.
-
If the space is tight or there is no time to plan, I use semi-automated hyperlapse or interval modes. These are good for towers, statues, or quick fly-arounds. In practice, depending on the need and the requirements, we combine this with manual capture in most cases.
-
If the geometry is complex and I need complete control, I go with the full manual. This is often the case when scanning interiors, under-roof overhangs, or capturing unique camera paths.
Another factor is light. If shadows are moving fast, clouds are passing, or I am chasing golden hour (which is quite different for photogrammetry), manual methods let me work with the light I have more flexibly.
Combining Flights
Of course, if the job is important and time permits, I will often combine all types of flights. I will run a few automated flights for structure, then fly manually for detail shots and wall data, and even walk around with the drone in hand for terrestrial capture. Finally, adding a hyperlapse orbit or two is always on the table, around the main subject or specific areas that I may feel need more data.
 Conclusion
There is no universal best method—only what works best for the subject, the environment, and the experience level. Mastering all three gives you the flexibility to adapt to any situation. Pixpro Waypoints exists because full automation is robust and scalable. However, even the best software cannot replace the decision-making of a good pilot.
Ultimately, it is not a question of manual or automated – it is knowing when to use each one. And if you get it right, the result is the same: clean, accurate, high-detail 3D models that serve their purpose.
Photographer - Drone Pilot - Photogrammetrist. Years of experience in gathering data for photogrammetry projects, client support and consultations, software testing, and working with development and marketing teams. Feel free to contact me via Pixpro Discord or email (l.zmejevskis@pix-pro.com) if you have any questions about our blog.
Related Blog Posts
Our Related Posts
All of our tools and technologies are designed, modified and updated keeping your needs in mind
Mid-Range Smartphone Photogrammetry: Poco X8 Pro Max vs iPhone 16 Pro Max
During my Sony A7 V review I argued that professional cameras are "solved" now. There is little left to revolutionize, and not much that still gets in the way of a competent shooter. I think we have reached the same point with mid-range smartphones.
The Cake is 3D – Food Photogrammetry Guide
Scanning foodstuffs can be fun and sometimes even useful. 3D asset creation for VFX, VR, and gaming industries is the most obvious use case, while showing off your homemade cake to your friends and family in 3D is more of a niche proposal.
Travel Photogrammetry - More Fun than 2D Photos
Sometimes a 2D photo does not do justice to a moment or a place, and you wish you had something more… dimensional. Something that captures shape, texture, and the little details that flat images tend to flatten even more.
Ready to get started with your project?
You can choose from our three different plans or ask for a custom solution where you can process as many photos as you like!
Free 14-day trial. Cancel any time.