.svg@webp)
Roof Scanning With Photogrammetry
 Lukas
Zmejevskis
Lukas
Zmejevskis
3D roof scanning for inspection and solar panel installation is one of the most common and accessible use cases for photogrammetry. If you are working in this area and looking to take advantage of photogrammetric workflows – this article is for you. Let us take you from A to Z on getting a 3D model of your object, doing some basic measurements, and exporting results.
Choosing a Drone for Roof Scanning
To 3D scan something not easily accessible – you need a drone. For those not well-versed in the latest tech, this might seem daunting, but only a few drones on the market can be considered good options. Used drone buying options are always a cost-effective way to begin flying. Buying a used drone will involve some risk and requires prior knowledge, so we recommend purchasing a new one. This way, you might get additional advice in the store and have a full warranty.
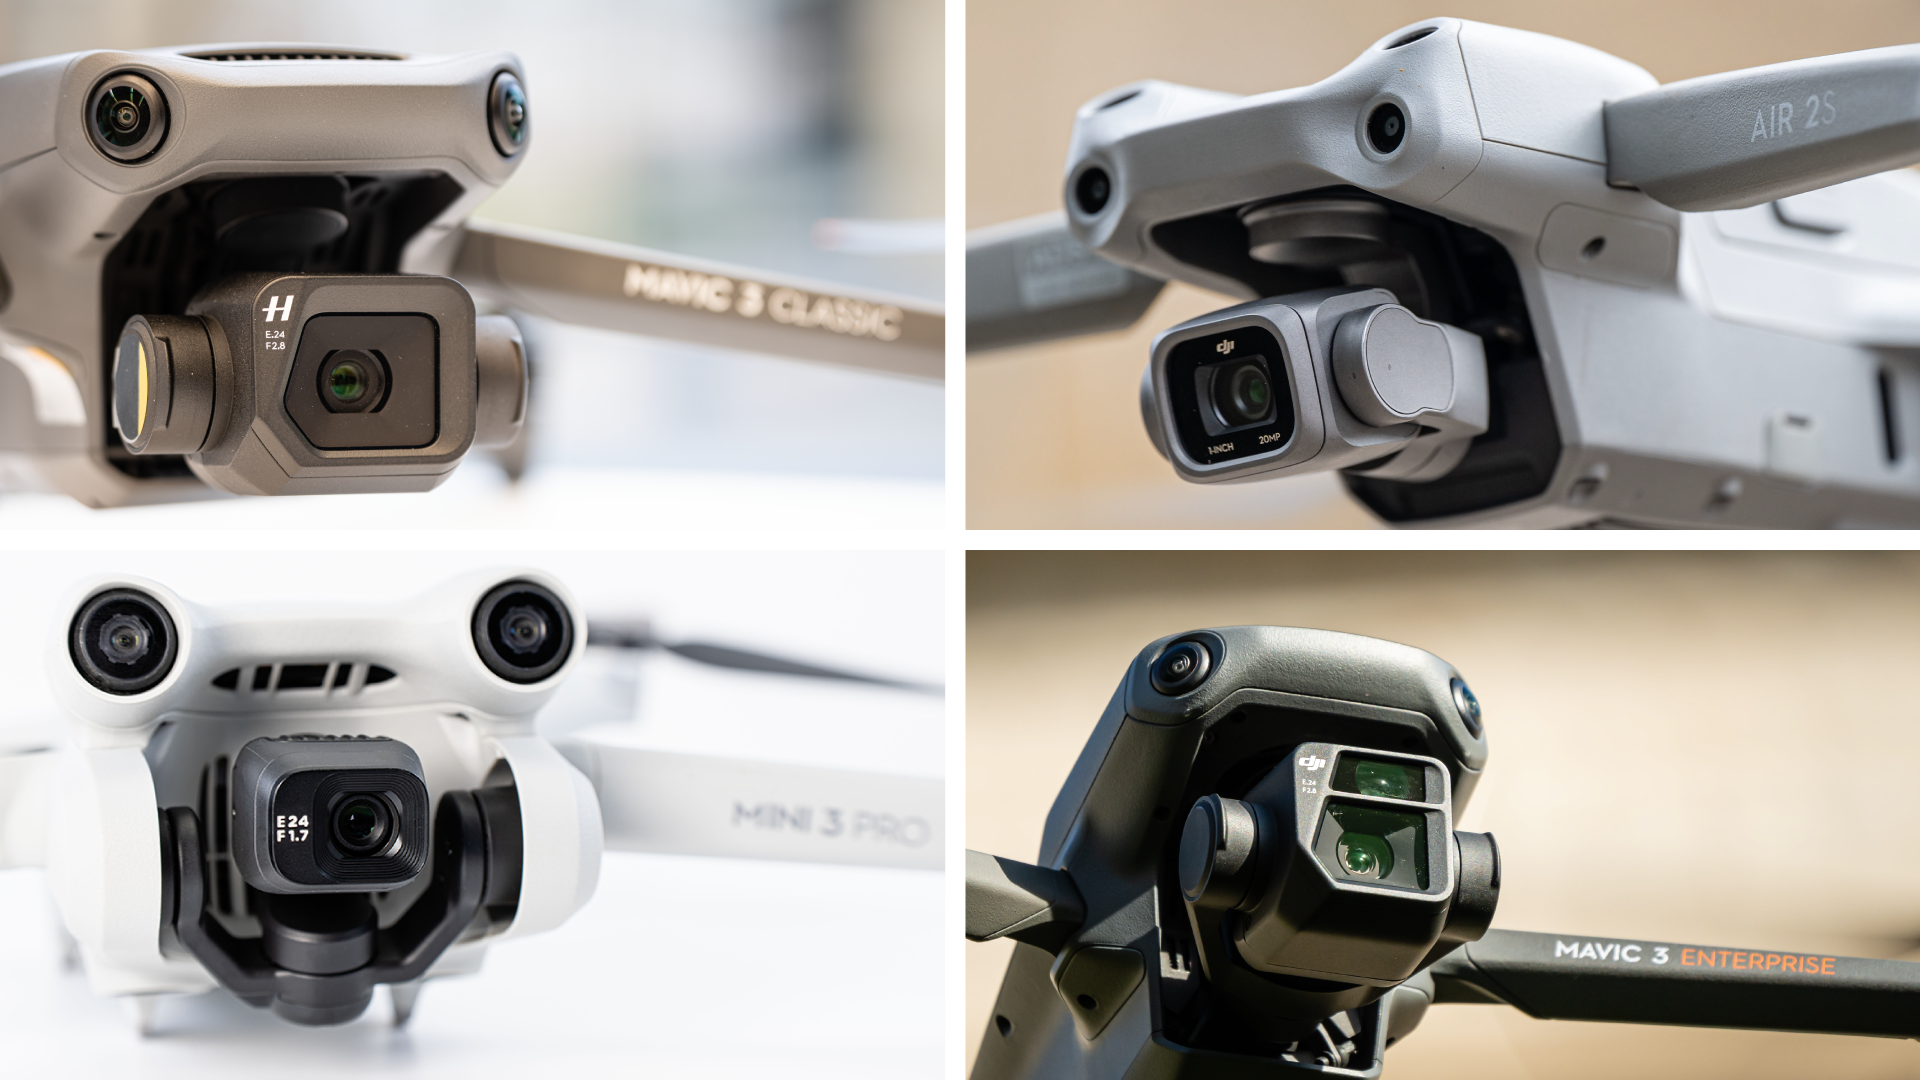
We need an excellent flying camera with GPS. High quality will give you good 3D reconstruction results, while GPS is for scaling and orientation. At the time of writing best drones for this purpose are DJI Mavic 3 Classic, DJI Air 2S, and DJI Mini 3 Pro. We would love to recommend more different manufacturers and models, but the fact is, there are none. These drones provide a stable flight experience, have tracking capabilities and provide good-quality photos. We are not considering enterprise drones because of their price. Still, the Mavic 3E is the drone for photogrammetry if you can afford it.
Camera Settings
Once you have your flying camera – a drone, you must learn how to use it and take good aerial photographs. What is a good photo? It is a technically sound image with no noticeable flaws that are relevant to the work at hand. Your results will only be as good as your starting date. You need to take well-exposed, not too dark or bright photos, which are sharp and in focus. It means you can see your subject clearly and in great detail.
You will need to explore camera settings and get out of auto mode to achieve that. If you are moving, keep the shutter speed high, so the photo does not become blurry. If you are flying at dusk, with less light, you have the same problem. You may also need to use manual focus to keep your subject in focus at all times. Learning to take photos is essential in photogrammetry, and there are no shortcuts. Let us take a look at some good and bad examples:
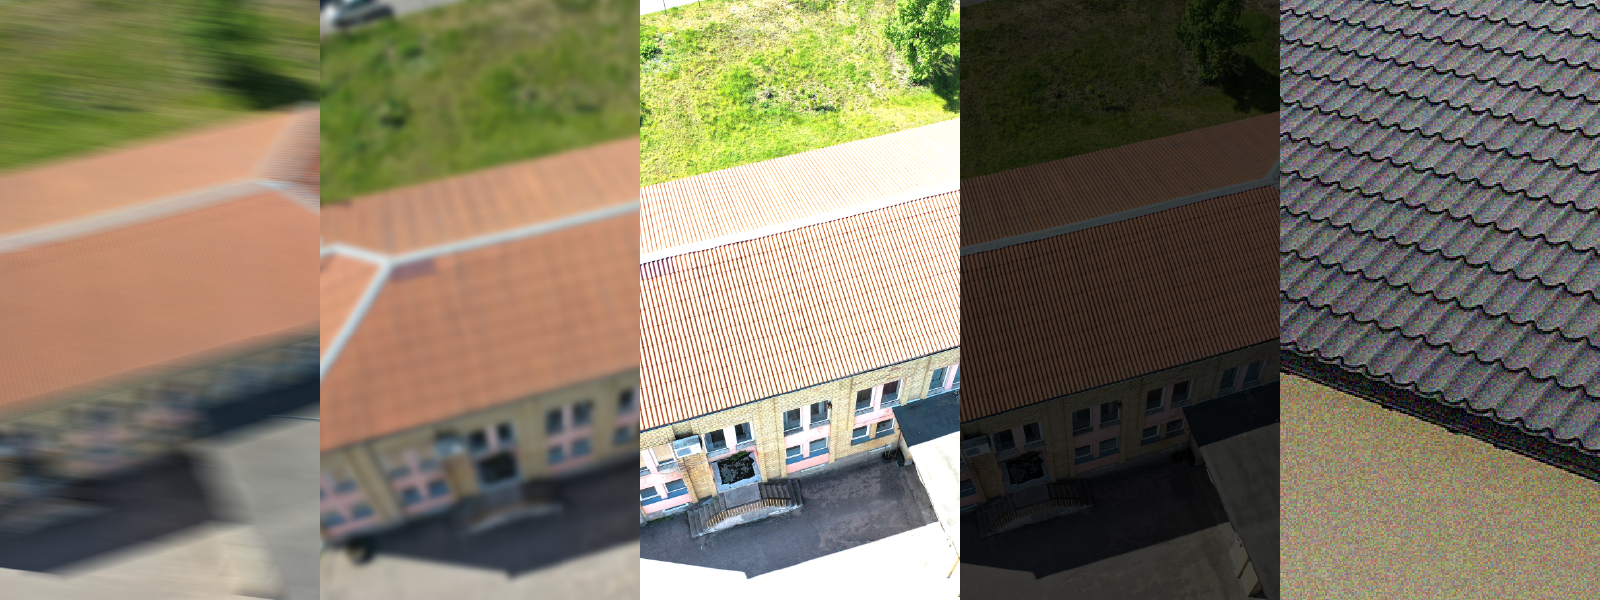
Motion Blur, Out-Of-Focus, Overexposed, Underexposed, Noise
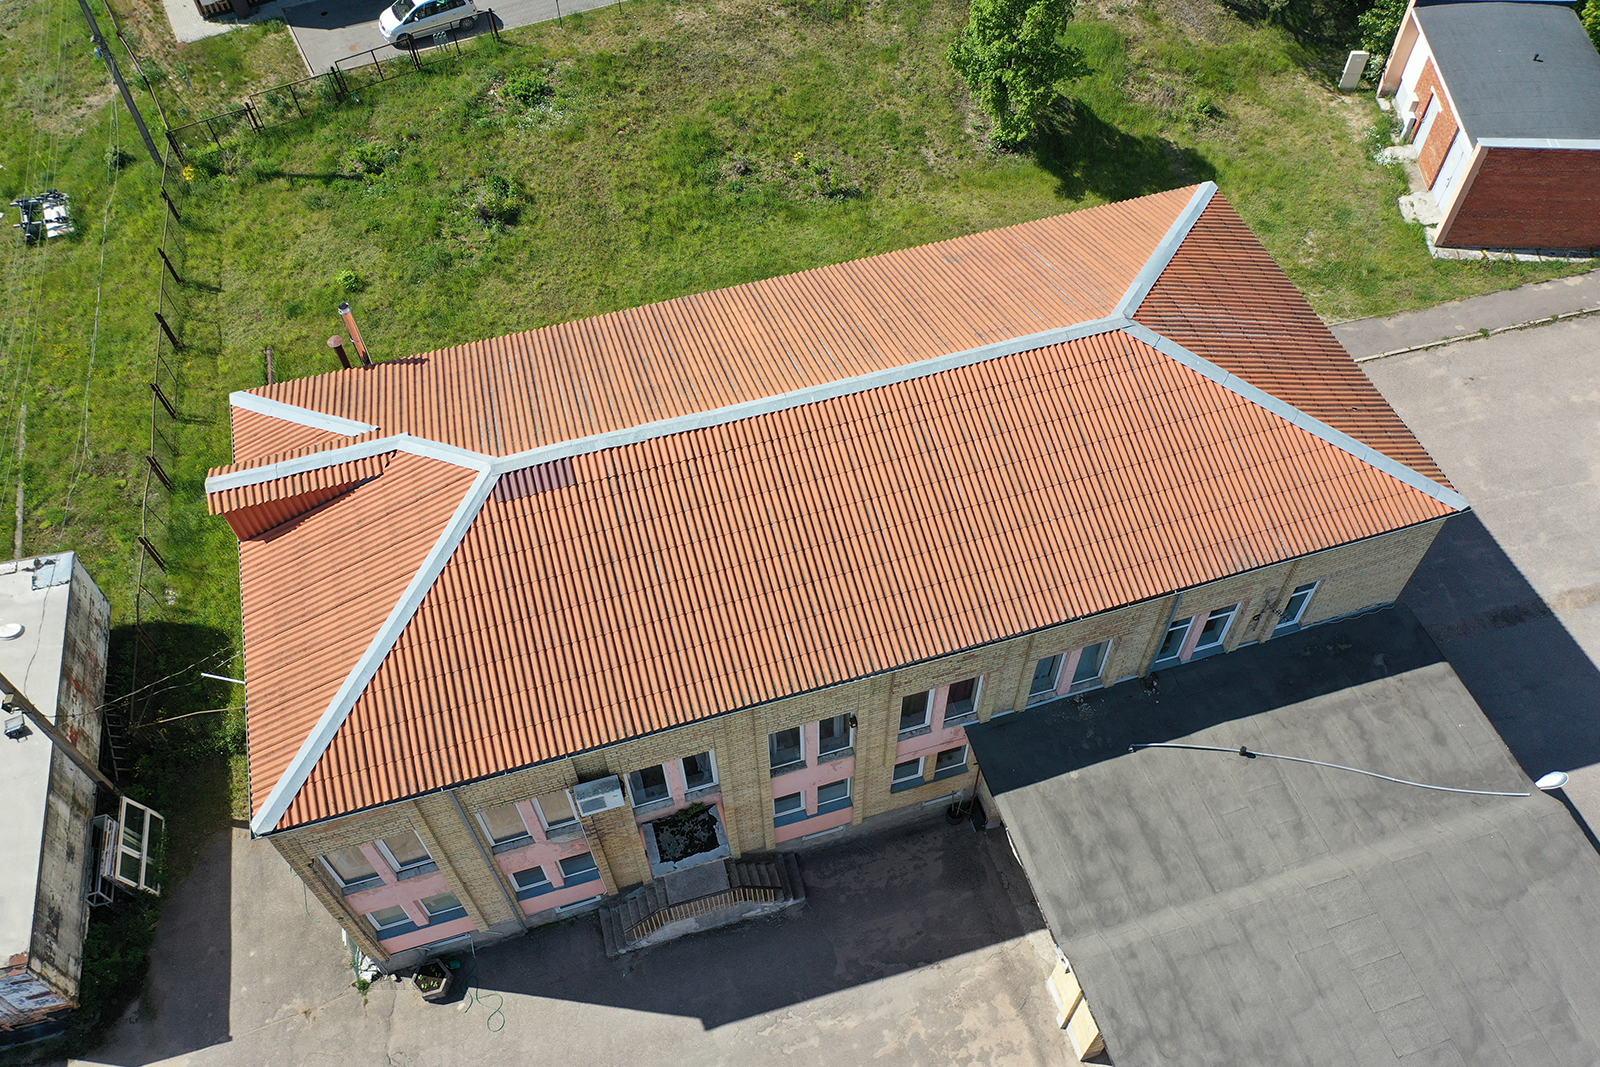
Good Photo Example
Fundamental Principles of Photogrammetry
Now that you can take technically good photos, you need to learn and understand how to fly to take photos for photogrammetry. Photogrammetry uses many images with different perspectives, calculating depth from those images and turning these depths into a 3D scene. In practice, this means a few basic things:
- Your subject or area of interest should be visible in all photos.
- All photos should be taken from different places.
- There should be a lot of overlap between all photos.
With this information alone, you can make photogrammetric 3D scans. In practice, a few flying techniques help to adhere to these principles.
Flying Techniques for Roof Scanning
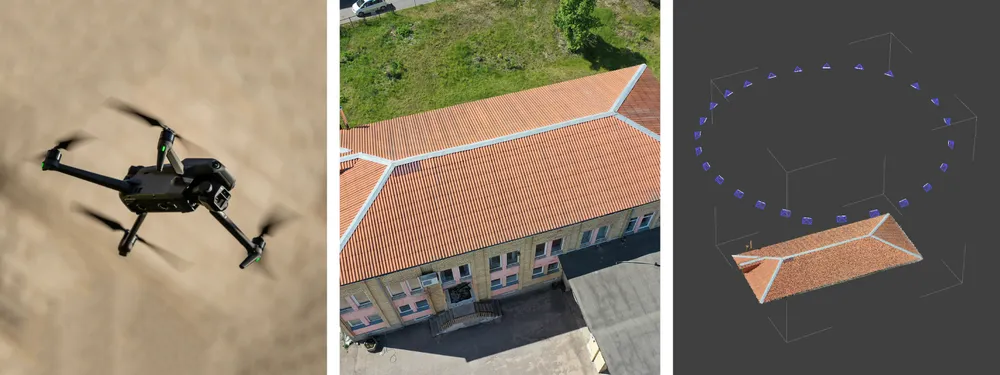
For small residential roofs, an orbital flight is the most efficient way of getting photos suitable for photogrammetry. It means flying around the roof in circles and taking many pictures. Flying is done manually or with the help of the tracking functions of your drone. Usually, these tracking modes are named “spotlight” or “point of interest”. We have a detailed article on manual orbital flying.
If your subject is a substantial residential or commercial roof, do a few orbital scans and a nadir scan. Larger objects are usually a question of planned flights and commercial drones, but you can do without them. Combining photos from a few orbits and a manual nadir scan will be effective for roof scanning as long as the fundamental principles are there.
Reviewing the Photos
Checking the photos you made is the most ignored part by many. You must examine them thoroughly before processing. You must filter out any unsuccessful, bad-quality images and unrelated photos. Photos made in the same exact spot and not containing your subject are undesirable. If you use poorly made photos, your processing time will prolong, and the results may be much worse than they should be. All photogrammetric software benefits from having to work with proper images only.
Photogrammetric Processing
We will process the photos in our Pixpro software. Still, the workflow should be essentially the same for many photogrammetry solutions. Firstly we create a project and upload the images to the software. In our photo manager, you can review the photos one last time and ensure no faulty pictures are in the set. Now go to “Full workflow,” select “3D reconstruction” and “Dense point cloud,” and press start.
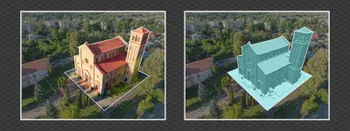
After the dense point cloud is complete, we check how our project looks. If everything seems to be in order, we can process the 3D mesh. Before creating a 3D mesh, we will crop our point cloud so that only our subject is visible. Processing the whole area will reduce the overall quality.
With the dense point cloud cropped, go to “Full workflow” again and choose mesh and texture for processing. Here we can control the size of our 3D mesh. If you plan to export the mesh into some software with limitations, you may need to limit its size. For this example, we select 100 thousand triangles, which should be small enough for most applications. You can decimate the mesh after the processing is complete as well. We can begin measuring and exporting the data when the processing is complete.
Measuring in Pixpro
We can take any measurements we like using lines in Pixpro. Watch the video below on how to do basic measurements of a roof example. When you place the line, measurements appear in the properties panel on the right side of the software. To set the line precisely, you can double-click on any line and edit its projections in photos.
Export from Pixpro
We can export the 3D mesh and any objects we draw for use in 3rd party applications. The export process is straightforward – you can right-click on anything in the layers panel and export the selected layers from there. Just choose the correct format and coordinate system for your application. Remember that most applications do not support geographic coordinates, so you may need to select local coordinates as your option.
Conclusion
Roof scanning described in this article can be learned and achieved in one day. If you follow it thoroughly, you can go from purchasing the drone at the store in the morning to having your 3D model in the evening. And with our Pixpro software, you can use cloud processing, so a powerful PC is unnecessary. We also help our clients in one-on-one remote sessions if anything goes wrong. Try our software for free now and get all the benefits.
Photographer - Drone Pilot - Photogrammetrist. Years of experience in gathering data for photogrammetry projects, client support and consultations, software testing, and working with development and marketing teams. Feel free to contact me via Pixpro Discord or email (l.zmejevskis@pix-pro.com) if you have any questions about our blog.
Related Blog Posts
Our Related Posts
All of our tools and technologies are designed, modified and updated keeping your needs in mind
Overlap Between Different Perspectives
Photogrammetry can be simple and rigid or complex and adaptable. Combining different scan patterns adds complexity to the work but improves detail and coverage. We often use examples of combined flights, of which the orbital + nadir grid is a classic. They provide great 3D structure while being easy
Pixpro Waypoints - Automated Photogrammetry Flights for Newest DJI Drones
The latest DJI drones are the most capable flying cameras on the market. If you need a tool like that or a competent machine for casual creation - DJI Mavic 3, DJI Mini 4, and DJI Air 3 series drones are the best.

Accuracy of Your Photogrammetry Project
Accuracy in photogrammetry is a multifaceted point of discussion. We can talk about absolute, relative, or even geometric accuracy, to name a few. No tool or technique can really prove anything beyond reproach.
Ready to get started with your project?
You can choose from our three different plans or ask for a custom solution where you can process as many photos as you like!
Free 14-day trial. Cancel any time.