.svg@webp)
Shutter Speed, ISO and Motion Blur in Drone Photogrammetry
 Lukas
Zmejevskis
Lukas
Zmejevskis
The days are getting shorter, and sooner or later every drone scan runs into the same situation. The light is fading, the job is not finished, and the drone is still moving. At some point the camera cannot get a sharp, clean image while flying at the speed you planned, and something has to give.
This is a two part article. This first part is the lesson: what shutter speed, ISO and motion blur actually do to a photogrammetry dataset, how they trade against each other, and where the line sits between flying through a scan and stopping for every photo. Next week I will put it to the test with some practical flights.
The Short Version
- Motion blur in pixels equals flight speed multiplied by shutter time, divided by ground sampling distance. The finer your ground sampling distance, the slower you have to fly.
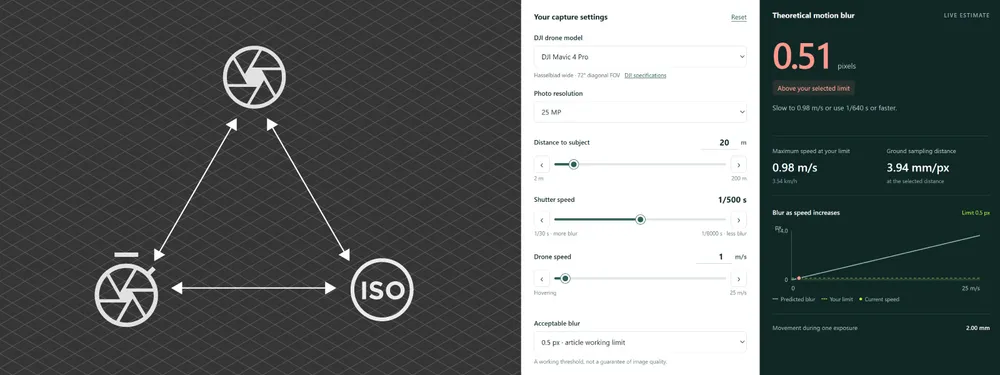
- Keep blur under about half a pixel. At 20 m from the subject, that limits a Mavic 4 Pro to about 1 m/s at 1/500 and about 0.12 m/s at 1/60.
- Depth of field is almost never a problem on drones, so opening the aperture is the cheapest light you can get, at the cost of a little sharpness.
- High ISO adds noise and reduces dynamic range, and noise hurts feature matching. Noise reduction helps up to a point, but it cannot invent detail that was never captured.
- When the speed you are allowed drops close to zero, stop the drone for each photo. It costs time, and a hovering drone is still not a tripod.
The Exposure Triangle, Photogrammetry Edition
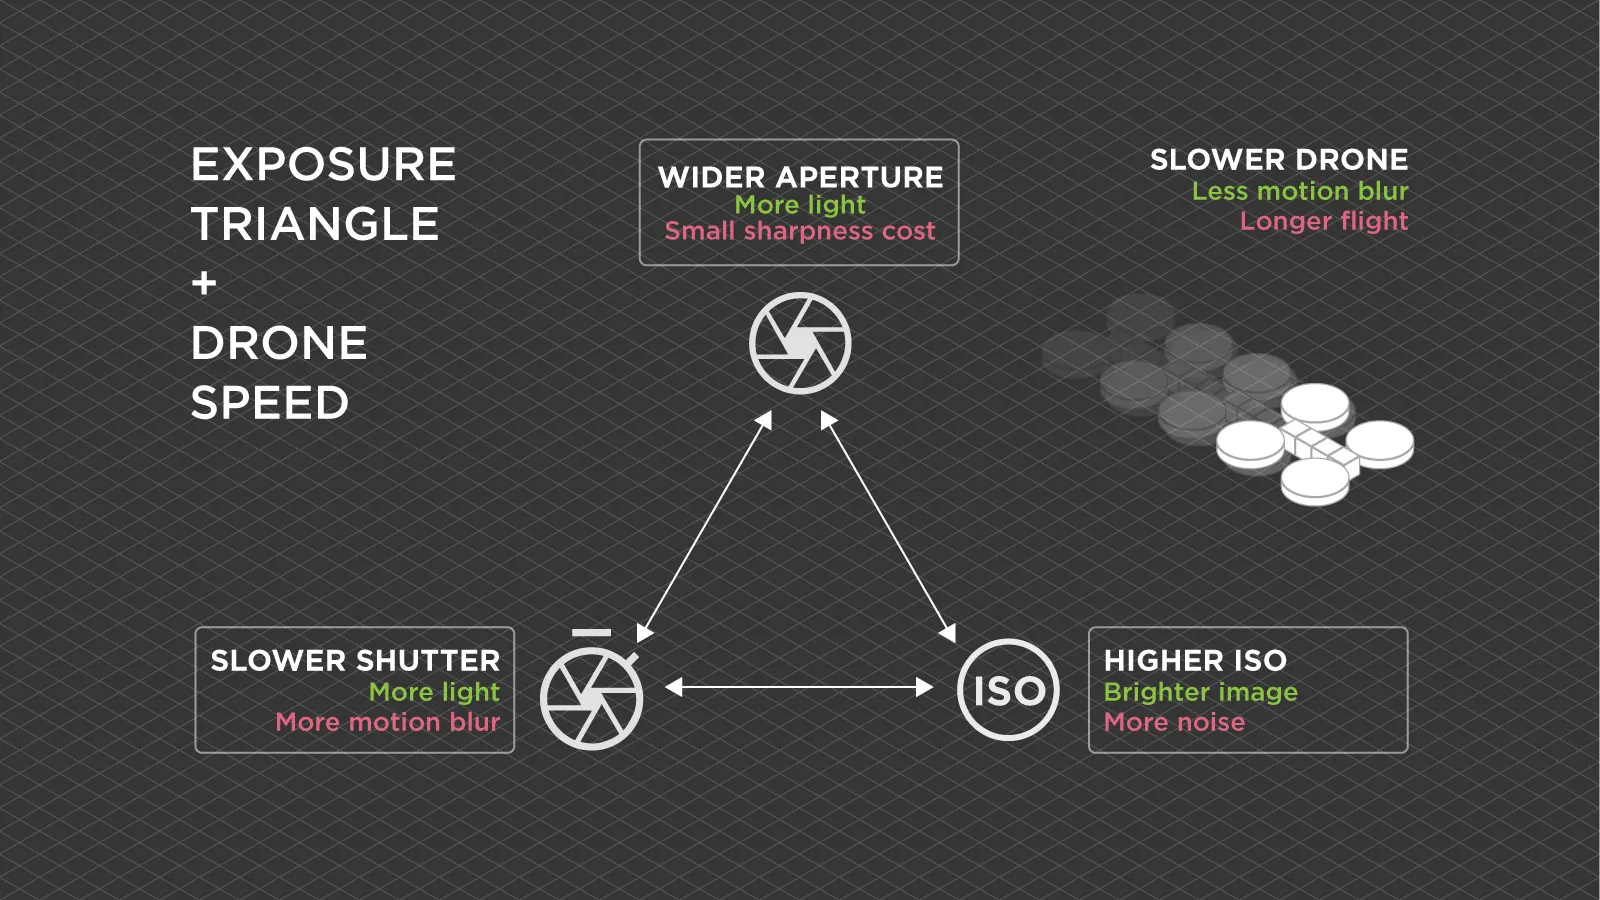
Every exposure is a balance of three settings: aperture, shutter speed and ISO. In normal photography each has an artistic side effect. In photogrammetry each has a technical cost.
Aperture controls how much light the lens lets in, and in a normal camera it trades against depth of field. On drones that trade barely exists. The lenses are short focal length wide angles on relatively small sensors, and both push depth of field deeper, so at typical scanning distances everything from a few meters to infinity is already within the sharp zone. Even the Mavic 4 Pro wide open at f/2 is a non-issue for depth of field.
It is not entirely free, though. Opening the aperture all the way does cost the Mavic 4 Pro a little overall image sharpness. It is not dramatic and you would struggle to notice it in most photos, but it is there. In fading light it is still the cheapest stop of light you can get, so it is usually the first thing to open.
Shutter speed controls how long the sensor collects light. Longer means more light and more motion blur.
ISO amplifies the signal after it is captured. Higher means a brighter image and more noise.
Once the aperture is open, you are left with a two way trade between blur and noise, and the only other lever is how fast the drone moves.
 Motion Blur in Numbers
Motion blur is how far the scene moves across the sensor while the shutter is open. For a drone flying past a subject, it comes down to one relationship:
Blur in pixels = speed × shutter time ÷ ground sampling distance
The part people miss is that blur is measured against your GSD. Fly closer for finer detail and every centimeter of drone movement becomes more pixels of smear. The finer your GSD, the slower you have to fly to keep it.
The Mavic 4 Pro in 25 megapixel mode gives roughly 4 mm per pixel at 20 m from the subject, 8 mm at 40 m and about 2.4 cm at 120 m. Here is the maximum speed that keeps blur under half a pixel:
| Distance to subject | 1/1000 | 1/500 | 1/250 | 1/125 | 1/60 |
|---|---|---|---|---|---|
| 10 m | 1.0 m/s | 0.5 m/s | 0.25 m/s | 0.12 m/s | 0.06 m/s |
| 20 m | 2.0 m/s | 1.0 m/s | 0.5 m/s | 0.25 m/s | 0.12 m/s |
| 40 m | 4.0 m/s | 2.0 m/s | 1.0 m/s | 0.5 m/s | 0.24 m/s |
| 80 m | 7.9 m/s | 4.0 m/s | 2.0 m/s | 1.0 m/s | 0.47 m/s |
| 120 m | 11.8 m/s | 5.9 m/s | 3.0 m/s | 1.5 m/s | 0.71 m/s |
Read the bottom row first. A nadir grid at 120 m flying 12 m/s on a bright day needs about 1/1000, which is why the area per battery test came out sharp. Now read the top rows. A close orbit around a house at 1/125, which is a perfectly ordinary evening shutter speed, allows you a quarter of a meter per second, which is well under a slow walk.
How Much Blur Is Too Much
A photo for viewing can hide a pixel or two of blur. A photo for photogrammetry cannot, because the software is not looking at the overall impression. It is looking for small, sharp, repeatable features and matching them between images. Blur softens exactly those features, and a softened feature matches less precisely or not at all.
Half a pixel is a common working limit. Around one pixel, fine texture starts to visibly suffer. Beyond that, fewer photos align, surfaces get rougher, and edges lose their definition. This is not a hard cliff, but it is a slope you start sliding down quickly.
In my opinion, half a pixel is a working limit rather than a conservative one. If quality is the priority, aim lower. There is also a sensor detail worth knowing: the Mavic 4 Pro actually captures 100 megapixel quad Bayer data and bins it down to the 25 megapixel files the table assumes. If you shoot the full 100 megapixel mode instead, each pixel is half the size, so the same drone movement becomes twice as many pixels of blur, and every speed in the table halves.
ISO Noise
Raising ISO does not add light. It amplifies what was captured, including the random noise that every sensor produces. In low light that noise becomes a visible grain, different in every frame.
That last part is the problem. Photogrammetry depends on finding the same feature in many overlapping photos. Random grain creates false features that appear in one frame and not the next, and makes real features less consistent. The result is weaker alignment and noisier dense clouds, which show up as bumpy surfaces on things that should be flat.
Higher ISO also reduces dynamic range, so shadows and bright areas lose detail sooner. In evening light, with dark eaves next to a bright sky, that costs you exactly the areas that were already hardest to reconstruct.
Noise reduction is the obvious response, and it does help, including the newer AI denoisers. But it works by smoothing, and smoothing removes fine texture along with the grain. Plain surfaces like rendered walls or smooth roofing can lose most of the texture the software needed to match them. No denoiser can create detail that was never captured.
Generative AI edits are worse. If a tool invents plausible looking texture where the data was weak, it invents it differently in every frame. To photogrammetry software that is not detail, it is contradiction, and on a dataset already at the edge it can be enough to break alignment or add geometry that does not exist. Clean the noise if you must, but never let anything make things up.
 The Trade-Off As the Light Drops
With the aperture already open, falling light leaves three options, and only three:
- Keep the speed and raise ISO. The scan stays fast and you pay in noise.
- Keep ISO reasonable and slow down, so a longer shutter does not blur.
- Stop the drone for every photo, which lets you use a long shutter at a low ISO.
There is no fourth option. Every low light scan is some mix of these three, and the art is knowing which one hurts your particular subject least.
Two practical notes. The light keeps changing while you fly, and a slow orbit at dusk can finish noticeably darker than it started, so in worse conditions do not use auto exposure at all. Set it manually, so it does not drift between frames. And in borderline conditions, shoot RAW. It gives you far more room to recover shadows and manage noise afterwards than a JPEG does. There is more on getting camera settings right in the photogrammetry settings checklist.
Orbits Versus Grids
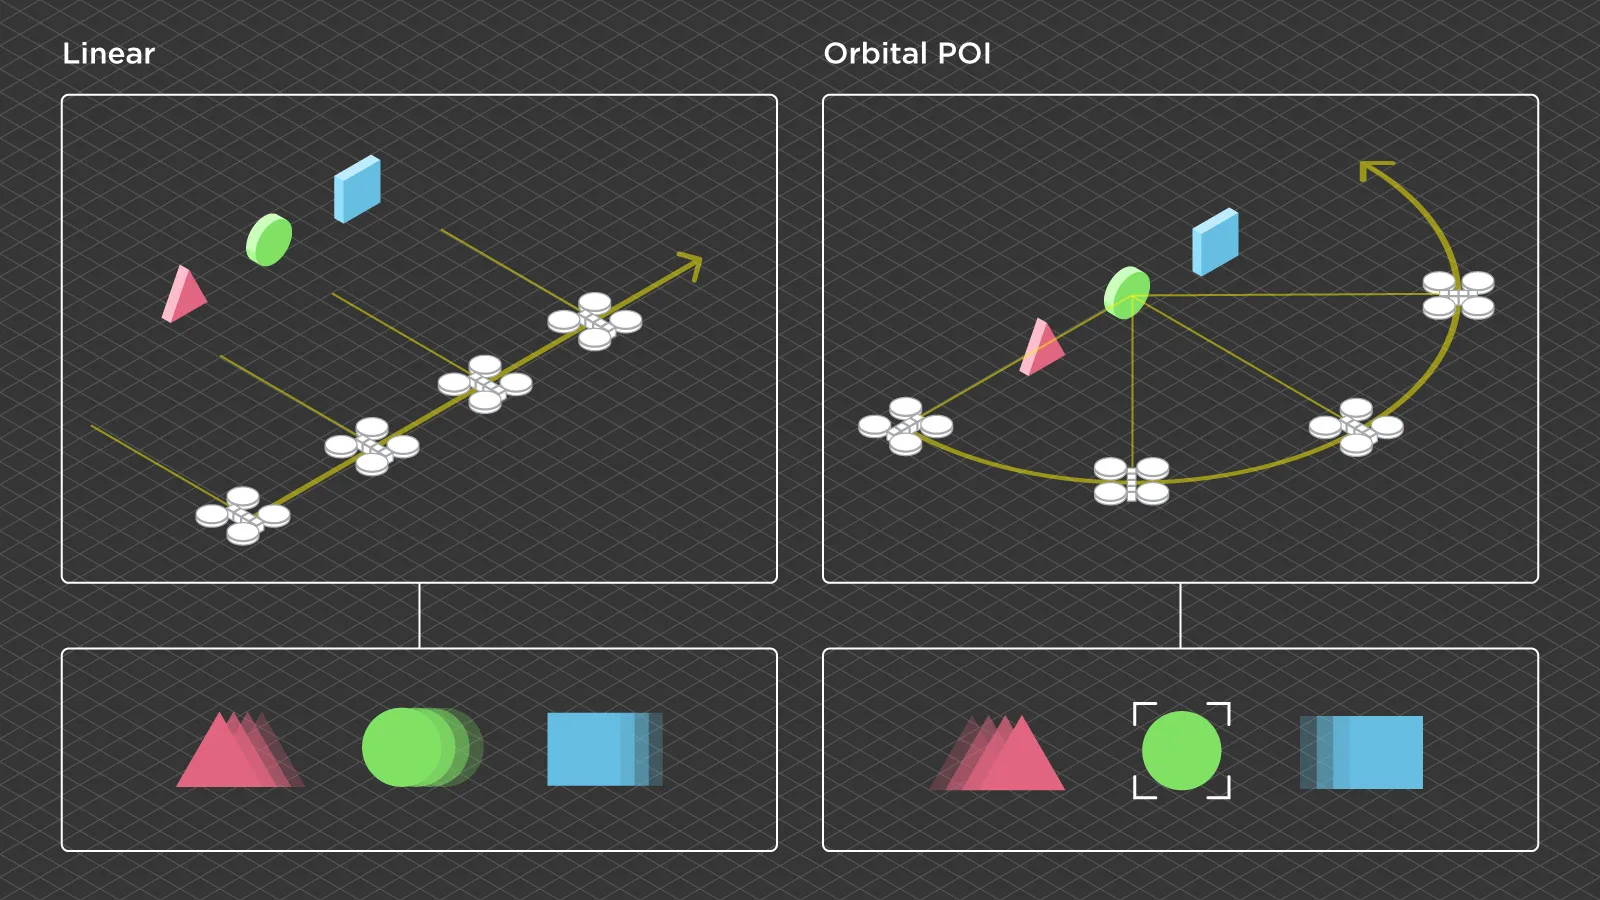
Orbits behave differently from grids, and in a useful way. During a point of interest orbit, the drone keeps rotating to hold the center of the subject in frame. The rotation and the forward movement largely cancel out for the point at the center, so it barely blurs even at a slower shutter.
Everything else still moves. The near faces of the subject, the far faces and the surroundings all slide across the frame during the exposure, and the more depth the subject has, the more they slide. That matters, because photogrammetry does not only use the center of the photo. Alignment uses features from the whole frame, including the background, so whole frame blur still counts even when the subject itself looks crisp.
So an orbit gives you some latitude over a grid, but not a free pass. A flat, compact subject benefits most. A tall building with deep features benefits least.
 Stop-and-Shoot
Look at the table again. When the allowed speed drops to a few centimeters per second, you are effectively hovering anyway, and that is the threshold where stopping for every photo stops costing you anything extra in sharpness.
It does cost time. A 20 m radius orbit is about 125 m around. Flown at 2 m/s, that is roughly a minute. Stopped for 72 photos, one every 5 degrees, at three to four seconds per stop to settle and shoot, it becomes four to five minutes. On a single roof, that is fine. Across a site, it adds up, and your battery is still draining the whole time.
And a hovering drone is not a tripod. The GPS, the flight controller and the gimbal of a quadcopter hold it remarkably still, but it is still a small aircraft holding itself in the air, and wind is always pushing. In my experience, exposures of about two seconds are possible only in perfect, calm conditions. Anything longer is asking for it.
Long exposures also bring their own kind of noise. The sensor builds up thermal noise and hot pixels the longer it collects light, and it builds faster when the sensor is warm, which is exactly what electronics in a working drone are. At fractions of a second this is negligible next to high ISO grain. Over a second or more it starts to show. So stop-and-shoot is not an escape from noise entirely, just a much better trade than cranking ISO.
Conclusion
Low light photogrammetry is a resource management game. Light is the resource, and you spend it on speed, on noise, on time, or on a little sharpness by opening the aperture. Every option costs something, and the closer you fly, the less speed you can afford.
None of this is a reason to stop scanning as it gets darker. It is a reason to know which way you are trading before you take off, rather than finding out in the reconstruction afterwards. Next week I will put these trade-offs to the test on real flights.
Frequently Asked Questions
What shutter speed should I use for drone photogrammetry?
It depends on your speed and distance to the subject. A nadir grid at 120 m and 12 m/s needs about 1/1000. A close orbit at 20 m needs either a fast shutter or a slow orbit, since at 1/250 a Mavic 4 Pro can only move about 0.5 m/s without visible blur.
Does depth of field matter for drone photogrammetry?
Almost never. Drone cameras use short focal length wide angle lenses on relatively small sensors, so at normal scanning distances everything is in focus even wide open. The Mavic 4 Pro at f/2 has no practical depth of field problem, though it does lose a little overall sharpness wide open.
Is high ISO or motion blur worse for photogrammetry?
Both reduce matching quality, in different ways. Blur softens features and noise adds false ones. Part 2 of this article will test which costs a reconstruction more on a real scan.
Can AI noise reduction fix low light photogrammetry photos?
It can clean grain, but it cannot restore detail that was never captured, and heavy smoothing removes texture the software needs. Generative tools that invent detail are worse, because they invent it differently in every frame.
Can a drone take long exposures for photogrammetry?
Only when hovering, and only in calm conditions. A hovering drone holds remarkably still but is not a tripod. Around two seconds is a practical ceiling in perfect weather, and long exposures add thermal noise of their own.
Photographer - Drone Pilot - Photogrammetrist. Years of experience in gathering data for photogrammetry projects, client support and consultations, software testing, and working with development and marketing teams. Feel free to contact me via Pixpro Discord or email (l.zmejevskis@pix-pro.com) if you have any questions about our blog.
Related Blog Posts
Our Related Posts
All of our tools and technologies are designed, modified and updated keeping your needs in mind
Satellite, Airplane, Drone: The Three Scales of Photogrammetry
Most of what we write about here happens below 120 meters. But photogrammetry did not start with drones and it does not stop with them.
 Pixpro Team

Photogrammetry Gear Guide 2026: What a Complete Setup Actually Costs
Nobody buys a camera and then does photogrammetry with it. You need something to capture with, something to process with, and something to process on, and this year the third one is the most interesting decision of the three.
Pixpro Team

What Photogrammetry Software Actually Costs in 2026
Pricing pages in this industry are a mess. Some publish a number, some hide behind "contact sales", some quote a monthly figure that only applies if you pay a year up front, and several sell the processing separately from the software that does the processing.
Pixpro Team
Ready to get started with your project?
You can choose from our three different plans or ask for a custom solution where you can process as many photos as you like!
Free 14-day trial. Cancel any time.